


Table of contents
- Stage 1: Configure Security & Create a CodeCommit Repo
- Stage 2: Configure CodeBuild to clone the repo, create a container image and store it on ECR
- Stage 3: Configure a CodePipeline with commit and build steps to automate build on commit.
- Stage 4: Create an ECS Cluster, TG’s , ALB, and configure the code pipeline for deployment to ECS Fargate
Today I wanted to go over a quick demo from Adrian Cantrill himself, the infamous "CatPipeline". I always wanted to create my pipeline, so making this should be fun 🙂 In this lab, we’ll use AWS Load balancers, ECS Fargate, CodeCommit, CodeDeploy, and many other awesome AWS services! So let’s jump right into it!
Stage 1: Configure Security & Create a CodeCommit Repo
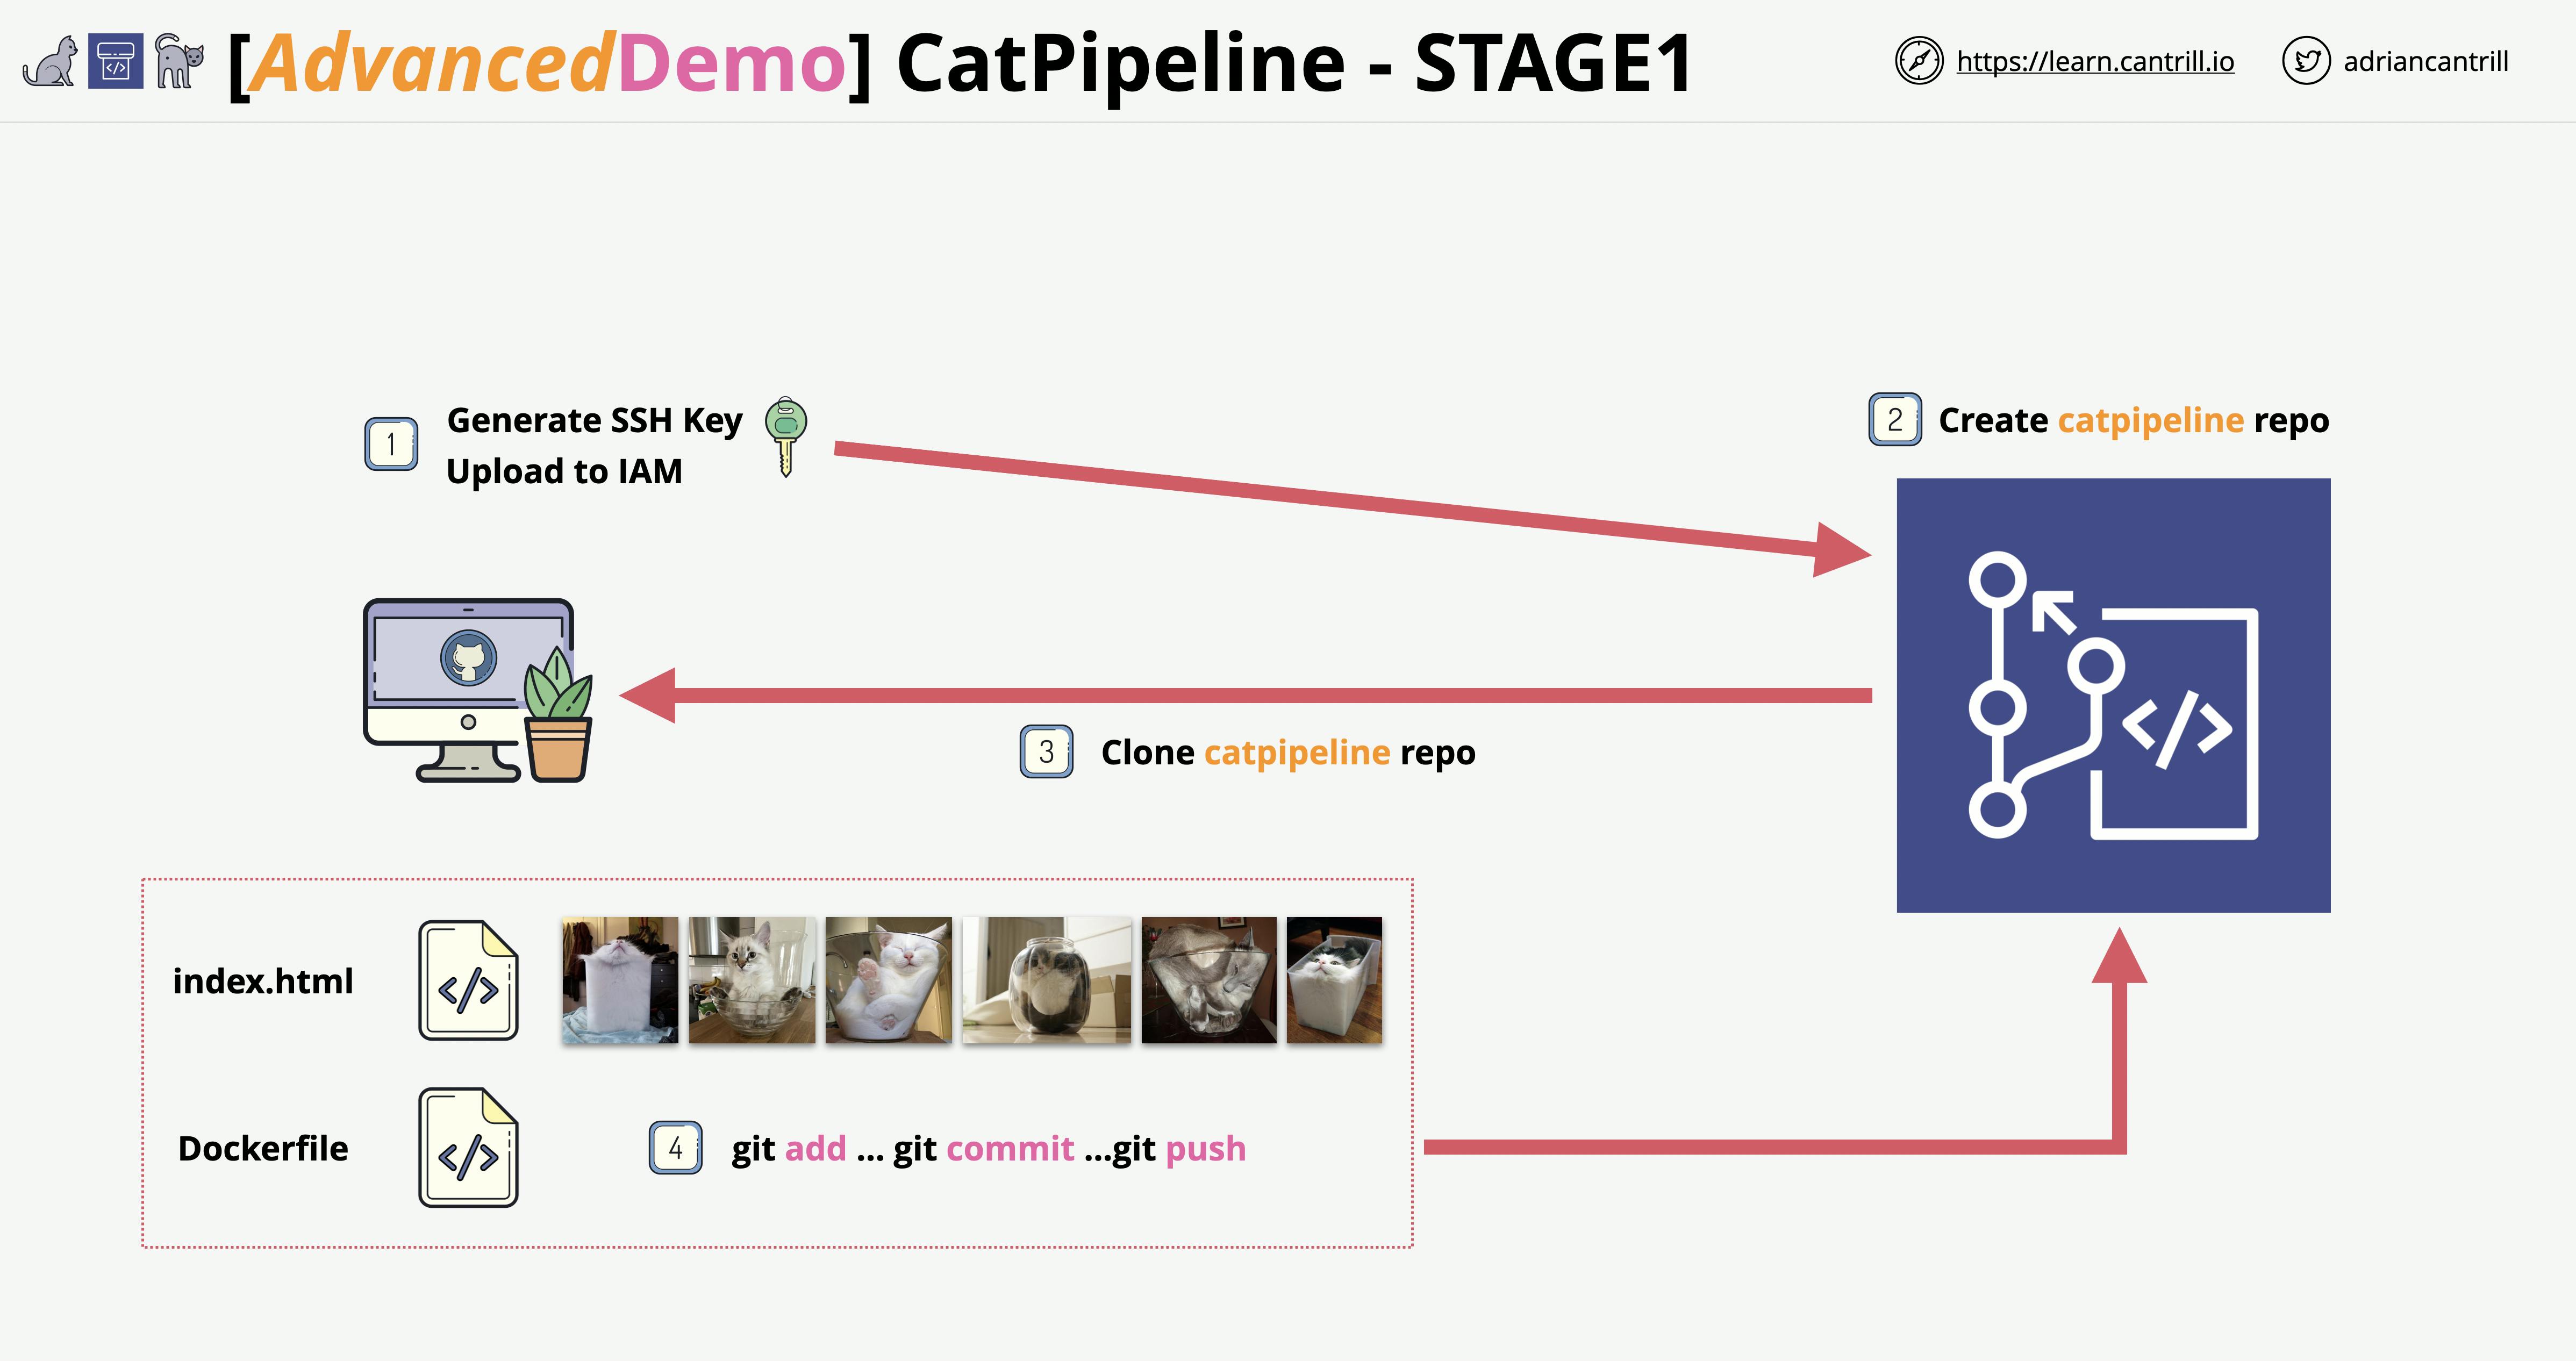
The first thing we need to do is make an SSH Key to authenticate with CodeCommit. I’m running on a Windows machine for this lab, if anybody is running on a Linux or MACOS machine you can go through the guide here. The guide for windows is here also.
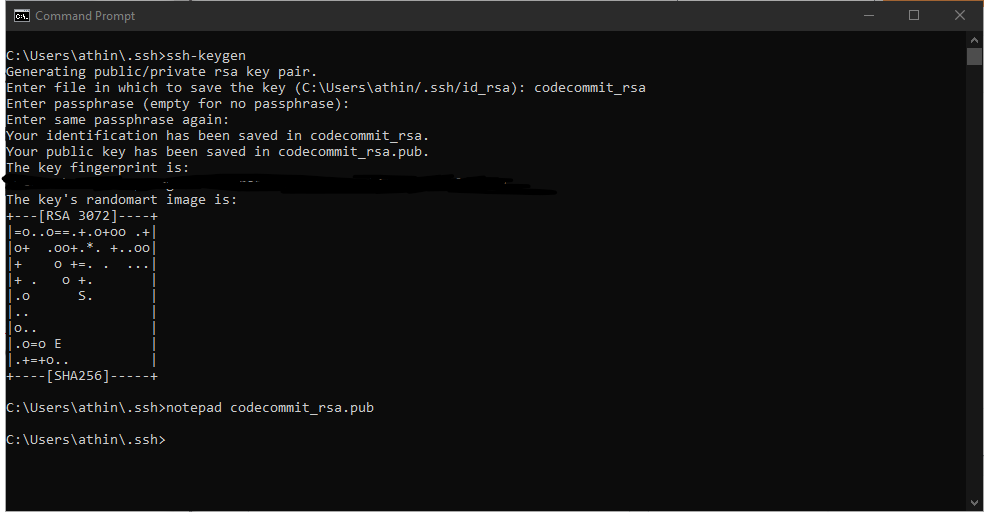
Quick Note
If you get "permission denied" make sure your config file does not have the .txt extension

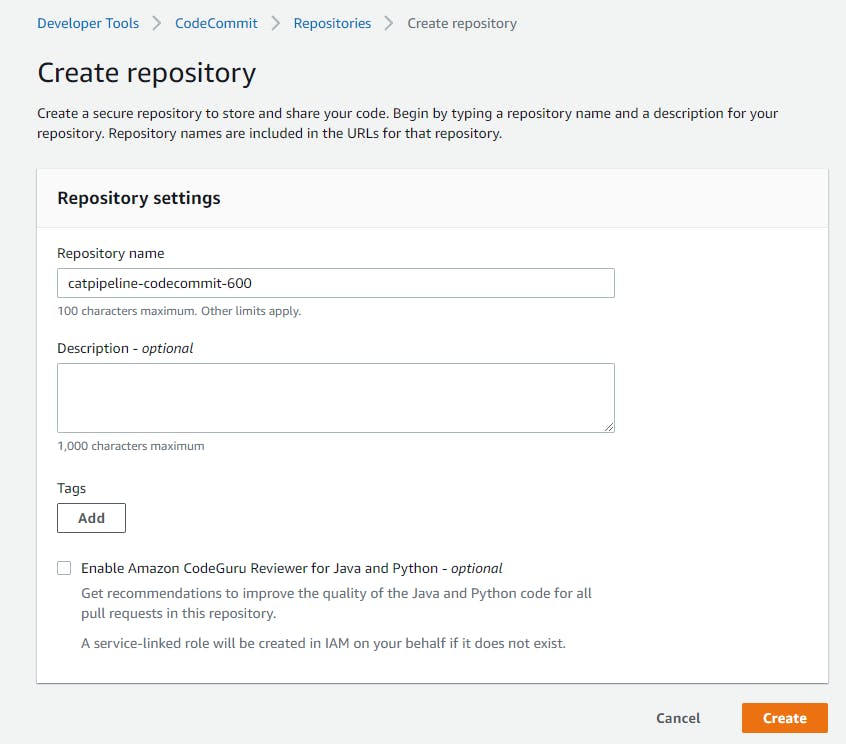
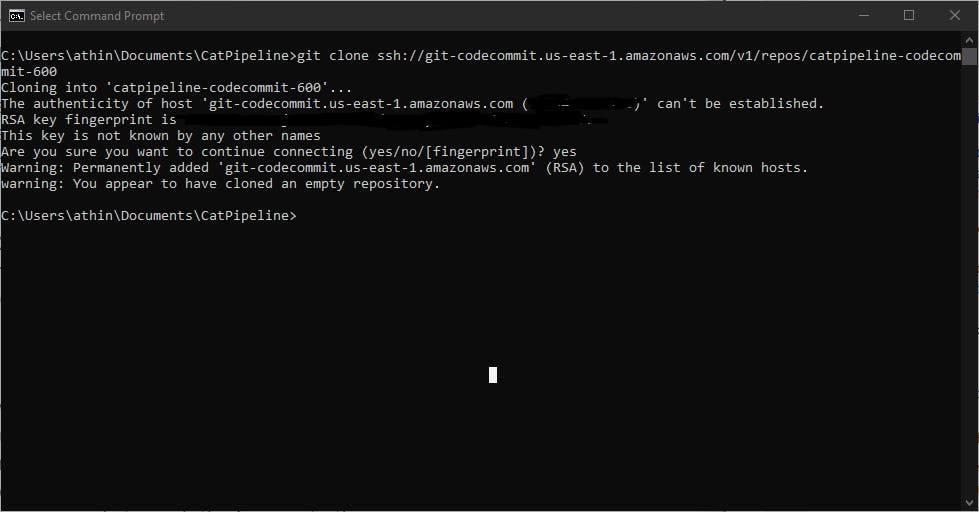
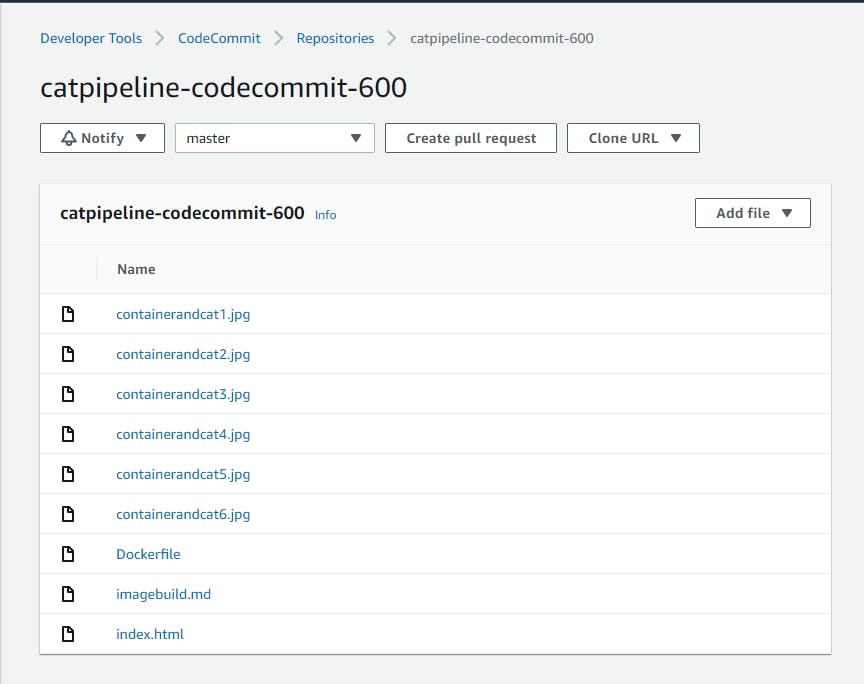
Once we have the SSH connection set up we need to make a CodeCommit repository and Git Clone it to the folder of your choice. So for example I made a folder called "CatPipeline" in my Documents directory and Git Cloned the repo.
Finally, we want to download the files provided for use using this link github.com/acantril/learn-cantrill-io-labs/.., unzip the file, and copy the files in the repo you made in codecommit that you cloned. Afterwards, we need to run these commands to push the images to the repo.
git add -A .
git commit -m “container of cats”
git push

Stage 2: Configure CodeBuild to clone the repo, create a container image and store it on ECR
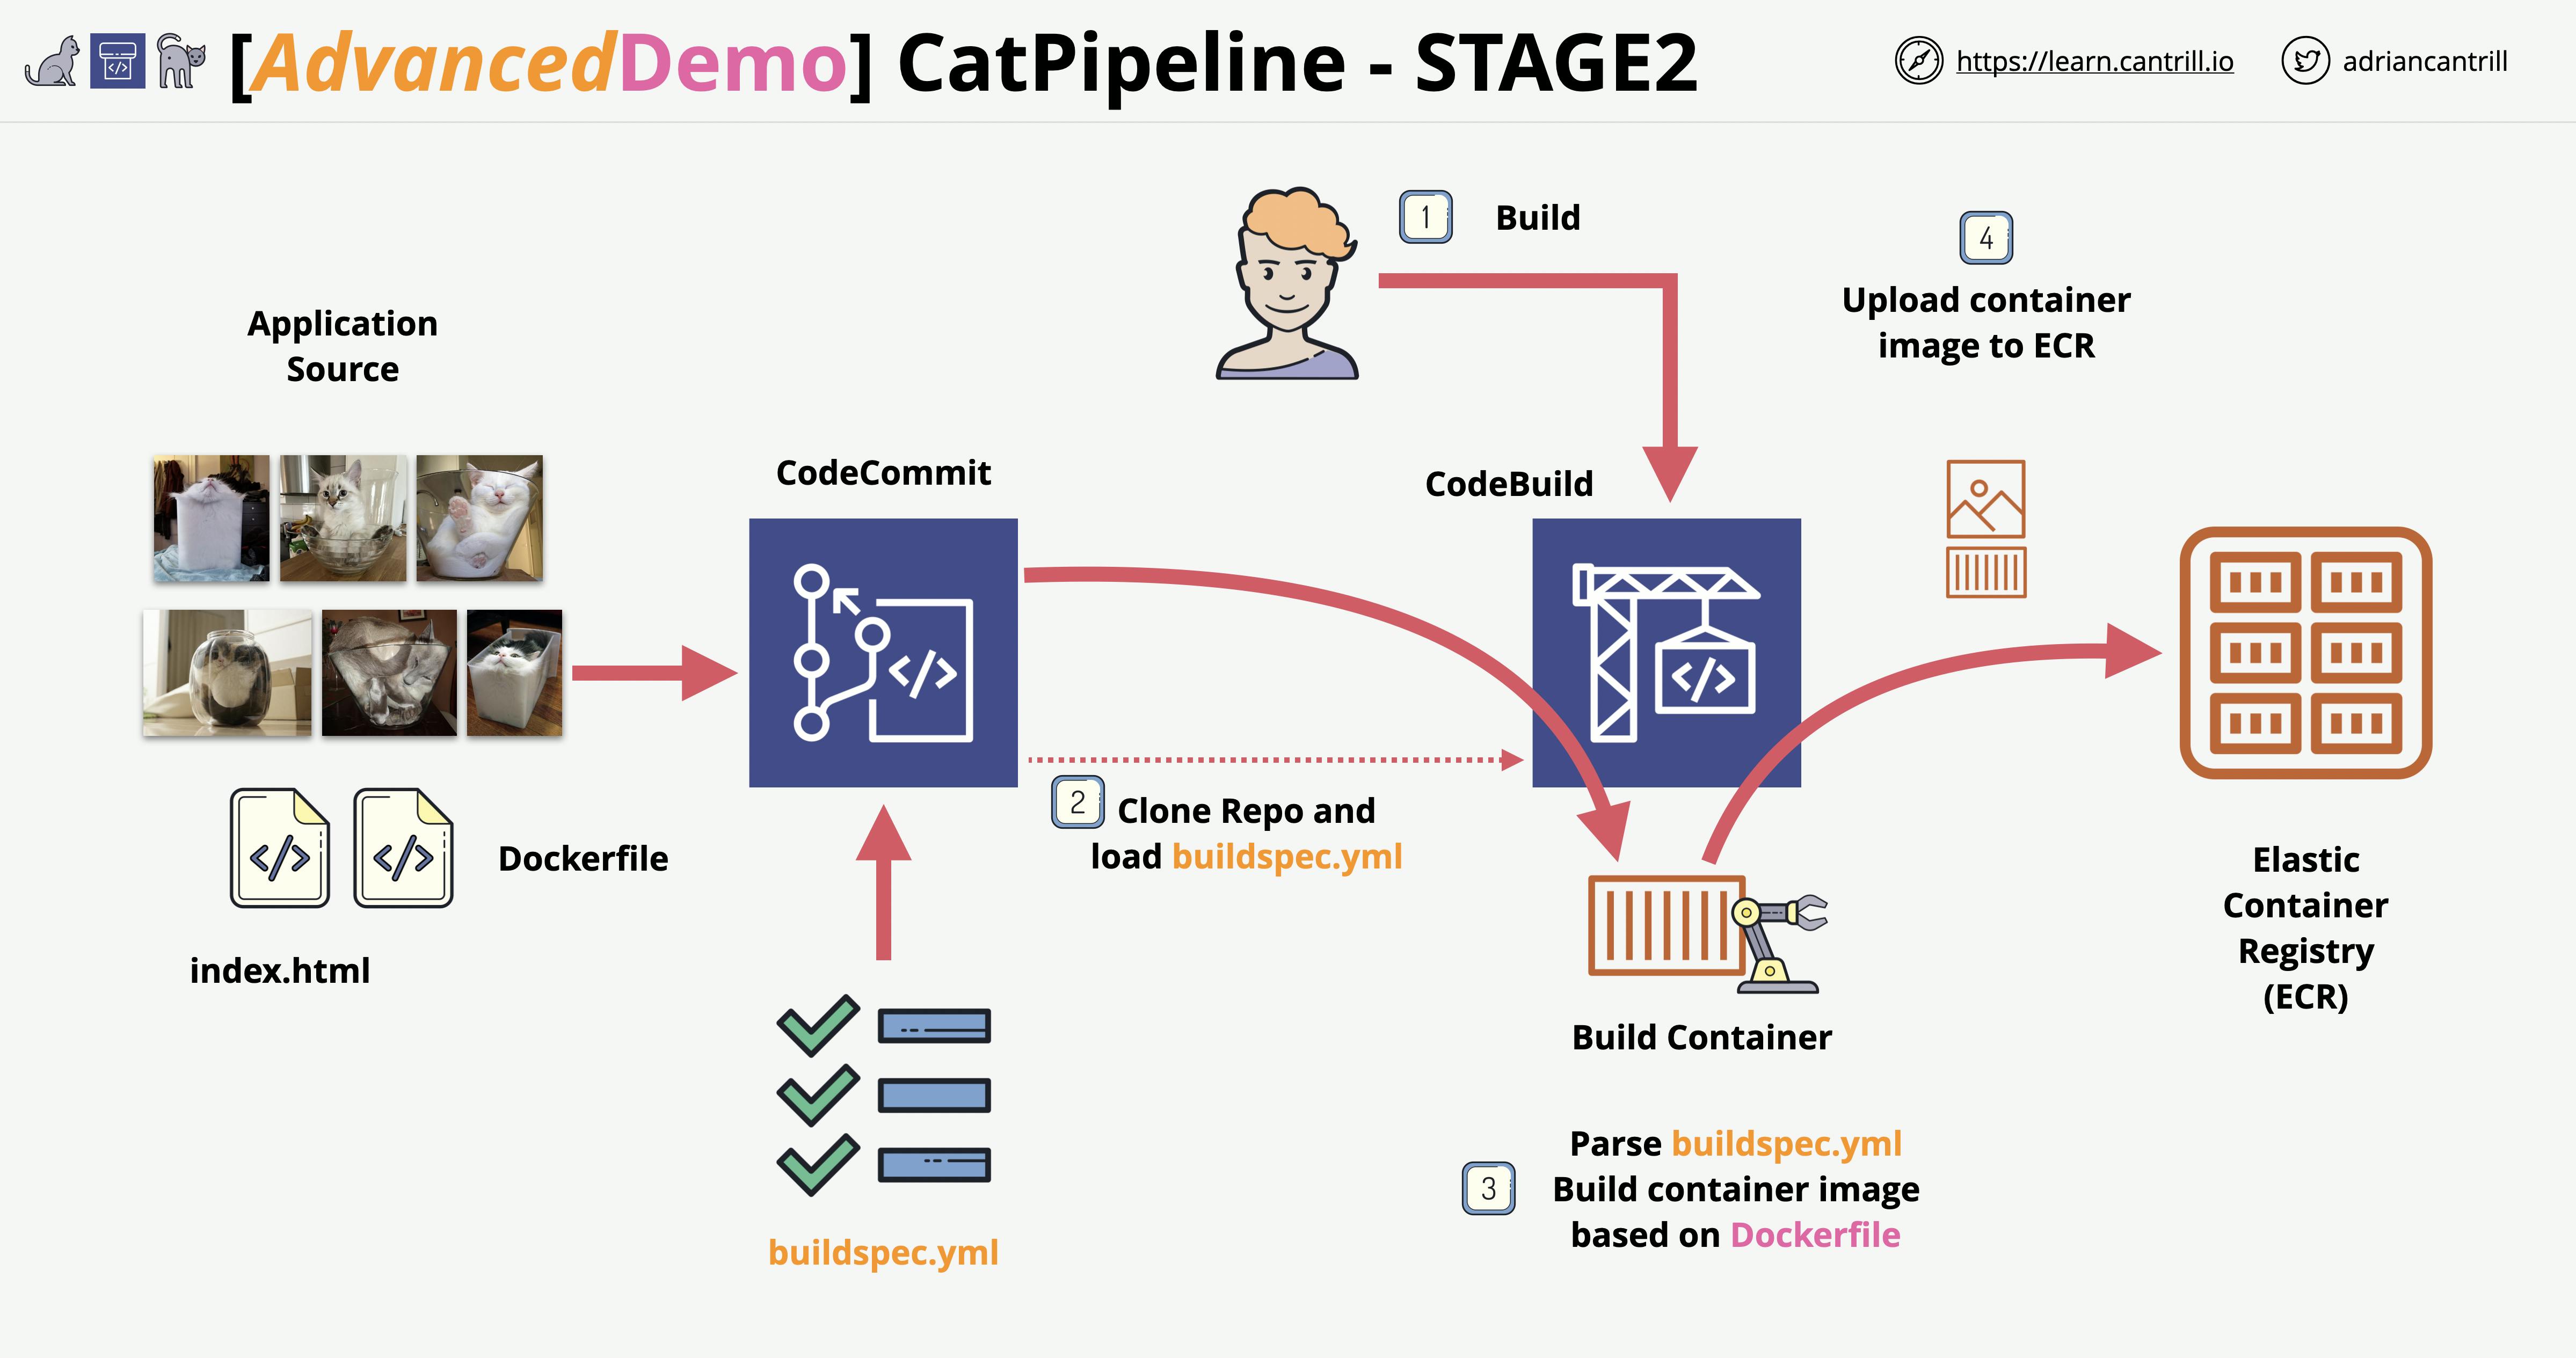
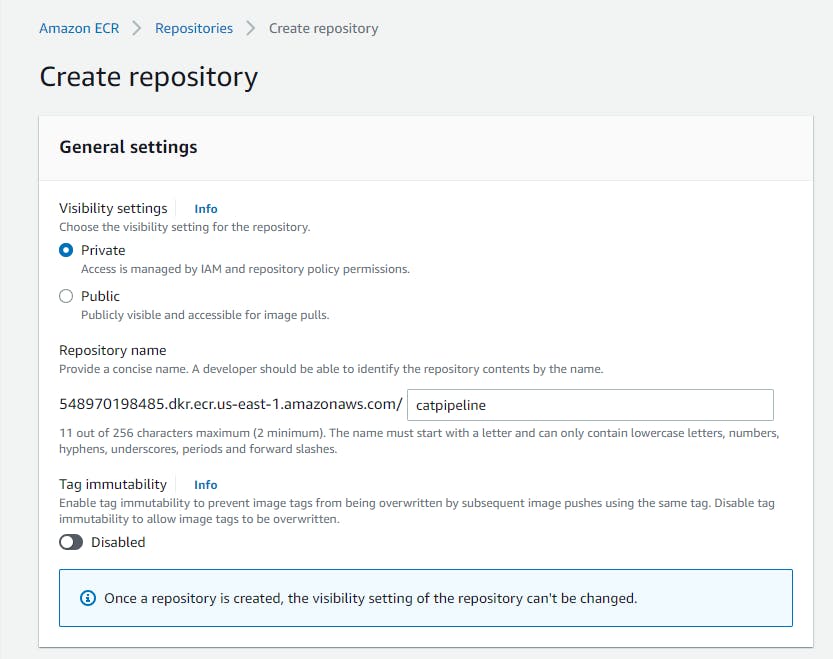
Now for this stage, we’re going to create a private Amazon Elastic Container Registry to store our Docker images in.
Next, we will use CodeBuild to build our Docker image that is in our CodeCommit repo.
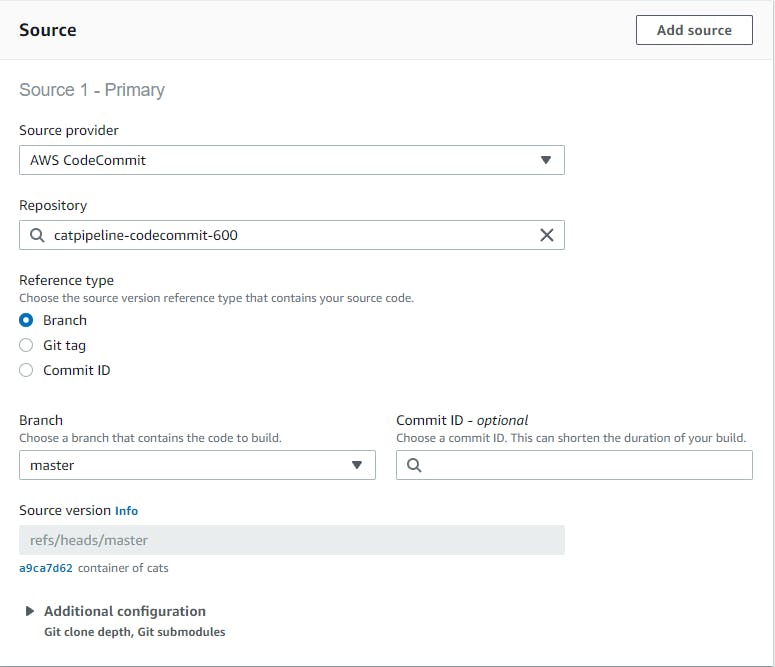
Source means where is the code that's needed to build.
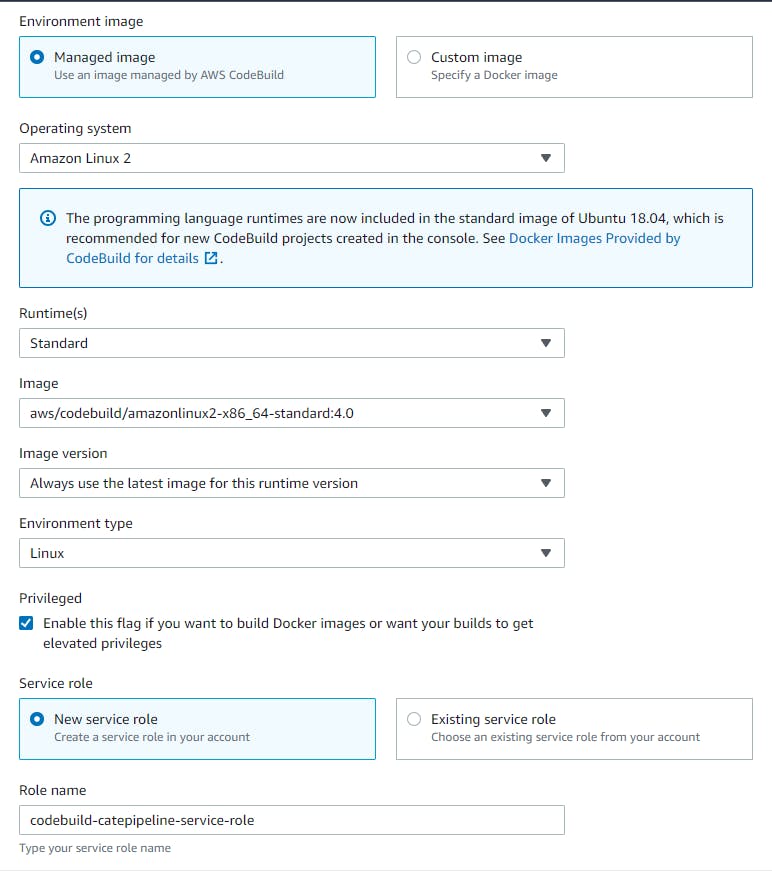
Environment means what you want the Docker image to be running on. Do you have your own Docker image or need to use a managed AWS image? I have also created a new service role
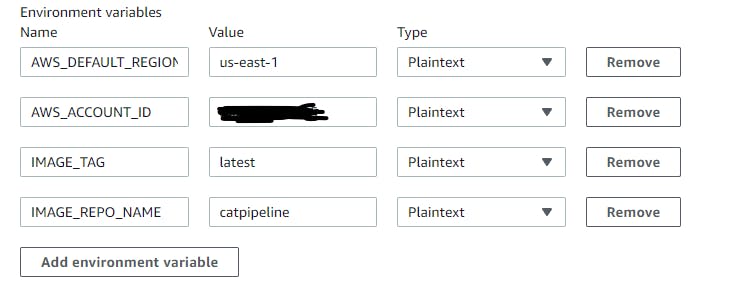
Under additional configuration, multiple environment variables were added. What region it needs to be deployed in, which account, what image version, etc.
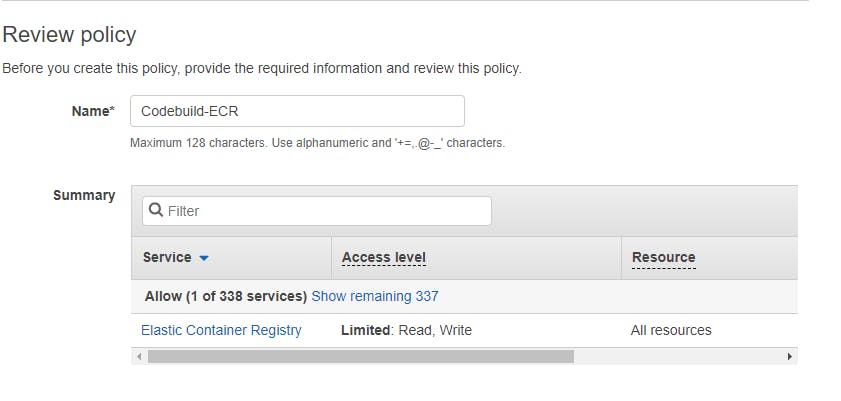
Before the CodeBuild project can use ECR to store the Docker image it will need permission to access ECR. So under IAM, we need to configure its access. We will create an inline policy.
{
  "Statement": [
    {
      "Action": [
        "ecr:BatchCheckLayerAvailability",
        "ecr:CompleteLayerUpload",
        "ecr:GetAuthorizationToken",
        "ecr:InitiateLayerUpload",
        "ecr:PutImage",
        "ecr:UploadLayerPart"
      ],
      "Resource": "*",
      "Effect": "Allow"
    }
  ],
  "Version": "2012-10-17"
}
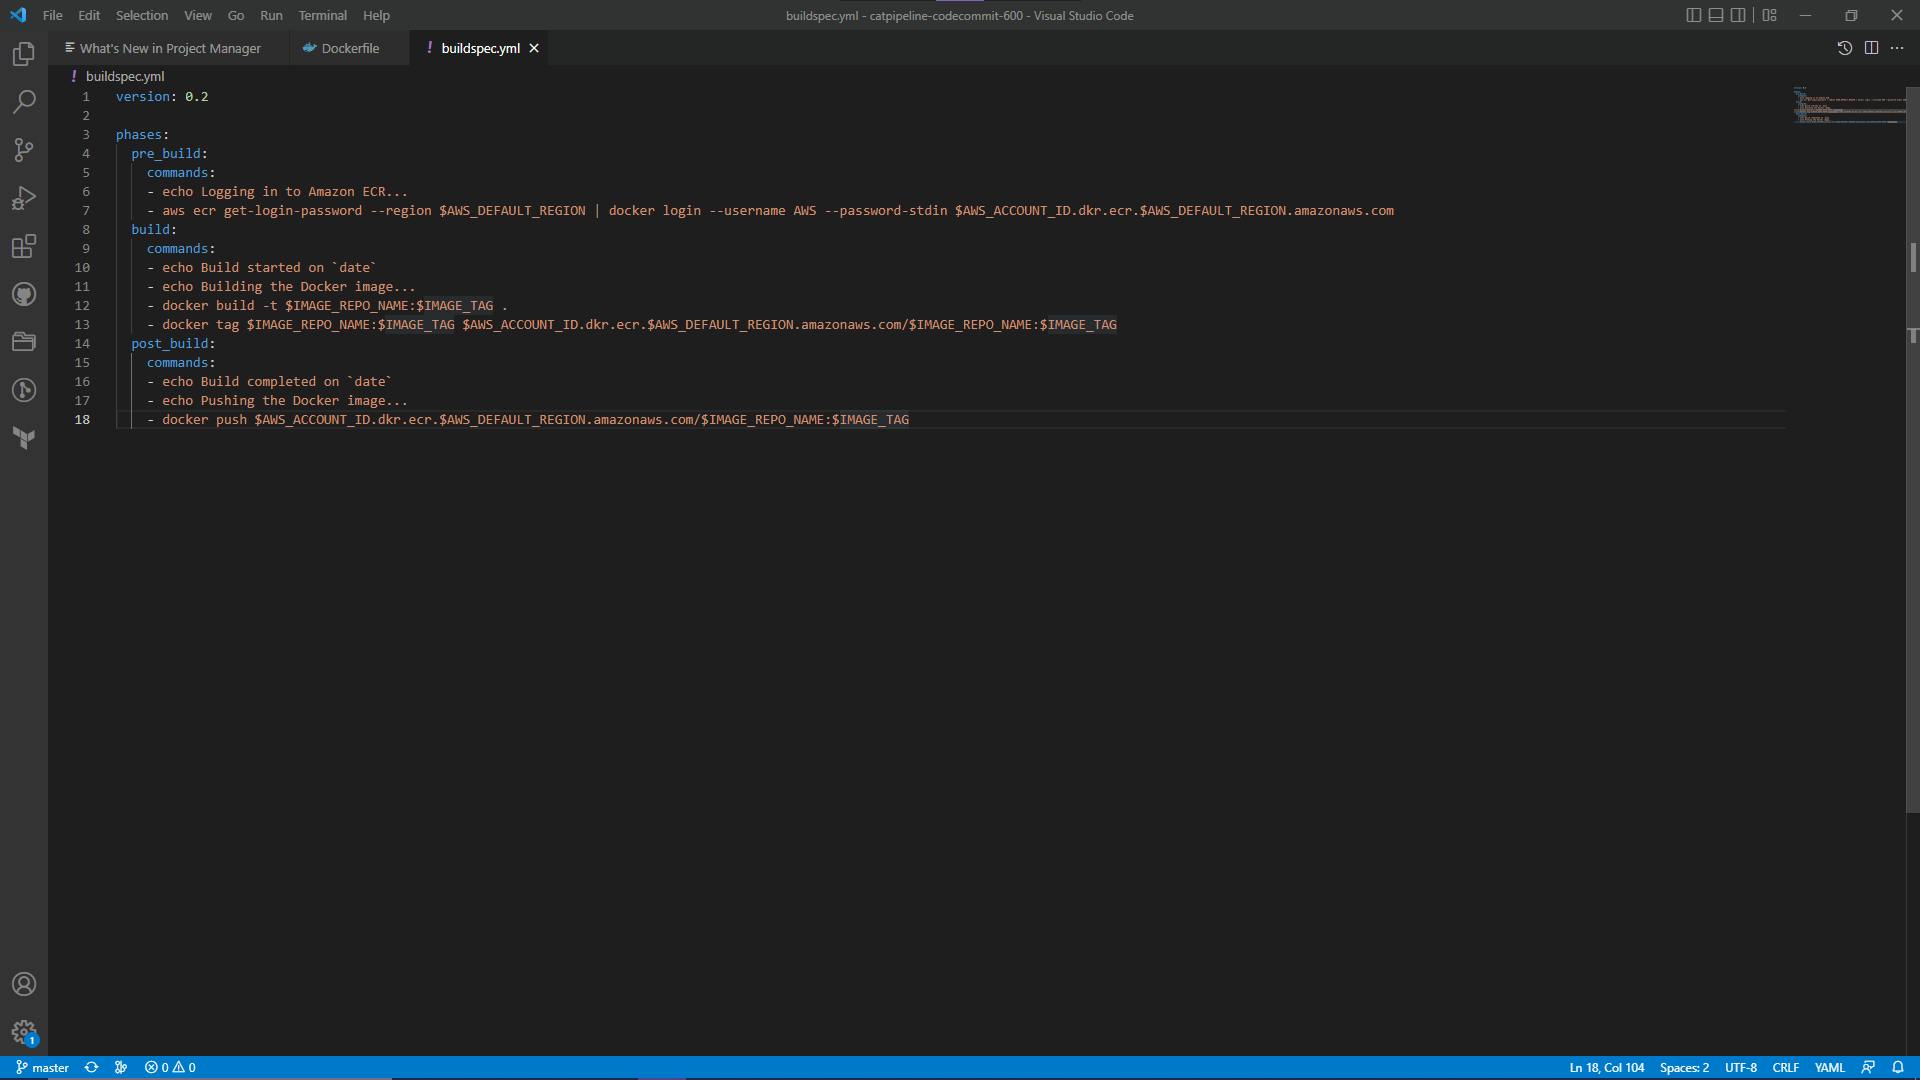
Let's run down the list to see what we have already. We have a repo in which our Docker image is stored, A tool where the image can be built, and A storage where the built Docker image can stay, and we gave CodeBuild permissions to access the ECR when storing the build. Now let's create our buildspec file and push it to our repo.
version: 0.2

phases:
  pre_build:
    commands:
      - echo Logging in to Amazon ECR...
      - aws ecr get-login-password --region $AWS_DEFAULT_REGION | docker login --username AWS --password-stdin $AWS_ACCOUNT_ID.dkr.ecr.$AWS_DEFAULT_REGION.amazonaws.com
  build:
    commands:
      - echo Build started on `date`
      - echo Building the Docker image...
      - docker build -t $IMAGE_REPO_NAME:$IMAGE_TAG .
      - docker tag $IMAGE_REPO_NAME:$IMAGE_TAG $AWS_ACCOUNT_ID.dkr.ecr.$AWS_DEFAULT_REGION.amazonaws.com/$IMAGE_REPO_NAME:$IMAGE_TAG
  post_build:
    commands:
      - echo Build completed on `date`
      - echo Pushing the Docker image...
      - docker push $AWS_ACCOUNT_ID.dkr.ecr.$AWS_DEFAULT_REGION.amazonaws.com/$IMAGE_REPO_NAME:$IMAGE_TAG
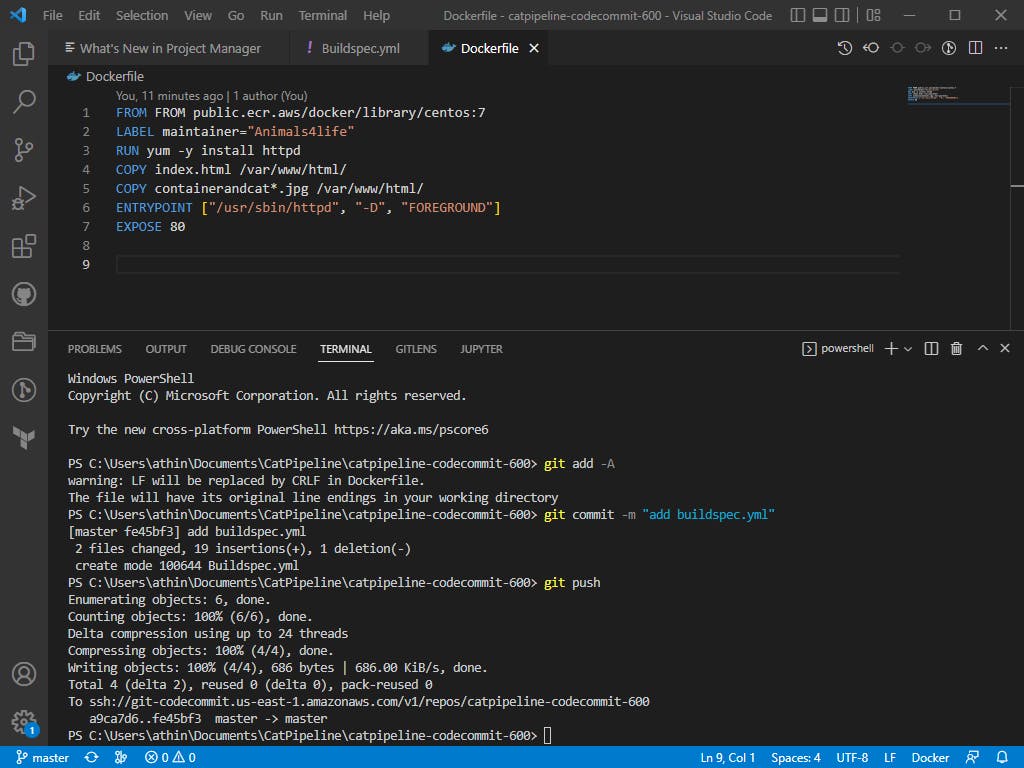
Before we even push the file to our repo, we need to do two things that tripped me up the first time. First thing in VSCode we need to make sure our Indentations are spaces, not tabs. So at the bottom, we will see this:

Click on it then an options panel will pop up and will give you the option to convert indentation to spaces.
Second thing is to change a line in the Docker file.
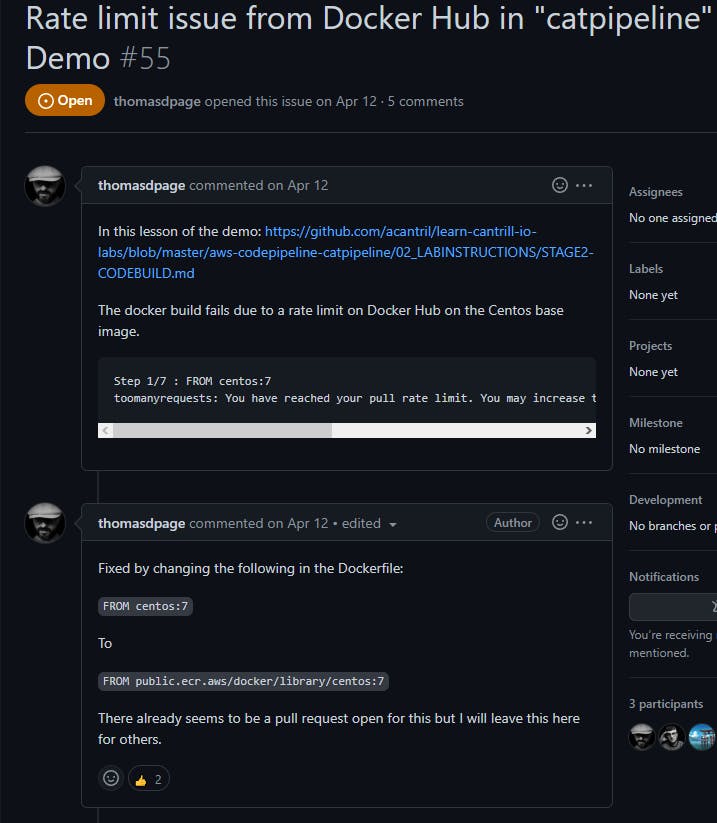
It's been an issue for a minute but shout out to thomasdpage for the solution!
Since that's been solved now let's push our files to CodeCommit.
Let's test our build!
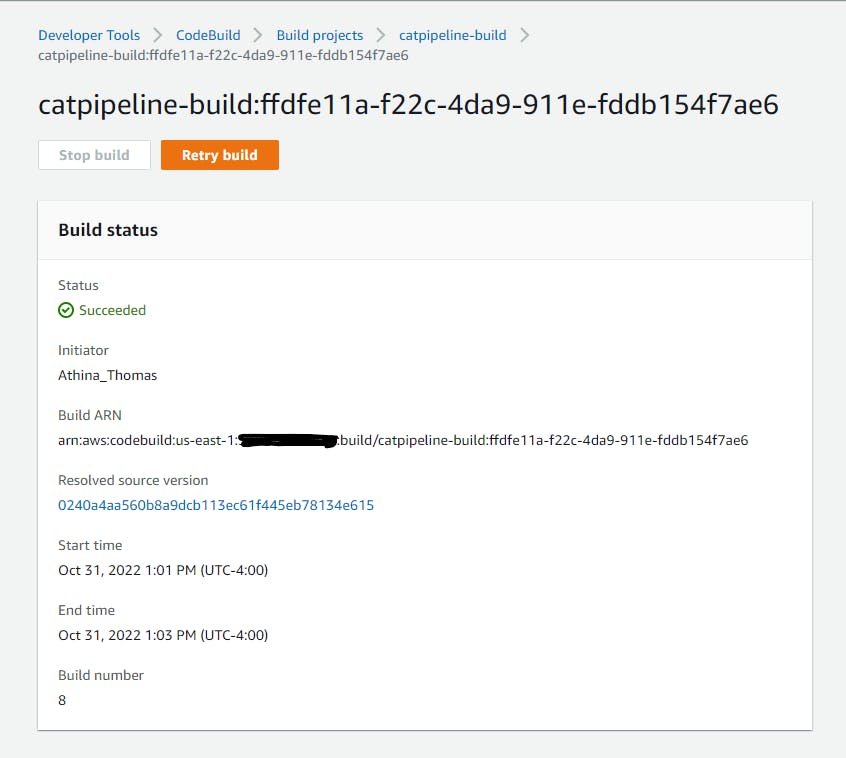
Success!
Now let’s go ahead and test our Docker image. In the guide, Cantrill provides us with a link https://console.aws.amazon.com/cloudformation/home?region=us-east-1#/stacks/quickcreate?templateURL=https://learn-cantrill-labs.s3.amazonaws.com/aws-codepipeline-catpipeline/ec2docker.yaml&stackName=DOCKER which provisions a cloudformation stack. Once clicked on It should look like this.
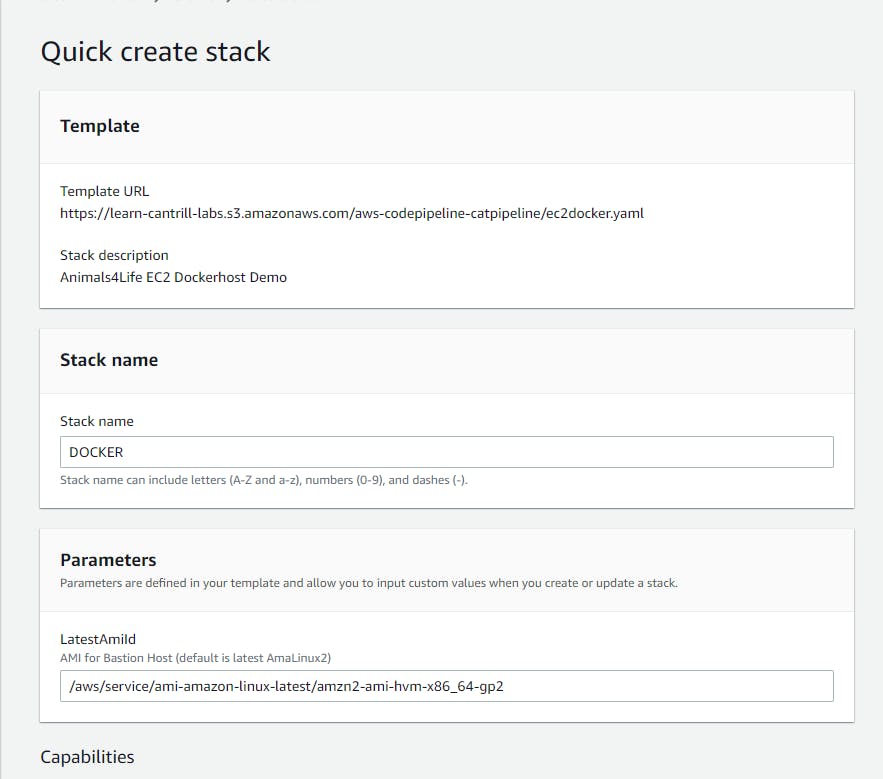
The YAML file will build a VPC, with multiple subnets, a routeing table, an internet gateway, and an EC2.
After the stack has been created we want to go to the EC2 dashboard and it should have an EC2 running.
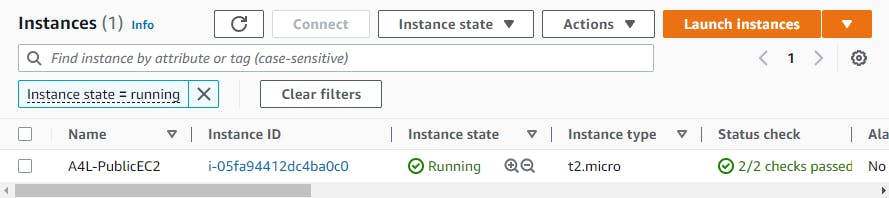
What we want to do is connect with the EC2 using EC2 Instance Connect and then make sure Docker is running with the command
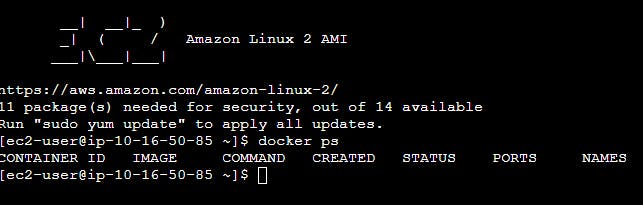
Secondly, we want our Docker to get access to our ECR so let’s run command <aws ecr get-login-password --region us-east-1> which should output this:

Don’t worry by the time you see this the lab will be taken down.
Then we want to use this login information to login into our ECR so let's run this command <aws ecr get-login-password –region us-east-1 | docker login –username AWS –password-stdin ACCOUNTID_REPLACEME.dkr.ecr.us-east-1.amazonaws.com> where ACCOUNTID_REPLACEME is your account ID.

Fourthly, we need to pull the image from our ECR using and paste the URI of the pipeline.

Lastly, we want to run the docker image we just pulled using <docker run -p 80:80> and paste the docker image number. You can get the docker image using the command

After that, we need to see if the EC2 shows what’s needed to be shown so in the browser type http://PUBLIC_IP_EC2 where PUBLIC_IP_EC2 is your EC2 Public IP address.
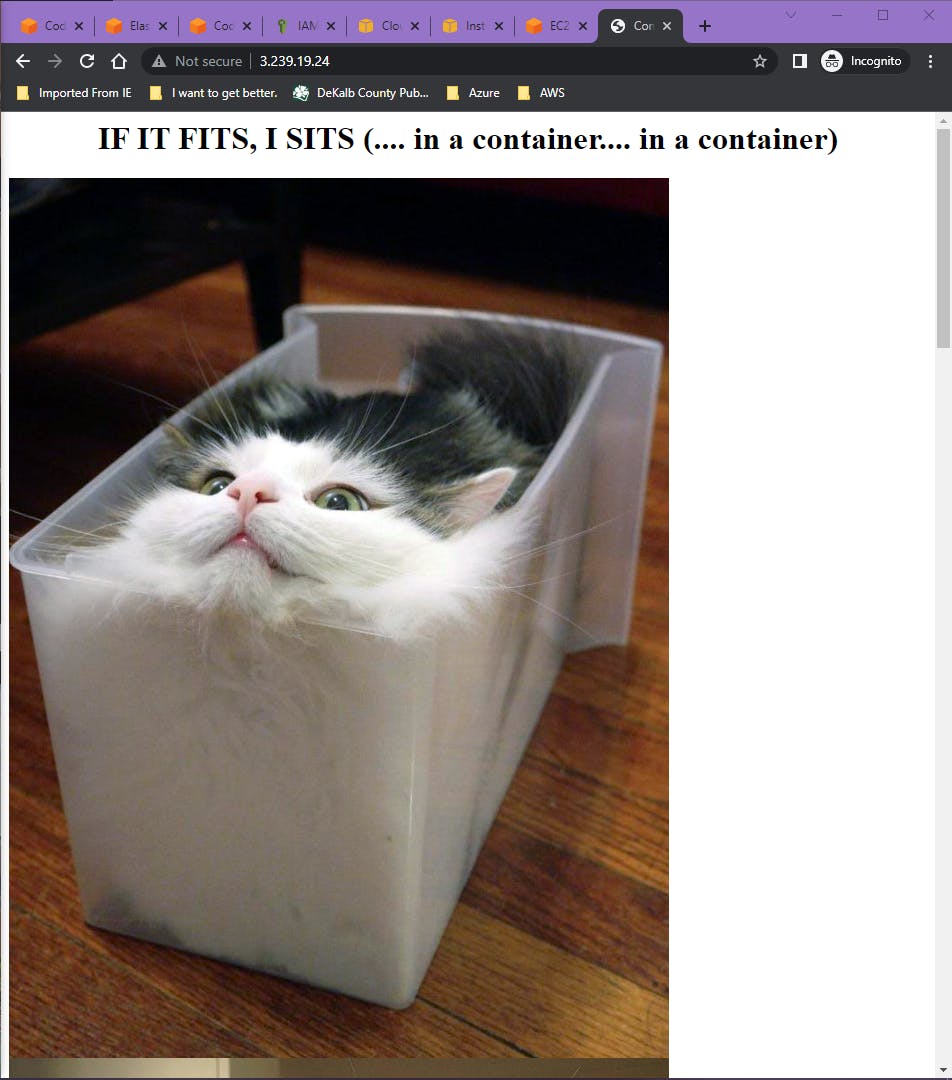
Look at the cute cat 🙂
Stage 3: Configure a CodePipeline with commit and build steps to automate build on commit.
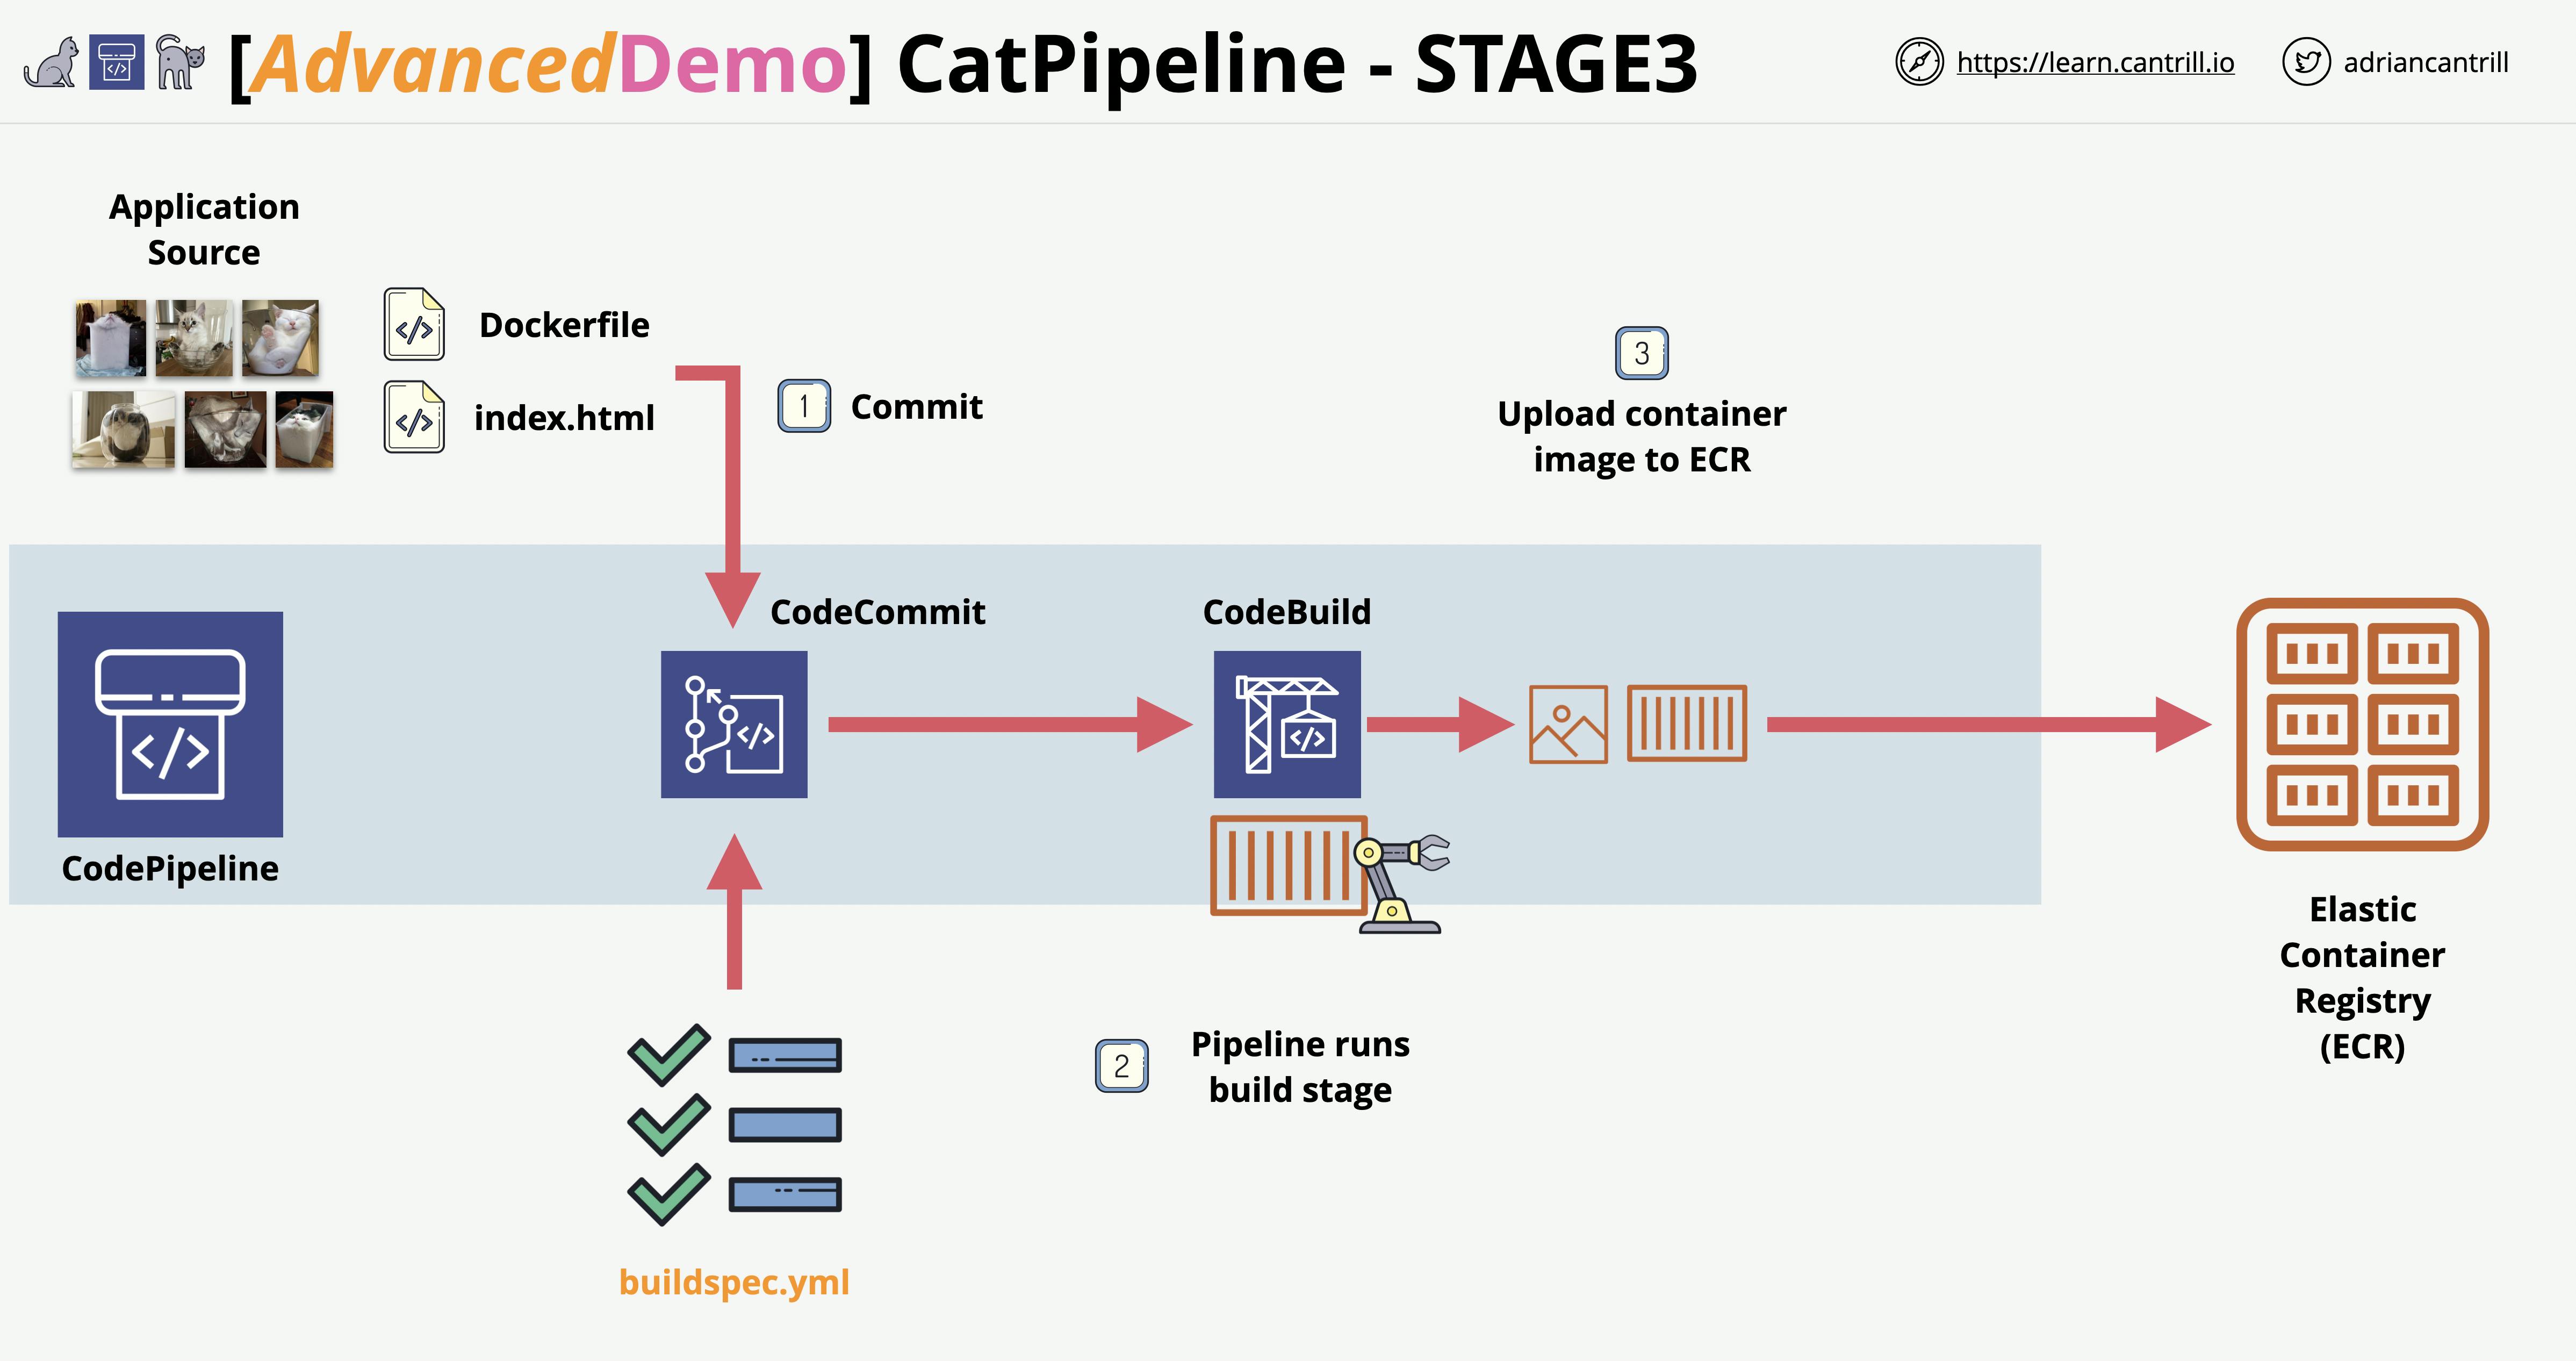
Just wanted to give you a moment and say thank you for still being on this journey with me because now we're gonna create a pipeline! YAY! 🙂. A pipeline can help developers push code out faster. CI/CD can test the code to make sure it can run properly in the environment. Everything comes in a full circle.
The first thing we need to do is create the pipeline.
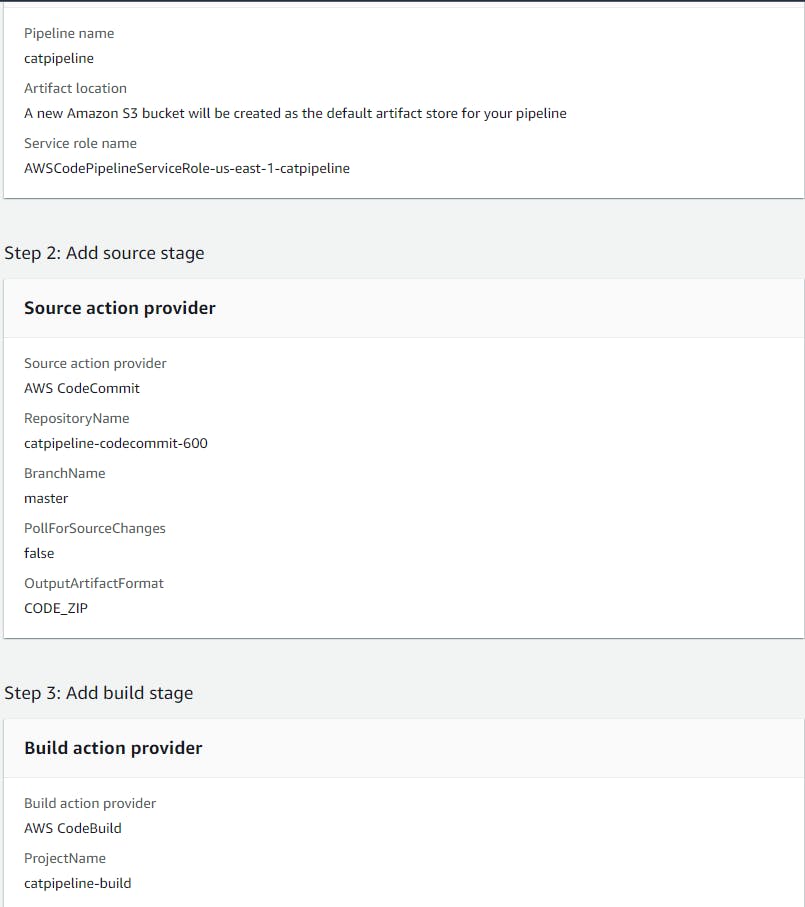
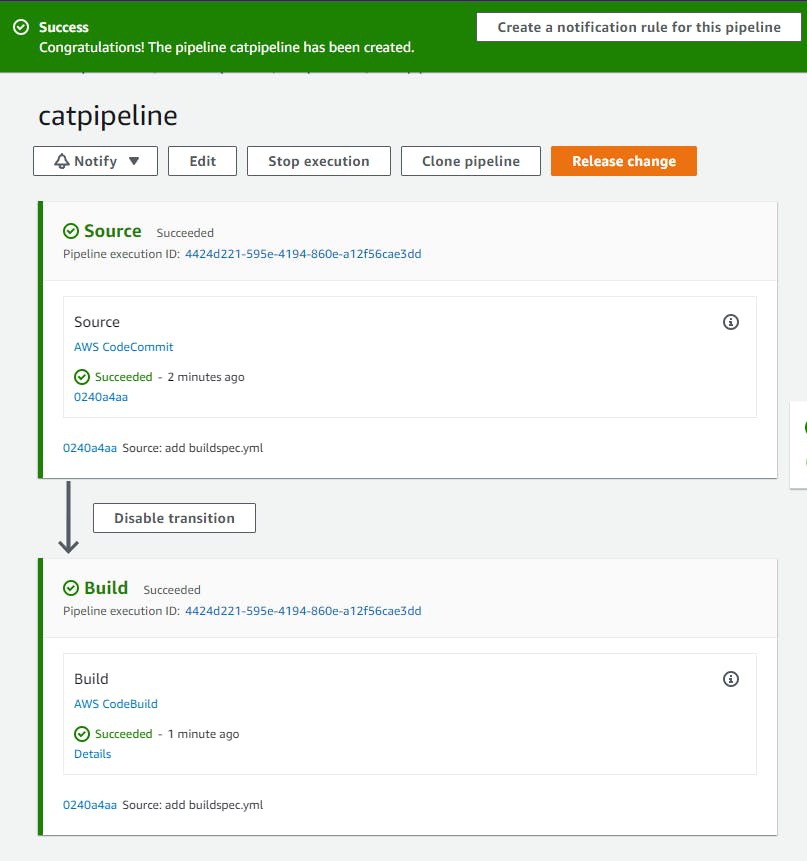
Success!
Stage 4: Create an ECS Cluster, TG’s , ALB, and configure the code pipeline for deployment to ECS Fargate

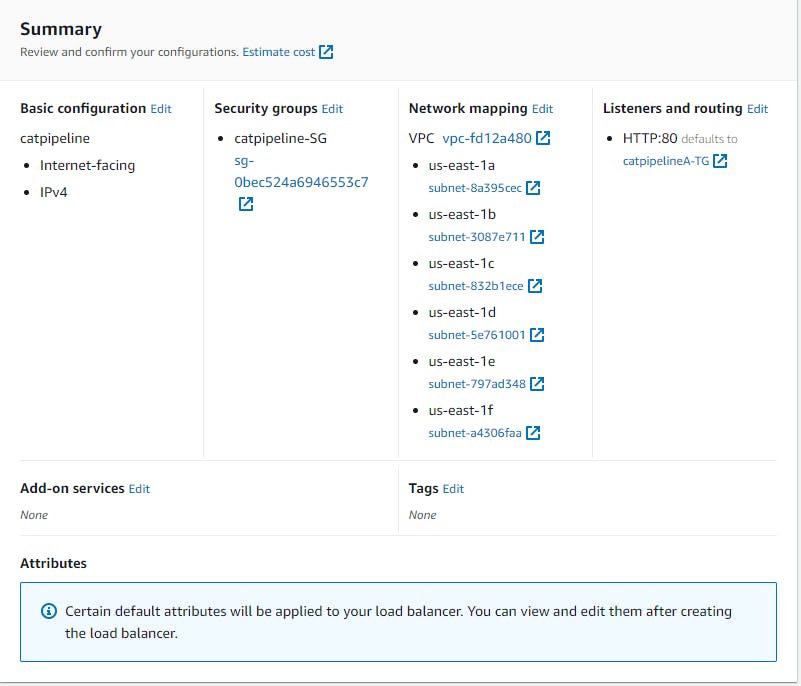
For this stage, we want to configure an automated deployment of the cat pipeline application to ECS Fargate. So let’s create an application load balancer that will be the entry point for the containerized application.
Now that our Load Balancer is created let’s configure a cluster under Amazon ECS
Make sure you're creating a cluster under ECS and not EKS. Make sure you choose a network.
Once the cluster is created we need to define the task. So under task definitions click create and click on Fargate.

After the task definition has been created let’s view the definition and copy our JSON.
{
  "ipcMode": null,
  "executionRoleArn": "arn:aws:iam:::role/ecsTaskExecutionRole",
  "containerDefinitions": [
    {
      "dnsSearchDomains": null,
      "environmentFiles": null,
      "logConfiguration": {
        "logDriver": "awslogs",
        "secretOptions": null,
        "options": {
          "awslogs-group": "/ecs/catpipelinedemo",
          "awslogs-region": "us-east-1",
          "awslogs-stream-prefix": "ecs"
        }
      },
      "entryPoint": null,
      "portMappings": [
        {
          "hostPort": 80,
          "protocol": "tcp",
          "containerPort": 80
        }
      ],
      "command": null,
      "linuxParameters": null,
      "cpu": 0,
      "environment": [],
      "resourceRequirements": null,
      "ulimits": null,
      "dnsServers": null,
      "mountPoints": [],
      "workingDirectory": null,
      "secrets": null,
      "dockerSecurityOptions": null,
      "memory": null,
      "memoryReservation": null,
      "volumesFrom": [],
      "stopTimeout": null,
      "image": ".dkr.ecr.us-east-1.amazonaws.com/catpipeline",
      "startTimeout": null,
      "firelensConfiguration": null,
      "dependsOn": null,
      "disableNetworking": null,
      "interactive": null,
      "healthCheck": null,
      "essential": true,
      "links": null,
      "hostname": null,
      "extraHosts": null,
      "pseudoTerminal": null,
      "user": null,
      "readonlyRootFilesystem": null,
      "dockerLabels": null,
      "systemControls": null,
      "privileged": null,
      "name": "catpipline"
    }
  ],
  "placementConstraints": [],
  "memory": "1024",
  "taskRoleArn": null,
  "compatibilities": [
    "EC2",
    "FARGATE"
  ],
  "taskDefinitionArn": "arn:aws:ecs:us-east-1::task-definition/catpipelinedemo:1",
  "family": "catpipelinedemo",
  "requiresAttributes": [
    {
      "targetId": null,
      "targetType": null,
      "value": null,
      "name": "com.amazonaws.ecs.capability.logging-driver.awslogs"
    },
    {
      "targetId": null,
      "targetType": null,
      "value": null,
      "name": "ecs.capability.execution-role-awslogs"
    },
    {
      "targetId": null,
      "targetType": null,
      "value": null,
      "name": "com.amazonaws.ecs.capability.ecr-auth"
    },
    {
      "targetId": null,
      "targetType": null,
      "value": null,
      "name": "com.amazonaws.ecs.capability.docker-remote-api.1.19"
    },
    {
      "targetId": null,
      "targetType": null,
      "value": null,
      "name": "ecs.capability.execution-role-ecr-pull"
    },
    {
      "targetId": null,
      "targetType": null,
      "value": null,
      "name": "com.amazonaws.ecs.capability.docker-remote-api.1.18"
    },
    {
      "targetId": null,
      "targetType": null,
      "value": null,
      "name": "ecs.capability.task-eni"
    }
  ],
  "pidMode": null,
  "requiresCompatibilities": [
    "FARGATE"
  ],
  "networkMode": "awsvpc",
  "runtimePlatform": {
    "operatingSystemFamily": "LINUX",
    "cpuArchitecture": null
  },
  "cpu": "512",
  "revision": 1,
  "status": "ACTIVE",
  "inferenceAccelerators": null,
  "proxyConfiguration": null,
  "volumes": []
}
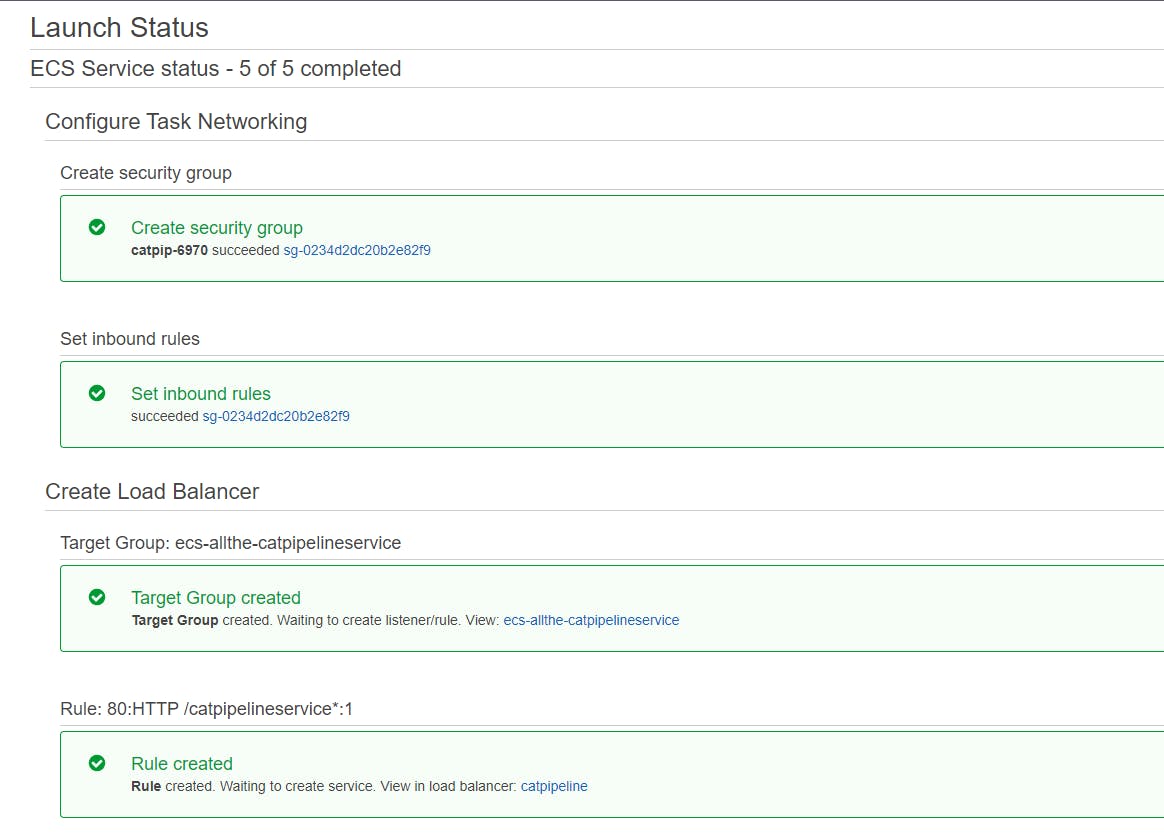
Let’s create a service for the cluster.
Lastly, let’s see if our Load Balancer is showing our cats! Go to EC2 under Load Balancer click on the catpipeline Load Balancer and copy the DNS name and paste it into the browser.
Looks like it works!
Now we’re not done yet, let’s add a deploy stage to our pipeline so that when we commit to our repository it will deploy.
Let’s go back to our codepipeline and edit it. Under build we want to add a new stage called deploy and add an action to the group.
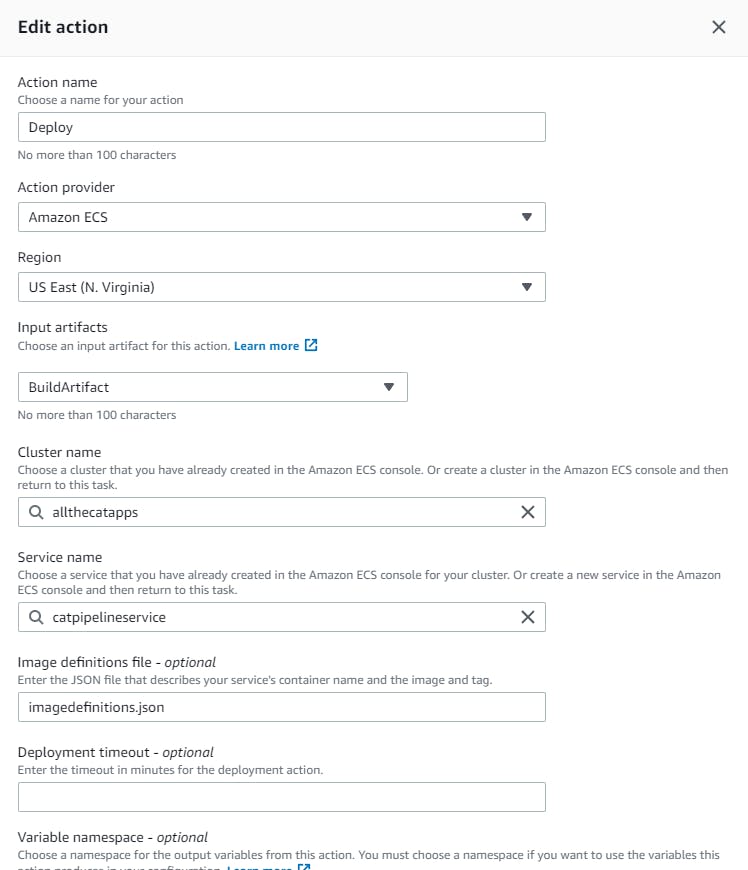
So let’s break down what’s going on. Our pipeline is listening to our CodeCommit for any changes, if any changes happen in our repo our Codebuild will create another Docker image based on our changes and store it in our ECR, then it will deploy the image in our ECS (Fargate).
Conclusion
This was an actual fun demo to go through I liked it. My main goal in my career is to be able to build and maintain infrastructure without needing to see someone do it first so this is a good practice to do. I ran into two problems in the demo first was the CodeBuild which I went over and second, the CodePipline deploy stage, make sure your spelling is correct. Will be doing more of these demo labs, actually a lot more but in Azure until then have a wonderful day!